Fox Body Refresh

apex svt

MEAN STREAK
Established Member
Joined
Jun 29, 2012
Messages
2,166
Location
USA
-loomed some wiring
-Digital 6 & window switch wires and set
-cleaned up the steering rack
-underside looks great!
-rear main out rear main In
-put the heart back in it. No accessories on, but way less clutter than before!

419A7BE0-68EA-4F2A-BB41-C93151552686.jpeg
76AD9F1B-7D75-4134-A094-786B19BCA198.jpeg
E1DD4770-9224-4EF5-B74D-0E9BCBAC1521.jpeg
4B9683A7-826A-4703-A062-CEB54CC7C186.jpeg
95761200-04A4-4E7A-8B3A-E49F04C5B3AC.jpeg
C2E9A9C0-80C2-439E-844C-CACFEE34F575.jpeg
999927C5-DC96-4AA2-BF90-DD2E10E45305.jpeg
7040FBDA-2789-4F90-B50C-39E2E3CC7358.jpeg
8FE0497F-2153-418A-8735-D2A681E77C7D.jpeg
4972EDB1-E0BD-4148-A7A7-EE4B200C01D9.jpeg

Getting closer
 

apex svt

MEAN STREAK
Established Member
Joined
Jun 29, 2012
Messages
2,166
Location
USA
-Accessories on
-New updated starter
- Drilled/tapped all the egr vacuum ports and plugged them. EGR removed.
-Battery box in the truck, wiring getting close
-Buddy hooked us up with a D1-SC bracket, Cog crank pulley, crank support bracket, and crank support hub.

Will be put to great use at some point.
61F46403-89C5-4361-ABED-213F9E2699C2.jpeg
3FEB4817-C1D3-4622-8C3B-173F6E0D35D9.jpeg
D89C5B3B-0D4F-4DD6-B589-7A55B77553CA.jpeg
459DECBD-2F0C-4763-8479-F4541087906A.jpeg
9F2E4532-511B-4586-9CCE-7C5197632A78.jpeg
51CB1CF4-7D45-49B9-9B0E-A90919A78C10.jpeg
819ACEA8-729F-4912-B4AB-8D4B7838BAAC.jpeg
 

apex svt

MEAN STREAK
Established Member
Joined
Jun 29, 2012
Messages
2,166
Location
USA
Have had some delays lately, haven’t had much time to work on the car.
Finally had a good week.
-Upper intake on
-Subframe connectors welded/painted
-Pulled the carpet for a good scrub
-Fuel lines ran, tank in, fuel filter mounted. Need one 90* fitting and it will be done. -8 feed, -6 return.
-Aluminum Driveshaft in
I’m sure some odds and ends I’m forgetting but getting closer. Almost time to start some body work.
FE02D85D-CAA7-4990-A90B-8022A7DCDBF0.jpeg
C63CE352-2335-438A-9F1A-F18797A3A046.jpeg
A425985B-8DC1-493E-BCE4-F0830E19D9B5.jpeg
3018CF5A-025F-4C16-8BE9-CF908AB781E4.jpeg
EA743580-3D63-4EA1-98B5-C0DF3FFA264E.jpeg
83568667-3E93-4A51-84D3-1DE5FFB49D0D.jpeg
B6CF3E20-B238-49EB-9C05-D3086B46EA36.jpeg
63118C51-0B76-488B-96F5-4CFDA69C4146.jpeg
 

apex svt

MEAN STREAK
Established Member
Joined
Jun 29, 2012
Messages
2,166
Location
USA
Need to snag some more pics but.
-Exhaust is on
-Everything’s wired

Did a test fire. Pump was priming fine but no fuel. Primed primed primed, nothing. Dropped the tank, flipped the wires, got fuel. Car fired right up, but the regulator was leaking so we shut it
down.

-Rebuilt the regulator

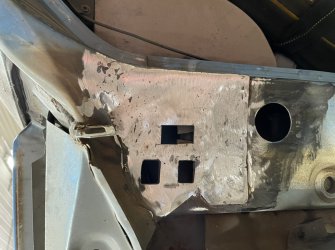
Started tearing into the body. The car is in pretty good shape but we found some rough spots. Specifically top door hinges both sides. Maybe common on Fox’s?

Cutting them out and welding in new metal.

7EED9486-BF3E-4D98-9812-58DDE5A92CA0.jpeg
B8DD570F-D7C6-417A-8A84-EA9C83AE63D7.jpeg
D167E8A5-266E-4C0A-9572-DA35FFBF6D35.jpeg
C1BF4771-97A2-4BAC-BE10-62E82BC4C5BB.jpeg
 

apex svt

MEAN STREAK
Established Member
Joined
Jun 29, 2012
Messages
2,166
Location
USA
Apart she comes. Originally we hadn’t planned on taking it this far apart, but these cars come apart super easy and I think it will really make the paint work easier/better in the end.

Getting pretty close to sanding time. I can now see how these projects go from 2months to years. We’re still planning on this spring/summer, we’ll see how it goes.

5C7463AF-7473-48C1-8A29-AAAA24F34457.jpeg
BD174E52-7F96-49DD-86E1-706D7B83EEB3.jpeg
1783D605-511E-487F-AD57-DEA44CB23EF2.jpeg
4FA24F3A-BBB8-4BD0-9F83-8B02A9056A67.jpeg
7D200E0D-9E20-48F0-A2CD-6D0C6CD64D2E.jpeg
CCD512EA-25B4-456B-B5B6-FCC9411A1D11.jpeg
 

CobraBob

Authorized Vendor
Established Member
Premium Member
Single Barrel Sirs
Joined
Nov 17, 2002
Messages
105,544
Location
Cheshire, CT
Apart she comes. Originally we hadn’t planned on taking it this far apart, but these cars come apart super easy and I think it will really make the paint work easier/better in the end.

Getting pretty close to sanding time. I can now see how these projects go from 2months to years. We’re still planning on this spring/summer, we’ll see how it goes.

View attachment 1741142View attachment 1741143View attachment 1741144View attachment 1741145View attachment 1741146View attachment 1741147
Reading about you tearing it apart and saying it will make re-painting the panels easier reminded me of Glenn's '65 Mustang restoration and his successful painting venture. I love watching restorations like this. Keep up the great work!!
 

Bdubbs

u even lift bro?
Established Member
Premium Member
Joined
Jan 8, 2010
Messages
16,091
Location
MN
That's some motivation! Looking good!

Sent from my moto g power (2021) using Tapatalk
 

apex svt

MEAN STREAK
Established Member
Joined
Jun 29, 2012
Messages
2,166
Location
USA
Small update.
Cleaning up some little things that were hidden. Inside the wheel tub was showing quite a bit of surface rust but is still solid and almost no rust on the outside.
-Wire wheeled down and painted (por 15). Still needs touch up.
-Driver side upper door hinge patched. Will need a little filler come body time.
-Wire wheeled and painted inside the fender (unseen area to prevent rust)

Little by little..
4744F3BD-1CFF-4F8B-8D45-927C524F7B88.jpeg
FA81D683-8A07-4E39-9874-4802D678A830.jpeg
DEFC92F5-4893-41C9-B79E-301B1F2E30E7.jpeg
651E40B4-841F-458C-9C5C-DEFA6272FDAD.jpeg
80708F0C-407F-4021-97BB-D044DB8E7D58.jpeg
DF192840-9CCA-48EE-B43C-622B4B95A8DF.jpeg
70748C5C-1030-4E16-A620-BB332AFA016F.jpeg
 

Attachments

  • AE1420F8-AC74-4167-AF5A-04F11689AE94.jpeg
    AE1420F8-AC74-4167-AF5A-04F11689AE94.jpeg
    319.8 KB · Views: 74

apex svt

MEAN STREAK
Established Member
Joined
Jun 29, 2012
Messages
2,166
Location
USA
Started patching the passenger side top hinge. Looks rough now, but that’s how the other side was and it turned out just fine. (What grinders are made for).
-Passenger side under fender wire wheeled down and painted.
-Back bumper area wired down and painted
-Bumper support wired down and painted.
-Trim removed from the windshield and hatch. Not a fun task, only ruined on piece. Someone got happy with the glue gun on the hatch. Wouldn’t come out without bending unfortunately.

Our theory is to sand/wire down the unseen areas and coat them all with Por 15 as it’s supposed to be a rust inhibitor. All other areas will be painted, and may even spray over the por15 in some spots.

If anyones had experience or has suggestions please feel free. This is our first go at it.

Thanks for the support guys!

71F9AFC6-E70B-47FB-817D-985FBEE3398F.jpeg
8E037B65-86DB-4BD3-910B-3A54E17444A3.jpeg
0F9BB95C-9F41-47EC-93A5-475662A85FF2.jpeg
C265422E-8D3F-45A9-A4AE-CB015842A303.jpeg
E220F74B-93A5-446B-B1BB-40104864CDFE.jpeg
8B9FBE96-1454-485C-B6A9-4532852ABC38.jpeg
AF295930-18DB-4087-AA72-C83A6219F9E9.jpeg
 

suicidekings

Garage Queen
Established Member
Joined
Mar 17, 2011
Messages
1,679
Location
Queen Creek, Arizona
Pics or it didn’t happen, not to derail OP’s thread.
Im still waiting for it to be delivered but here is a pic of the car. it has different wheels now but ill post up when I get my new wheels for it.


1985-ford-mustang-lx-coupe-50-3.jpg


Sorry to derail the thread here. OP im wanting more pics of progress btw!! Subscribed.
 

Users who are viewing this thread


Top