Official Photo Tutorial Thread (Photoshop, Camera Settings, Lightroom, etc)

HYBRED

That Just Happened
Established Member
Joined
Mar 4, 2007
Messages
10,701
Location
Dallas TX
^ That's not PS, it's witch craft

:lol::lol::lol::lol:

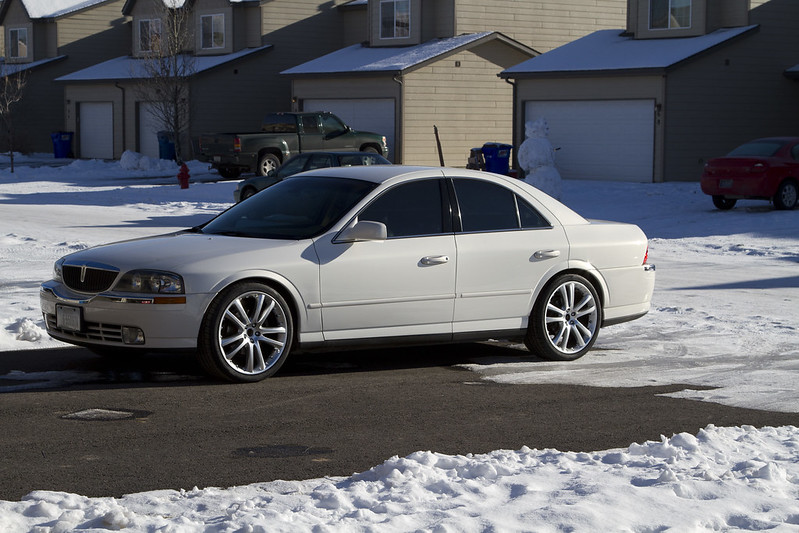
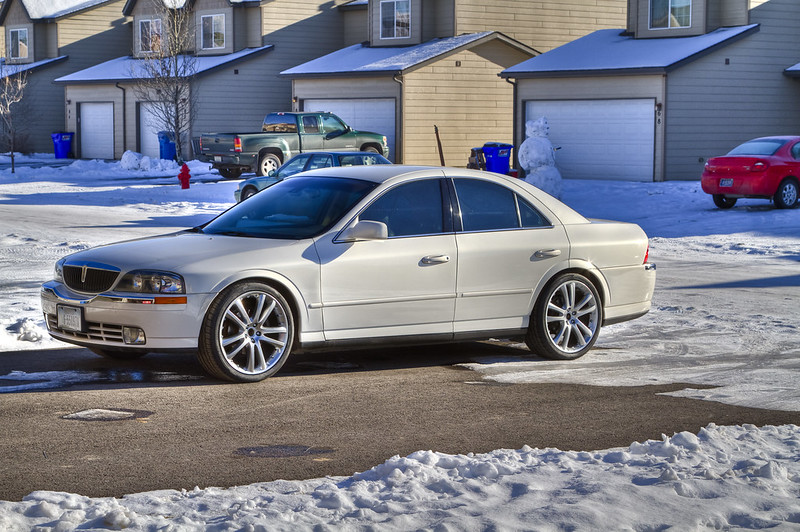
Honestly, the most important part of that kind of processing is knowing what to edit, not the actual techniques for editing. The technical portion of background and reflection cleanup is very simple. Clone stamp, work slow, blur, etc. I look for distractors that clutter up the photo and pull the eye away from the image focus.
- Other cars, buildings, dumpsters, signs etc in the background - anything that causes irregularities on the horizon line. 7 and 8 show a drastic example of this.
- Bright spots and colors that contrast or pull from the subject, like lights, glares, stop signs, etc.
- Reflections of buildings, cars, signs, poles, etc. on the car. Anything that makes the reflected lines irregular. Straight line reflections show the car's shape and look cleaner than the entire foreground showing up on the car. Don't believe me? Find one advertisement that shows the building across the street reflected in the car door.
- Glare points on the car. See the Viper photo (#2) in my previous post. Note the glare removal on the fender and below the mirror.

Note that MOST of this stuff can be controlled by simply picking the right location and angles, and using a polarizing filter. For everything else there's Photoshop.
 
Last edited:

FiveSpeed

New Member
Established Member
Joined
May 10, 2004
Messages
759
Location
Tualatin, Oregon
Awesome thread idea. This will help me quite a bit as I just bought a DSLR myself and have no idea how to use it, along with the programs. Thank you very much
 

Deric

Active Member
Established Member
Joined
Dec 31, 2009
Messages
1,118
Location
Minnesota
One of the best things a beginner can do to get a good looking photo, besides the above witchcraft, is to adjust the levels. Basically, your camera doesn't do the best job showing REAL black and white, depending on the color balance and exposure and blah blah blah.

In Photoshop you can fix that. If you go to the THRESHOLD adjustment menu, you will see your photo appear in only two shades, 0 and 255 (black and white). When you adjust the slider to white, watch for the last pixel to turn from black to white. This is your "blackest" (closest to 0) pixel in the image. Go the other direction and the last pixel to turn black is your "whitest" (closest to 255) pixel.

Next when you go to the LEVEL adjuster, click the black dropper and use it to select the "blackest" pixel in the image. This will adjust that pixel from whatever it is, to a true 0. Also, all other pixel with be adjusted relative to the change in the pixel you chose. Do the same for white, though this is more subjective depending what you want the tone of the picture to be. I usually pick a few white pixels and see what I think looks best. It effectively lets you decide on the White Balance, with some compromises of course. Though most can be fixed afterwards. You can play with the black one too, to really fine tune your image.

Or, if you aren't as picky as me, there is a short cut, CTRL+SHIFT+L, that lets PS do its own version of the previous description. This is great for quick fixes. But be careful as it sometimes picks wrong and looks very ugly.
 
Last edited:

Planter

Banned
Joined
Feb 23, 2010
Messages
15,554
Location
In the 5280'
Couple more with background work...

ViperPP5-X2.jpg


My PP reflection removal technique -
Find an area that matches the "clean" reflection you want (sky, road, etc) and clone it over. Start small till you get enough to use a bigger stamp. For gradients and to get rid of the obvious circular stamp mark, reduce the opacity of your stamp to 20-40% and gradually blend the area. I go back and forth between the clone stamp and blur tool until I get it smooth "enough." Same concept applies to removing signs from trees, power lines, etc. On body lines and edges, center your stamp on the line in a clean area and clone it over. You'll get a much cleaner line that way than trying to clone up to each side of the edge. Just make sure to use the preview to keep the line straight. Also keep this in mind - go slow, be patient, zoom out frequently and save often to make sure you don't get to a point you can't back up from.

can you do a video screen capture and make a recording an upload to youtube? I would love to see how you do that.
 

Uncle Meat

Zircon Encrusted Tweezers
Established Member
Joined
Sep 22, 2002
Messages
6,353
Location
Prattville, Alabama
Best Newb HDR advice.

Get Tripod.
Set up your shot
Set ISO to 100
Make sure camera is set to record in raw
Set Drive mode to high speed continuous
Set Camera to Aperture Priority
If it has exposure bracketing, start with +- 1 EV
You don't need a remote shutter button, but it will help.
Turn OFF image stabilization
Use autofocus to focus on the subject by depressing shutter button half way but without taking picture.
Once focused, switch autofocus to off so it doesn't try to refocus during the 3 shots.
Hold down remote or shutter button..
Voila

Another option besides a remote shutter release is to use the camera's built in timer to trigger the shutter for you.

U.M.
 

Blown_By_You

Richard Head
Established Member
Joined
Sep 22, 2005
Messages
7,613
Location
Montana
Another option besides a remote shutter release is to use the camera's built in timer to trigger the shutter for you.

U.M.

I have a nice remote shutter, but honestly just prefer to fire it in bursts. Using the timer means you still have to mess with the camera 3 times, possibly upsetting the picture. I think a GOOD tripod and ballhead are a better investment, although I often shoot them handheld, given the fact that the software can correct most misalignment anyway.

The hardest part for shooting handheld is getting a fast enough shutter speed. If you are in anything but bright light, you will need a tripod since you don't want to raise the iso at all.
 

Deric

Active Member
Established Member
Joined
Dec 31, 2009
Messages
1,118
Location
Minnesota
I have a nice remote shutter, but honestly just prefer to fire it in bursts. Using the timer means you still have to mess with the camera 3 times, possibly upsetting the picture. I think a GOOD tripod and ballhead are a better investment, although I often shoot them handheld, given the fact that the software can correct most misalignment anyway.

The hardest part for shooting handheld is getting a fast enough shutter speed. If you are in anything but bright light, you will need a tripod since you don't want to raise the iso at all.


Do you set it up for automatic -1/0/+1 bracketing burst, or do you just adjust that between shots? I normally set it to bracket on its own.

EDIT: I just read your other post. Sorry.
 
Last edited:

Blown_By_You

Richard Head
Established Member
Joined
Sep 22, 2005
Messages
7,613
Location
Montana
Do you set it up for automatic -1/0/+1 bracketing burst, or do you just adjust that between shots? I normally set it to bracket on its own.

EDIT: I just read your other post. Sorry.

Yes, AEB. I shoot alot of HDR, and the main reason is simple.. I lack the photoshop skills to fix alot of problems in a photo that has a high dynamic range, so HDR solves that problem quickly.. I usually only go to +1-1, and don't get too crazy in photomatix, so my pics don't look too HDRish. If a picture has ALOT of contrast, I will go +1-1/3. -1-1/3, and if there is a TON of contrast, like shooting into the sun, I will set it on manual and just shoot 5 or 7 shots manually by watching the meter and going 3 clicks at a time (my exposure value is set to 1/3's, some cameras may only do 1/2s)

For instant, my cars are white, and recently have been shooting in snow, which makes it extremely hard to expose the paint and tires properly, so a quick fix was just to shoot a 3 round burst, let it run through photomatix, then quickly sharpen, contrast, and remove noise in Camera raw.. Total edit time of about a minute lol


So this is what I mean.. I took this quick pic for the LS forum to show the new stance.. The first pic is the real exposure value, unedited.

properly exposed by MattWhidden, on Flickr


And this is the result from +1,0,-1 run through photomatix.. It was just an easy way to get more depth without a lot of edit time.


Settled Front's only by MattWhidden, on Flickr
 
Last edited:

Deric

Active Member
Established Member
Joined
Dec 31, 2009
Messages
1,118
Location
Minnesota
Ah I see what you mean. I think we are the opposites! I enjoy the post processing part of it so I end up skipping the HDR and editing what I dont like in the image. I never do much HDR, only dabbled in it once or twice to see what happens. Although I am looking at my pictures on this screen here at work and they look much different than they did on my old editing computer. Display quality is very important too.

I like the car HDR you just posted. Its not over the top like many HDR'ers tend to do. I think the only thing I would change if it were mine would be to take a touch of the blue/cyan out of your windows. But I notice all the stupid little things that dont matter so dont listen to me haha.
 

Blown_By_You

Richard Head
Established Member
Joined
Sep 22, 2005
Messages
7,613
Location
Montana
Ah I see what you mean. I think we are the opposites! I enjoy the post processing part of it so I end up skipping the HDR and editing what I dont like in the image. I never do much HDR, only dabbled in it once or twice to see what happens. Although I am looking at my pictures on this screen here at work and they look much different than they did on my old editing computer. Display quality is very important too.

I like the car HDR you just posted. Its not over the top like many HDR'ers tend to do. I think the only thing I would change if it were mine would be to take a touch of the blue/cyan out of your windows. But I notice all the stupid little things that dont matter so dont listen to me haha.

You are most definitely right, I would edit out the blue tint on the windows too.

Like I said, I just used HDR to help expose the image. This was by now means edited for anything other than to show off the stance. But in the original pic, you can see how dark the tires were and it would take some editing time to lighten the wheel wells up without blowing out the paint.

I guess it's alot easier for me due to the high burst rate on my camera. Doing a quick HDR with my old rebel would not be so easy or successful
 

Deric

Active Member
Established Member
Joined
Dec 31, 2009
Messages
1,118
Location
Minnesota
Does anyone know if Photobucket messes with images at all?

On my old computer I had them edited how I like them But now Im at work looking at them on this thread and they look way over saturated to me, so I assumed it was my work monitor being junk.
But I just set them as my desktop on my work monitor and they look fine again.
 

Planter

Banned
Joined
Feb 23, 2010
Messages
15,554
Location
In the 5280'
Does anyone know if Photobucket messes with images at all?

On my old computer I had them edited how I like them But now Im at work looking at them on this thread and they look way over saturated to me, so I assumed it was my work monitor being junk.
But I just set them as my desktop on my work monitor and they look fine again.

degrades the **** out of the quality.

flickr, smugmug or Zenfolio - Professional photo and video hosting for photographers and enthusiasts. are the best.


personally I despise flickr and smugmug because they are so limiting, but zenfolio is awesome.
 

HYBRED

That Just Happened
Established Member
Joined
Mar 4, 2007
Messages
10,701
Location
Dallas TX
Any free upload site is going to screw with your image quality. That includes photobucket, imageshack, etc.

People consistently underestimate the value of a quality monitor. I was using an $800 Dell Ultrasharp while editing, calibrated by a friend of mine for print work. The depth, contrast and color display is amazing. I upload the pics to my Smugmug site and view the pics on my cheapo work monitor and they're dark, underexposed, and lack detail. But, if I order that same exact photo in a poster print, it'll be perfect.

IMO, if you're serious about getting into the post processing part of photography, the best gift you can give yourself is a quality IPS panel monitor. They've come down a LOT in price since I bought mine; I think you can get one comparable to my Dell for around $350. I picked up a pair of 22" HP LED IPS monitors off Woot for under $300. The easiest way to tell if a monitor is an IPS vs. a TN is to check the viewing angle. If it's 178* or 170-180* in both directions, odds are it's an IPS.
 

hyvltge

PSI
Established Member
Joined
Apr 14, 2004
Messages
1,853
Location
Chandler
Christy
Edits: Depth markers, pool divider, curb, general pool cleanup
christy.jpg

First of all thanks to all of the contributors.

I do have a question on this shot if I may. I understand the techniques used for the revisions and removing of unwnated items, but how did you get the water coming off of her arms clearer in the edited version?
 

Fox-4

OFFICER BARBRADY
Established Member
Joined
Jun 12, 2007
Messages
5,810
Location
Turlock, Ca
And usually it will say what monitor type they are. I wish I could have gotten a IPS monitor, but the two that I have seen to be ok.
 

Users who are viewing this thread


Top