Mystichrome single turbo hellion build thread

01yellercobra

Well-Known Member
Established Member
Joined
Oct 5, 2005
Messages
21,325
Location
Cali
That’s what I was thinking in my head but I just wanted to make sure before I bought one and installed it for like the 4th time and had to pull it again, I would have been pissed lol. Thanks brotha

It still works. If it does get low I usually fill up around quarter tank just to be safe.
 

fivelitrecobra

Active Member
Established Member
Joined
Jul 2, 2013
Messages
530
Location
PA
Looks like this is going to be an awesome build. You're definitely not wasting any time getting started! Great job on pulling yourself back together, not an easy task, keep it going!
 

Dimitri318

Well-Known Member
Established Member
Joined
Feb 17, 2005
Messages
636
Location
Greenville, SC
It still works. If it does get low I usually fill up around quarter tank just to be safe.
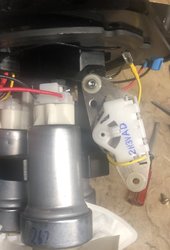
I said screw it and ended up buying a new one. I had problems where I’d run out of fuel in one of my old cobras if I didn’t keep a really close eye on it. Let’s just say I ran out of gas a lot lol so I don’t want to go through that again.

Looks like this is going to be an awesome build. You're definitely not wasting any time getting started! Great job on pulling yourself back together, not an easy task, keep it going!

Thanks man, I really appreciate it. I had umbilical hernia surgery last month and I sat on svtperformance and read for like 16 hours a day of what I wanted to do and it was killing me not being able to work on it so now I’m spending every second I get working on it.


So I got my new fuel sending unit installed and finally on the 4th try, my fuel hat is on for good(I hope lol).

609FE7CB-1723-435C-BDB4-FE4A6B2F7D39.jpeg


I finally re read Malcolm’s write up and found out I’m an idiot and completely misunderstood what he explained. After re reading it a few times, I went and bought a relay and will be wiring everything up when the fuel line get here and I can mount the gas tank back up.


So I removed all the stock hard lines and I’m waiting on my black braided fuel lines to be delivered so I started on the wire tuck. Everything was going smooth and I got everything almost out and at the very end, this happened.

617B4694-3AC3-4BD2-B2BC-E2C72B2A1CF1.jpeg
197AFA05-1806-4E96-BF32-867FE5EB6DE9.jpeg


One of the wires got pinched and stripped out :facepalm. It’s the 4th one down one the box, the yellow 20amp fuse. So I looked up the wiring diagram and it says it’s the alternator.

Please for the love of god someone tell me I can buy one of those mini add a fuses and cut the green wire as well and splice in a 20amp fuse, would that work? I know it’s probably not the best idea, but the fuse box will be in the fender and no ones gonna see it right lol?
 
Last edited:

Dimitri318

Well-Known Member
Established Member
Joined
Feb 17, 2005
Messages
636
Location
Greenville, SC
That is why I hate wiring. It looks really good tucked though. Just not high on my list of things to do currently.

Other than that hiccup, it actually wasn’t too bad.

So I ordered some terminals and I will have the wire tuck finished up tonight hopefully.

937400F3-9B60-4087-9C25-83E67A54DB1C.jpeg


And the UPS guy dropped another present off for me today...

A39A1A0A-73FE-4AB6-B3A1-D9D2A7E6CBF5.jpeg
 

PaxtonShelby

iamdrab
Established Member
Joined
Nov 16, 2010
Messages
5,434
Location
Pittsburgh, PA
Great build, but your story is better! Congrats on having the strength to do all you have done to pull your life back together. Our cars like to keep our wallets empty, but they also help keep our heads in the right place. Keep up the great work buddy....ALL of it! Lots of good folks around here with tons of experience and advice. And a bunch of them are pretty damn funny too. Now get back in the garage! :)
 

Dimitri318

Well-Known Member
Established Member
Joined
Feb 17, 2005
Messages
636
Location
Greenville, SC
Thanks guys, I really appreciate it!! Yea I’ve met a few guys off this forum in person and know a few of you guys from online and this is pretty much the forum I get on bc of the good people on here. And you’re right about the cars keeping the wallets empty lol but at least we have something to show for it instead of wasting money on all the other stupid stuff out there.

I am actually getting off work now and heading straight to the garage sir lol. I bought all the tools to do the fittings for the fuel lines myself so tonight I will hopefully have all the lines run and the tank put back in as well as having the FC3 controller wired in. I will be posting more pics of the progress here shortly!
 

Dimitri318

Well-Known Member
Established Member
Joined
Feb 17, 2005
Messages
636
Location
Greenville, SC
So I got a few things done...started on my fuel lines and got a couple fittings made. And started taking the old wire looms out and have to order some new ones before I can re run the wires and button it up. Got a couple questions for you guys.

1. For everyone that’s done a wire tuck, did you just re use the hard plastic covers on the wires and just electrical tape everything back together?

2. The blue plastic can and the white one in the gas tank were both broken when I pulled them off. I’ve read that you can delete them but it requires welding the tank closed and venting to atmosphere, is this correct? I would rather not buy the pieces again bc they are a little expensive for 2 pieces of plastic, what could I do about this?

CF135C38-5843-44FF-8843-7E07480030AF.jpeg
725494F3-122B-42D4-B055-5D8448AF2387.jpeg
 

Dimitri318

Well-Known Member
Established Member
Joined
Feb 17, 2005
Messages
636
Location
Greenville, SC
I’d leave your evap system intact.


Sent from my iPhone using svtperformance.com

Well every single piece is pretty much broken so I was just looking at the pros and cons of deleting it before I went and bought all new stuff. From searching I can’t really find any pros other than saving money to replace parts. And the cons, obviously I don’t want to be venting to atmosphere and have someone smoking a cigarette and walking behind the car and something catch fire. I know that’s probably a small possibility, but it still could happen. And of course from what I’ve found online, it’s gonna cost me like $150 to buy all new stuff. Do you know if the evap stuff off of GTs are the same as cobras?
 

Dimitri318

Well-Known Member
Established Member
Joined
Feb 17, 2005
Messages
636
Location
Greenville, SC
Finished the wire tuck tonight except for one little spot behind the passenger headlight that needs some loom but that’ll take just a couple minutes when I get some.


6BEFE918-5421-4707-9E06-1BFC7584EF45.jpeg
CC6A4094-D1E2-4317-9F38-8F419129AD6E.jpeg
 

MG0h3

Well-Known Member
Established Member
Joined
Jul 23, 2014
Messages
13,953
Location
El Paso, TX
Well every single piece is pretty much broken so I was just looking at the pros and cons of deleting it before I went and bought all new stuff. From searching I can’t really find any pros other than saving money to replace parts. And the cons, obviously I don’t want to be venting to atmosphere and have someone smoking a cigarette and walking behind the car and something catch fire. I know that’s probably a small possibility, but it still could happen. And of course from what I’ve found online, it’s gonna cost me like $150 to buy all new stuff. Do you know if the evap stuff off of GTs are the same as cobras?

I almost think it is from some pics I saw. Or maybe it was a Mach tank. Can’t remember.

I do know that my evap was disabled during tuning and data logging for some reason and holy shit. No thanks. Stank to high heaven. Thought I had a leak.


Sent from my iPhone using the svtperformance.com mobile app
 

Dimitri318

Well-Known Member
Established Member
Joined
Feb 17, 2005
Messages
636
Location
Greenville, SC
So it’s been awhile since I got anything done to the car bc I can’t find any good help at the restaurant and I’ve been pulling 80-90 weeks again at my restaurant. Finally found some help last week and got back to business.

Problem is it seems I misplaced my install instructions on the Fore triple pump hat and I’m pretty sure this is how the sender bolts up. Can any of you guys with this hat confirm this? I know how to put it in the tank but forgot about the sending unit. I will post up more pics here shortly with more progress.


8052631E-53C1-482F-89C7-4FCA1037FC30.jpeg
 

Attachments

  • 5A24355F-9A5C-4B5E-8449-29541B25233D.jpeg
    5A24355F-9A5C-4B5E-8449-29541B25233D.jpeg
    183.4 KB · Views: 132

MG0h3

Well-Known Member
Established Member
Joined
Jul 23, 2014
Messages
13,953
Location
El Paso, TX
I can’t remember. Seems like that bottom hole should be mounting to something. I thought mine was installed and I just clipped the sender onto it.


Sent from my iPhone using svtperformance.com
 

4sdvenom

Never Enough!
Established Member
Joined
Dec 2, 2003
Messages
2,439
Location
Ft. Wayne, IN
Sub’ing in for more updates. You’ve got a nice, clean and very detailed build going here. Keep up the great work and congrats on getting yourself back in the game bud. That’s coming from someone who has been there before as well.

-Ken
 

Dimitri318

Well-Known Member
Established Member
Joined
Feb 17, 2005
Messages
636
Location
Greenville, SC
Found out I was using the wrong plate that the fuel level sender sits on, Fore sends you a different one that bolts up to the top 2 bolt holes. It’s been a few months since I worked on it and completely forgot but found the right piece last night and got the fuel pumps set in last night(will get pics of that tonight).

In the mean time since I’ve been away from this thread, I ended up ordering the Holley dominator and somewhat started the wiring process. I made a mounting plate for it to sit on in the passenger dash for now but might leave it there, haven’t 100% decided. All of the wires in this picture are the “plug and play” wires. Not shown are the wires you have to run so you can monitor whatever you could honestly think of, it has over 100 inputs/outputs you can pick from to monitor coolant temp, IAC, fans, boost control, etc.. I am still in the learning process with the Dominator and am still browsing the Facebook page and reading the manual to learn exactly how to wire all the sensors in. So far I’ve decided I’m going to run the sensors:

Radiator temp
Fuel Pumps
Ford IAC
Fans
Boost Control
Oil temp
Transmission temp
2 widebands

If anyone else on here is running the dominator, post up what you’re monitoring if you could so I could maybe get an idea of what else to wire up.

6D5F10E0-17CE-4E62-8958-1D2AF74A494E.jpeg
 

JetmechF16

Under Pressure
Established Member
Premium Member
Top Shelf Gentlemen
Joined
Sep 14, 2006
Messages
3,980
Location
Huffman, TX
Awesome build! If you're still looking for fuel tank venting ideas, I found a company that makes some pretty awesome vents specifically to let air in/out of the tank while keeping vapors contained. It isn't cheap but this vent plus ptfe lines and I have absolutely zero e85 smell in my garage. It works like a pcv catch can where it uses a media to cause the vapor to condensate and drip back to the tank while also allowing filtered air in. Here's the link to the one that you can mount anywhere, I have mine above the fuel cap inside the trunk so it's the highest point in the system.

II MUCH VSR Vent System for Fuel, Differential, and Transmission P/N 200024

IIMuch-Fuel-Vent-Bracket_1024x1024.jpg
 

Dimitri318

Well-Known Member
Established Member
Joined
Feb 17, 2005
Messages
636
Location
Greenville, SC
Well it’s been awhile but finally got back on track with the build. Just got the motor back from the machine shop yesterday and gonna try and drop it in this weekend. I had bought some of the purplish colored bolts from Pro Bolt USA bc they are different from everyone else so I thought I’d give them a shot. Gonna try and get the coil covers powder coated wrinkle black and get someone to maybe match the bolt color in there and see how that turns out. Any of you guys on here do powder coating that would maybe be able to match the bolt color??


EBF60ECC-4E96-42D2-B244-460734D72A5C.jpeg
16A4F6E4-3F11-42AD-A1A7-A066C55CE9EF.jpeg


I went to install the valve cover but the passenger side gasket is way too long and won’t go in, anyone ever had this problem or know of a way to fix it? The driver side went on just fine but this one is giving me trouble.

C5F97B1E-6DC7-40F6-B180-EB2E84F348F6.jpeg
1846E10A-6489-4C52-B585-E919B37CE9A0.jpeg


I also have new pulleys from metco for the timing cover, you guys know if these need to be torqued down at all or just tightened down pretty good? I know they’re Allen head bolts so didn’t know about torquing them but figured I’d ask.


C9C22D91-298C-417E-91B3-E45D06166564.jpeg
 

Dimitri318

Well-Known Member
Established Member
Joined
Feb 17, 2005
Messages
636
Location
Greenville, SC
Well the valve cover gaskets just needed some persuasion and a friend came over and helped me get em and finally set the motor in last night really late. Now it’s time to put all the accessories on and hopefully have most of the front of the motor put together today.


44641007-FAD9-4114-A529-01EDB8D92D7B.jpeg
 

Users who are viewing this thread


Top