MG 2001 Cobra Terminator Swap - Build Thread

josephcostello

Well-Known Member
Established Member
Joined
Aug 24, 2014
Messages
753
Location
Los Altos
Ooofff. Where’s you set the pivot ball?


Sent from my iPhone using svtperformance.com

4mm shorter than stock which I should be more like 8mm, info I read online was a bit misleading.

today was a bit disappointing because I wanted so badly to hear this car run today. But it just didn’t happen. After dropping the trans I realized that the EGR tube was not going to fit at all with the HCM. Since I need this for smog, my old man and I spent about 7 hours bending it to accommodate it.
38dbfd2f5eecf0de7ca2d758e667e896.jpg

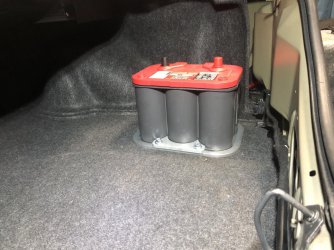
Barely started on the wiring. I’m ditching all the factory power and ground cables and doing my own system, think Big 3 kit but better.
bc149c8c2365ea18bb122f0894ff2583.jpg


Sent from my iPhone using Tapatalk
 

MG0h3

Well-Known Member
Established Member
Joined
Jul 23, 2014
Messages
13,912
Location
El Paso, TX
You probably would’ve been happy with 4mm.

I really liked how my RXT engaged with the stock pivot ball.

Think I took mine down 5/6. Been awhile.


Sent from my iPhone using svtperformance.com
 

josephcostello

Well-Known Member
Established Member
Joined
Aug 24, 2014
Messages
753
Location
Los Altos
You probably would’ve been happy with 4mm.

I really liked how my RXT engaged with the stock pivot ball.

Think I took mine down 5/6. Been awhile.


Sent from my iPhone using svtperformance.com
Good info, I heard that as well but it's my understanding if the TOB is pushing against the pressure plate it's a no go? This is my first clutch I have ever done so this is all new to me.
 

josephcostello

Well-Known Member
Established Member
Joined
Aug 24, 2014
Messages
753
Location
Los Altos
Lots of progress. Got the trans re installed (PITA!) and pivot ball adjustment perfect with about 1/8 inch of play in the fork.
Screen Shot 2022-02-05 at 7.43.46 AM.png

Screen Shot 2022-02-05 at 7.43.50 AM.png

Radiator installed. Just an 03/04 stocker I got from a friend and painted with high temp paint. Powdercoated the brackets.
Old:
Screen Shot 2022-02-05 at 7.47.44 AM.png

New:
Screen Shot 2022-02-05 at 7.43.54 AM.png


Started to put the front end together. The spindles and sway arm were powdercoated. New A Arms, hubs, MM Tie Rod ends. Cool thing on the A Arms. They are actually NOS 03/04 Cobra A arms. After diving down a rabit hole there were small provisions to make the 03/04s a slightly better geometry then the other years/models. They were bought from Ford Performance back in the day and weren't made for long. most likely production left overs.
Screen Shot 2022-02-05 at 7.52.03 AM.png

And the start of my wiring. I am running dual Aeroforce gauge pods inside and adding a wideband and oil pressure gauge. For the oil sensor, i tapped into an unused port on the cooler. I didn't like the wiring harness Aeroforce sent with their kit so i modified it slightly.
Screen Shot 2022-02-05 at 8.05.44 AM.png

Screen Shot 2022-02-05 at 8.05.56 AM.png

The wideband will be installed into a fifth 02 bung on my offroad X after smog. I mounted the wideband box to the metal plate under the steering column.
Screen Shot 2022-02-05 at 7.44.06 AM.png

Power will be tapped into the fuse box through an Add-a-Circuit you see in the picture.

The cluster I had paint matched with factory. Went with SEMs midnight black and many light coats. Very happy with the outcome.
Screen Shot 2022-02-05 at 7.59.20 AM.png

And the finished product.
Screen Shot 2022-02-05 at 8.05.37 AM.png
 

josephcostello

Well-Known Member
Established Member
Joined
Aug 24, 2014
Messages
753
Location
Los Altos
We have power! Kinda cool sitting inside looking at the terminator gauges and being able to put the windows down lol.
93018aa0a49f0e61ccf4d0eaa99df5a6.jpg

I decided I was going to ditch all the factory terminator power wire and do my own system. Since I am putting the battery trunk, the Big 3 kit wasn’t going to be enough. Thanks to @BossMane for getting me all set up with the perfect wire for the job.

Whole car has 1/0 flexible welding wire. I have one power wire coming from the battery to a 250amp fuse to a power block right under where the battery originally was. Wire on the left comes from the battery.
703fbc81f572ba897e371c6c15db0180.jpg

Second to left is routed to the fuse box.
508cf599f7bb00e1db387ec4488e1c1b.jpg

Second from right goes to the KMJ. Had to trim the plastic trim around the post to fit the big wire
450d07be00ae90ae70c321cd4fd91fb9.jpg

Far right goes to starter. All the other wire with part of the OG power wire harness/ big harness that goes across the bottom of the motor was re wrapped and re routed in front of the oil pan, up underneath the oil cooler and up to to the fuse block
55a398872d08b194a347c18a99082d4b.jpg

884db346fa9352a1fdd41f8506cd3f07.jpg

This was before and after of the harness I re did. I shortened some of the wires going to one of the sensors.
70fb611a954307acfe13a31968943b2c.jpg

37c44e81a5fe4dce9d7a98c68c35969b.jpg

The final piece included a Taylor battery box I custom mounted to sit above the carpet.
06a46254cbb865dc39d3623482d3cba8.jpg

But it wasn’t up to my standards so I ripped it out. I’m waiting on a billet battery tray for a Optima Red Top that’s coming in a few days. You’ll have to wait to see that.


Sent from my iPhone using Tapatalk
 

josephcostello

Well-Known Member
Established Member
Joined
Aug 24, 2014
Messages
753
Location
Los Altos
Some more wiring.
a2e6b7784f2c59cf50edc4d285bc012b.jpg

987582ae37a83c9958a2a7ce960e53f3.jpg

Has to trim a hole to fit the 1/0, wideband, and oil pressure sensor wire.
8855683d8d1eb6b70f2f7eb1dc11527f.jpg

Battery to engine ground
29e158fe4eb2c918018d04c826babff3.jpg

I had pre plumbed a dummy wire before I put the dash back in to go behind the heater core and come out the factory grommet.
db379764661cf5b381eb5f776ac4cc8b.jpg

Attached to engine mount. You can also see my engine to chassis ground I moved from the passenger to the driver side.
a6e01b6d974257f2577e83f2742bd963.jpg

Waiting on another power block and then I will mount grounds here so I only have one wire going to the battery
23bbd8be77150c79624540a6e6c28239.jpg


Sent from my iPhone using Tapatalk
 

josephcostello

Well-Known Member
Established Member
Joined
Aug 24, 2014
Messages
753
Location
Los Altos
Been making huge progress the past couple days. Last night I got everything hooked up, put fluids in her, went to crank it and the starter I bought from autozone wouldn’t engage the flywheel. Pulled it this morning, returned in, and bought a nicer one from summit. So no fire today.

In her current glory. Remember I have to get it running stock hence the stock pulley, throttle body, intake etc. all of that will be changed soonish.
ca9e0043c3493c5effa32bad0371a80c.jpg

New intercooler pump. Fixing the wiring is on my to do list. Plumbing layout is temporary.
876cf36fc6ce9895f304586cf7cea5ee.jpg

Stickers t56 mount.
88e70515b6728bbb55e0fd1ff2f1f7f8.jpg

Terminator tank
329fb331995f0654708ce27267a44ea6.jpg

Super super temporary exhaust set up.
dd7d11419c9b720b5dbb6278cb847141.jpg

Anyone know if this will be a problem...? It’s like this on both sides.
f64b96b51e0a3fe868e574781817a6cd.jpg

Only the best for the T56. Peddle feel is AMAZING. So glad I went with a twin disk.
7f5004d56356ee8d96008e4bcd75221e.jpg


Sent from my iPhone using Tapatalk
 

josephcostello

Well-Known Member
Established Member
Joined
Aug 24, 2014
Messages
753
Location
Los Altos
Was not at all satisfied with the Taylor battery box set up I bolted in the back, so I decided to step it up a bit. Bit the bullet on an Optima red top mounted on a billet aluminum battery tray.
2.jpg

2-1.jpg


I moved all ground wires to a block behind the trunk panel and have two single wires going to the side posts on the battery. Really happy with how it came out.
unnamed.jpg

2-2.jpg
 

Attachments

  • 2-1.jpg
    2-1.jpg
    323.5 KB · Views: 70

CobraBob

Authorized Vendor
Established Member
Premium Member
Single Barrel Sirs
Joined
Nov 17, 2002
Messages
105,544
Location
Cheshire, CT
The battery does look really good on that billet tray. I took a look at all of your custom wiring and man, I was blown away. Nice work. I love these build threads.
 

josephcostello

Well-Known Member
Established Member
Joined
Aug 24, 2014
Messages
753
Location
Los Altos
The battery does look really good on that billet tray. I took a look at all of your custom wiring and man, I was blown away. Nice work. I love these build threads.
I really do appreciate that! So much time (and money) involved, but this car is coming along just how I wanted.

Oh and guys, it RUNS! Runs terrible ATM because of a vac leak and im working out some other bugs. But i'll post up a youtube video in the PM.
 

52merc

Well-Known Member
Established Member
Joined
Nov 15, 2000
Messages
580
Location
Calgary, Alberta, Canada
It runs. That is a big hurdle. Good luck finding all your gremlins. After a build like this it is to be expected.

My son and I did a rotisserie restoration on a his Fox box. We stripped the car completely down for rust repair and paint. After putting it back together we had a few issues to deal with, but we found them all all and afterwards the car ran well once he got it tuned.

Keep us informed. I look every day for your updates.
 

josephcostello

Well-Known Member
Established Member
Joined
Aug 24, 2014
Messages
753
Location
Los Altos
It runs. That is a big hurdle. Good luck finding all your gremlins. After a build like this it is to be expected.

My son and I did a rotisserie restoration on a his Fox box. We stripped the car completely down for rust repair and paint. After putting it back together we had a few issues to deal with, but we found them all all and afterwards the car ran well once he got it tuned.

Keep us informed. I look every day for your updates.
Big hurdle indeed. I'm looking forward to the "finish" side of the build, dialing in the drivetrain, putting the interior together, body/paint, wheels etc. Wow that sounds like quite the endeavor. I'm fortunate I kept this car in nice shape when I was a stupid teenager and thankfully rust and the like is non existent on this car.

So my battle to get the car to even turn over was a starter problem that took me two days to figure out. Basically the starter was working, getting juice at the solenoid when the ignition allowed it, but the bendix drive was not engaging the flywheel (wasn't even moving out). The first time this happened I returned the starter to autozone and bought a mini torque one from summit. Installed and same thing. Bench tested it and it was fine, installed again, bendix WAS NOT MOVING. I even installed it in the car hooked up to the battery and remote starter and it was not moving. I was seriously dumbfounded. It had me second guessing my wiring, my splices in the wiring, my grounds, etc.

In the end, it turned out to be the small tab on the pink/white wire touching the big stud on the starter solenoid. Factory this served a purpose to NOT touch anything besides for what is was designed for, but in my wiring I flipped this wire over and therefore was the basis for all my problems. So a heads up for everyone, make sure you are aware of what that ignition wire is touching.

Finally, she cranked. I cranked it over twice for 30 seconds each per the instructions of the builder. Then she fired right up! I didn't realize it at the time but I had two major vacuum leaks which was causing the idle to surge and eventually die. Pair that with a terrible sounding exhaust/exhaust leak, she never sounded so good.

Here's a video I took just now, there's still something going on with the idle I believe. But it'll take time to work out all the little bugs, including one of my idlers which I suspected was bad previously. I'll be posting more walk around videos for you guys.


josephcostello

Well-Known Member
Established Member
Joined
Aug 24, 2014
Messages
753
Location
Los Altos
Today was brake day. I've had all of this boxed up for a while. I went with Stoptech rotors, street pads and stainless steel lines. The calipers are the originals from my car I had sent out, rebuilt and powder coated about a month ago. Hooked up the ebrake cables and bled the brakes 5 times before I realized I needed to do the master cylinder first.
2.jpg

2-3.jpg


After this I put it in gear and the rear wheels move. I need to buy longer lug nuts in the AM and then the rear wheels will go on. Tomorrow I will be driving it down the street.
2-2.jpg

2-1.jpg
 

geoffmt

Well-Known Member
Established Member
Premium Member
Joined
Jul 30, 2015
Messages
2,024
Location
billings, mt
Huge progress! Troubleshooting can be a pain but great when it’s all figured out. I love how everything looks so clean!


Sent from my iPhone using svtperformance.com
 

josephcostello

Well-Known Member
Established Member
Joined
Aug 24, 2014
Messages
753
Location
Los Altos
So today was a huge day for me. Long story short, I put 50 miles on the car today.

First I soon realized the noise I thought was an idler was my power steering pump :sneaky:, thankfully the pump seems to be fine i just ran it low. Only thing I needed to button up after going around the block a few times was a loose power steering line and an end link in the IRS.
IMG_0625.jpeg

IMG_0623.jpeg

IMG_0628.jpeg

I went ahead and put the tail lights, head lights, and mirrors on the car to make it street legal. I put it back on jacks and checked all mechanics from front to back. Everything seems be in good order.
IMG_0632.jpeg

IMG_0634.jpeg

On my hour long drive it was very weird getting use to the new car. Alignment is so bad it is beyond unsafe and i'm driving on 8 year old tires that are cracked. Clutch and the T56 are awesome. The car honestly drives like s**** between the exhaust leaks, tires and "alignment". Still I was smiling ear to ear the whole time, lol.
IMG_0636.jpeg

It has been a ton of work for me to get to this point of the build. I plan to slow down a bit as I start getting this car dialed and putting the interior and body back together. I will be moving pretty soon and starting a job, but I plan to have the car done by mid April. It will be making a 10 hour drive down to LA for Fabulous Fords Forever.
 

Users who are viewing this thread


Top