Upgrade worth considering for any S197 Shelby's. I will be considering in my future engine build.

The Hot Water Bypass Kit includes Intake modifications (CNC machining to remove the front and rear cast water necks, Un shrouding of the stock intercooler core, fabrication to install the diverter plate that maintains stock function of the bypass valve and o-ring seal gasket, increases bolt holes to metric 8 clearance size, modification of the rear of the intercooler core to a -16 female rear entry while maintaining the stock front ports for exit of the IC water.)
Front and rear 5 axis CNC billet water necks that o ring seal directly the head using high quality Viton o rings. These maintain steam port exits adding two to the rear water block. We provide the -4AN fittings for these and the 1.125” hose nipples.
Phenolic spacers that drop over the billet water necks and are o-ring sealed to the head. They are heat isolators that prevent engine heat from heating the induction system. The intake system will run warm to the touch as opposed to scorching hot. You will see about a 100F temp drop of the intake system components. Includes fastener that secure these spacers using the stock dowel holes along with two transfer punches for adding two dowel locations to the intake manifold should you choose to do so.
Custom ARP Stainless 8mm Studs with M8 Jet nuts and washers for securing the components and adding a touch of dress up.
FM GT500 Hot Water Bypass Kit pricing is:
Retail: $5,675.00 each
Note: The customer must send us your Intake to be modified.
Please Contact Us for additional details:
1.682.558.9275
[email protected]
Hot Water Bypass Kit Options:
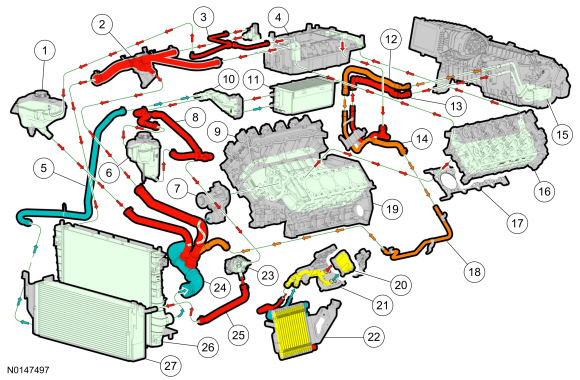
2013-14 Shelby Cooling System
5.8L with Coolant-Cooled Oil Cooler
NOTE: At (100°F) ambient temperature, green arrows indicate coolant temperature below (194°F), amber arrows indicate coolant temperature approximately (194°F), red arrows indicate coolant temperature above (194°F)

5.8L with Air-Cooled Oil Cooler
NOTE: At (100°F) ambient temperature, green arrows indicate coolant temperature below (194°F), amber arrows indicate coolant temperature approximately 90°C (194°F), red arrows indicate coolant temperature above (194°F)
Ford Mustang GT500 Hot Water Bypass Kit
The Hot Water Bypass Kit includes Intake modifications (CNC machining to remove the front and rear cast water necks, Un shrouding of the stock intercooler core, fabrication to install the diverter plate that maintains stock function of the bypass valve and o-ring seal gasket, increases bolt holes to metric 8 clearance size, modification of the rear of the intercooler core to a -16 female rear entry while maintaining the stock front ports for exit of the IC water.)
Front and rear 5 axis CNC billet water necks that o ring seal directly the head using high quality Viton o rings. These maintain steam port exits adding two to the rear water block. We provide the -4AN fittings for these and the 1.125” hose nipples.
Phenolic spacers that drop over the billet water necks and are o-ring sealed to the head. They are heat isolators that prevent engine heat from heating the induction system. The intake system will run warm to the touch as opposed to scorching hot. You will see about a 100F temp drop of the intake system components. Includes fastener that secure these spacers using the stock dowel holes along with two transfer punches for adding two dowel locations to the intake manifold should you choose to do so.
Custom ARP Stainless 8mm Studs with M8 Jet nuts and washers for securing the components and adding a touch of dress up.
FM GT500 Hot Water Bypass Kit pricing is:
Retail: $5,675.00 each
Note: The customer must send us your Intake to be modified.
Please Contact Us for additional details:
1.682.558.9275
[email protected]
Hot Water Bypass Kit Options:
- Polishing the intake is an available option that has proven popular and really improves the look of the intake. Call For Pricing
- Billet -12AN dual IC water outlet that straightens out the water exit from the stock core and eliminates the cast stock outlet. Call For Pricing
- Intake Plenum spacer… this is an aluminum spacer, black anodized, that uses a factory lid gasket. It is 3/8” thick and spaces the floor of the intake lid 3/8” further away from the IC core. This un-shrouds the outlet of the intercooler air for more airflow and less pressure drop and increase the plenum volume for more power. (shown in one pic… black ring between plenum and plenum lid. Pricing: $432.00
2013-14 Shelby Cooling System
5.8L with Coolant-Cooled Oil Cooler
NOTE: At (100°F) ambient temperature, green arrows indicate coolant temperature below (194°F), amber arrows indicate coolant temperature approximately (194°F), red arrows indicate coolant temperature above (194°F)
5.8L with Air-Cooled Oil Cooler
NOTE: At (100°F) ambient temperature, green arrows indicate coolant temperature below (194°F), amber arrows indicate coolant temperature approximately 90°C (194°F), red arrows indicate coolant temperature above (194°F)

