Has anyone do this? All the videos I find are using a lift and pole jack. Can this be done using jack stands? I also can get the car up on ramps but then the rear would be loaded and do not know if doable like that. Thanks.
You are using an out of date browser. It may not display this or other websites correctly.
You should upgrade or use an alternative browser.
You should upgrade or use an alternative browser.
Replaceing upper control arm on jack stands?
- Thread starter HillbillyHotRod
- Start date
Yes, I did it on jack stands when I upgraded from stock. I don't think you have enough space if the suspension is loaded, you'll also need to lower the gas tank a bit so the more space you have the better.
I've done substantially all of the mods on my car using jack stands. You don't want the axle supported by tires on the ground. If you need more clearance, just remove the tires. A floor jack can come in handy to get the bolts started by jacking the front of the differential. You won't need to move it much. Before you start make sure you have the right torx plus socket for the gas tank. A regular T50 is NOT the correct size. You don't need to remove the tank straps, but I'd suggest backing the bolts off an 1" and seeing if you can remove the bracket. Do yourself a favor and torque the bolt for the control arm to the bracket before bolting them in the car.
As mentioned above, the T50 is not the correct spline to fit the fuel tank strap bolts, it is a T50P (Plus) that fits correctly..........

The difference between the T50 and T50P, thinner splines on the T50, doesn't engage the bolt head properly.......

Incorrect Torx bit can strip out the head, and REALLY cause an issue when trying to get the bolt out, it has a round head, there is virtually no room to get a vise grip in that area and it becomes a MUCH bigger project because the oem bolt is also Blue loc-tited in place, it can get real ugly once the splines are stripped on the bolt head..........

If I remember correctly, it was either 2011 or 2013 when the oem fuel tank was redesigned and the area below the UCA is "horse shoe" shaped and the UCA can be accessed and removed without dropping the fuel tank?
R
The difference between the T50 and T50P, thinner splines on the T50, doesn't engage the bolt head properly.......
Incorrect Torx bit can strip out the head, and REALLY cause an issue when trying to get the bolt out, it has a round head, there is virtually no room to get a vise grip in that area and it becomes a MUCH bigger project because the oem bolt is also Blue loc-tited in place, it can get real ugly once the splines are stripped on the bolt head..........
If I remember correctly, it was either 2011 or 2013 when the oem fuel tank was redesigned and the area below the UCA is "horse shoe" shaped and the UCA can be accessed and removed without dropping the fuel tank?
R
Last edited:
Thanks for the replies. Already have the T50. Just been too lazy to take it on. Have the whole thing sitting on the bench for the last 6 months or so. I know you use the blue locktite on the arm to diff bolt but is it need on the arm to bracket bolt or the adjuster nuts? Also has anyone changed out the bushing on the diff? I have a poly replacement and was thinking of doing everything at once. I have heard a hole saw is a good way to get the old bushing out.
I did not use locktite. All of these bolts have high torque values. I don't see a nut backing off. The exception would be the two small bolts on the upper bracket. I replaced my differential bushing. You want a hole saw that is inbetween the inner metal sleeve and the outer metal shell. Once the middle section is gone, you can use a wire brush cup to remove the vulcanized material from the outer shell. Use a little emery cloth on the inner shell when you're done and reassemble. I highly recommend Energy Suspensions grease on that poly bushing.
I also did it on jack stands and didn’t find it to be too bad. Catmonkey gave you some great tips, he hit all the important points. Follow those and you’ll be good to go. Make sure you run your gas tank down low in case you do have to totally remove the strap bolts. That’ll make it much easier to get back into position.
Did mine using just jack stands and a floor jack. Lifted the car on all 4 corners and used the floor jack to lift the differential into place, it was a pain but easily doable. Not really sure why you would need to mess with the gas tank though or at least I didn't need to bother with it.
It's only necessary to partially drop the gas tank if you remove the upper bracket. It's been years since I did mine, but I don't think the OEM bracket will come out without partially dropping the tank. I know it won't with the heavier bracket I used.
I did mine on jack-stands a few years ago (cant find my write up on the site anymore :-( ). The job is not easy, but I took my time and got it done. Few suggestions: Disconnect the shock and sway bar to lower the rear suspension (jack at the rear pinch welds). Access into the upper rear is tight. If you go adjustable, I highly recommend blue Loctite on the jam nuts or you will likely be back fixing clunks later...took me 3-times to get it right\tight. I had to lower my gas tank a bit...not hard at all...just make sure the tank is close to empty if possible and support it on jacks.
Did mine using just jack stands and a floor jack. Lifted the car on all 4 corners and used the floor jack to lift the differential into place, it was a pain but easily doable. Not really sure why you would need to mess with the gas tank though or at least I didn't need to bother with it.
I had to lower my tank because the front mounting point of the UCM goes up into the floor under the rear seat, once the under seat bolt is removed, and the two other bolts are removed, the mount has to drop down to clear the floor. The fuel tank did not allow the mount to drop down far enough to be removed. It required lowering the tank to allow the mount to drop down and clear the hole in the floor where it mounts.
Not an oem mount, but the front area is shown. The mount has to drop down at least as far as the mounting boss to clear the floor to be removed. I did not have that much room between my floor and the tank......so the tank had to be lowered.
R
Last edited:
Did mine on stands. Doable. Definitely get the T50+ bit for the tank straps if you're doing the UCA mount. It won't come out without dripping the tank a bit.
Disconnect the shocks and sway bar links for tons of room. I used a floor jack on the pumpkin.
The real pain is adjusting the length correctly. Up, down, up, down...
Disconnect the shocks and sway bar links for tons of room. I used a floor jack on the pumpkin.
The real pain is adjusting the length correctly. Up, down, up, down...
Question. On the upper arm bracket where the adjustable swing arm connects. What is the torque for that bolt? I have the manual and it does not even show that bolt.
Also I am using a BMR bracket and it has two different holes. Which hole do you use. I am at stock height right now but may lower it in the near future.
Also I am using a BMR bracket and it has two different holes. Which hole do you use. I am at stock height right now but may lower it in the near future.
Last edited:
Question. On the upper arm bracket where the adjustable swing arm connects. What is the torque for that bolt? I have the manual and it does not even show that bolt.
Also I am using a BMR bracket and it has two different holes. Which hole do you use. I am at stock height right now but may lower it in the near future.
With the bracket in place, from what I remember, the upper hole is for a lowered car and the lower hole is for a stock (not lowered) ride height.
The torque will depend upon the BMR arm, the 2007-2010 arm has a smaller diameter "through bolt" and the 2011-2014 is larger with a greater torque value.
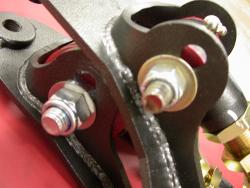
Below is the BMR through bolt difference......
^^^^^Larger 2011-up on bottom.
OEM "through bolt" difference.......2011-up larger......
R
Attachments
Thanks for the reply I will see what BMR says. I have the smaller 07-10 version so has the smaller bolt. I also found Ford does not have a spec as they only sell it as a unit.
From the BMR instructions for a 2008 adjustable UCA and mount: 129 ft/lbs for front and rear UCA cross-bolts. Torque the front bolt before installing the bracket on the vehicle (difficult to impossible to torque properly once on the car). If you have the OEM rubber bushing on top of the rear differential, torque the rear bolt with the suspension loaded.
Use the upper bracket hole closest to the body for stock ride height and lowered rear suspension.
I replaced my whole rear suspension in one shot years ago, and I found it easiest to remove the rear axle completely for the work I was doing. I supported the frame with jack stands and used my floor jack to maneuver the axle assembly. Feel free to PM me if you run into any more issues.
Last edited:
Good to know thanks.
From the BMR instructions for a 2008 adjustable UCA and mount: 129 ft/lbs for front and rear UCA cross-bolts. Torque the front bolt before installing the bracket on the vehicle (difficult to impossible to torque properly once on the car). If you have the OEM rubber bushing on top of the rear differential, torque the rear bolt with the suspension loaded.
Use the upper bracket hole closest to the body for stock ride height and lowered rear suspension.
I replaced my whole rear suspension in one shot years ago, and I found it easiest to remove the rear axle completely for the work I was doing. I supported the frame with jack stands and used my floor jack to maneuver the axle assembly. Feel free to PM me if you run into any more issues.
View attachment 1548678
View attachment 1548679
View attachment 1548680
View attachment 1548681
^^^^That is how I did mine also, put the car on Race Ramps (10" tire level at all four corners), and then used a floor jack to remove the rear race ramps and install jack stands to support the body during part of the install. After all new suspension parts were in place, I put the Race Ramps back under the rear tires and adjusted the LCA's in the relo's.....
-----------------------------------------
That would be a Great time to do an 8.8 axle restoration!!.........Sorry, I just had to say that...LOL!!
R
That would be a Great time to do an 8.8 axle restoration!!.........Sorry, I just had to say that...LOL!!
I know, right? I’m more about GO than SHOW, but my next major project will be a rear axle refresh including sand blasting and semi-gloss black paint or powder-coat.
Users who are viewing this thread
Total: 4 (members: 0, guests: 4)

