Nations Alternator for the 2010 GT500

XP900

Active Member
Established Member
Joined
Sep 27, 2020
Messages
340
Location
NY
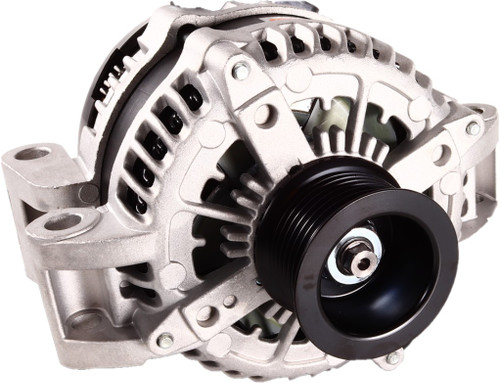
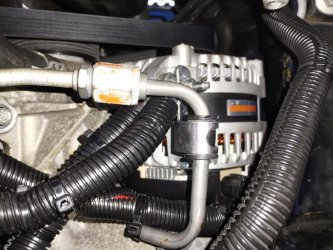
Since my car is down for some service and work I called Nations at ask about their alternator since I might be stressing my stock one out with the BAP, Craig pump, triple bypass fans, higher rad fan and a few other small acc. at idle.

I was not overly impressed since they didn't really answer my question if 6500 engine rpm was pushing it to their max rpm.
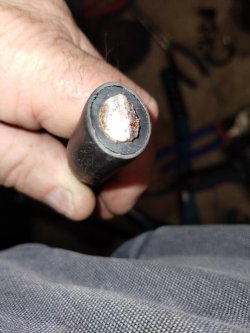
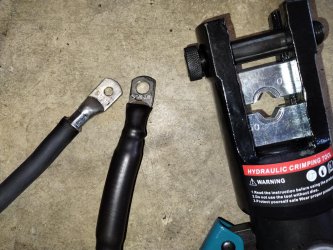
Also didn't answer my question about the alt connections if they were clocked versus the original mount. Their cable kit was 2 gauge and said it can be cut to size...I might was well order my own 1/0 cable and crimp the ends. No fuse is used so I guess they are basically giving you two wires - alt to ground and alt to fuse box.

Question: Anyone know the cable lengths they used for the alt to ground and fuse box and is the alternator clocked versus the original?
 

Vinnie_B

"LIVE LIFE AT FULL THROTTLE"
Established Member
Premium Member
Joined
Jun 22, 2021
Messages
1,973
Location
Michigan

XP900

Active Member
Established Member
Joined
Sep 27, 2020
Messages
340
Location
NY
When my alternator needs an upgrade this is what im going with......check em out @XP900


Battery Cables..........


I've compared both for a few days reading over comments and what bothers me about the Mechman is the number of complaints about the flashing display errors at higher rpms. Someone implied their wiring solution simply covers up the issue and doesn't address it. Most of the complaints were on the terminators but I don't want to take a chance if it is also on the S197 body alternators. Still up in the air as to whether this issue was really fixed and which one to finally pick.
 

Vinnie_B

"LIVE LIFE AT FULL THROTTLE"
Established Member
Premium Member
Joined
Jun 22, 2021
Messages
1,973
Location
Michigan
I've compared both for a few days reading over comments and what bothers me about the Mechman is the number of complaints about the flashing display errors at higher rpms. Someone implied their wiring solution simply covers up the issue and doesn't address it. Most of the complaints were on the terminators but I don't want to take a chance if it is also on the S197 body alternators. Still up in the air as to whether this issue was really fixed and which one to finally pick.
You cant go wrong with either. I'm going Mechman personally. The biggest issue ppl have is they dont properly update there wiring correctly when upgrading there alternator. Just make sure G102,107,108 and any others affecting powertrain system are good.


20230706_053742.jpg
20230706_053903.jpg
 

XP900

Active Member
Established Member
Joined
Sep 27, 2020
Messages
340
Location
NY
Vinnie....still haven't decided on Mechman or Nations but after reading all the threads with compaints abou the dash charging warnings it seems like almost all were on the older terminators.

Have a question....I'm making my own 1/0 guage wires for alt to grounds and box but I am undecided on which ends to use and didn't get a definitive answer from vendor - copper or tinned copper. Which connector ends does Ford currently use on these hi amp cables?
 

Vinnie_B

"LIVE LIFE AT FULL THROTTLE"
Established Member
Premium Member
Joined
Jun 22, 2021
Messages
1,973
Location
Michigan
Vinnie....still haven't decided on Mechman or Nations but after reading all the threads with compaints abou the dash charging warnings it seems like almost all were on the older terminators.

Have a question....I'm making my own 1/0 guage wires for alt to grounds and box but I am undecided on which ends to use and didn't get a definitive answer from vendor - copper or tinned copper. Which connector ends does Ford currently use on these hi amp cables?
Ive always seen on all Ford and personally use on repairs and recommend tinned copper @XP900
 

SCGallo2

Balanced performance
Established Member
Premium Member
Joined
Mar 4, 2014
Messages
1,196
Location
Southern MD
If routinely spinning your engine beyond 6000 RPM, I would install a 10% underdrive pulley on the alternator. All alternators will eventually fail if repeatedly spun to the moon. A good high current alternator will still provide stable output at idle RPM and above when slightly underdriven.
 

XP900

Active Member
Established Member
Joined
Sep 27, 2020
Messages
340
Location
NY
Finally received Mechman after two weeks. Told them my max RPM and they supplied it with a 2 3/16 diameter pulley versus the stock 2 3/8...which would actually make it spin slightly faster than stock! Not sure yet if the new stock belt size will be okay.

The Mechman rear connections were all clocked exactly as my original alternator and it is slightly bigger in diameter, depth and weight. Power steering aluminum line was not in the way and it didn't have to be bent. Installed fairly easily with sway bar and rack cables loose. Tag showed 209 amps at 800 rpm and 279 at 1800...higher than I thought it would be.

Making 1/0 power and 1/0 ground cables now using a new hydraulic crimper tool which is working much better than I imagined it would. Crushes the 1/0 terminals completely around without creating any side pigtails.
 

XP900

Active Member
Established Member
Joined
Sep 27, 2020
Messages
340
Location
NY
Notes on my Mechman alternator installation.

Bought the standard Mechman for my 2010. Box says 240 amps....included sticker shows output of 208 amps at 800rpm idle and 279 amps at 1800rpm cruise. Seems almost equivalent to the Nations.

After the Mechman install I noticed the alternator wasn't aligned very well (flush) with the crankshaft ribbing just eyeballing it... a straight edge on the crank confirmed it. Reinstalled the original alt and it aligned much better. Matched the two alts up side by side and the pulleys were lined up perfectly so that wasn't the issue. Reinstalled Mechman and used some force to keep it as far forward towards the radiator as possible as I tightened it up. It now aligned like the original did - still not perfect but much better. There is some play in the alt aluminum mounting holes and bolts (least 1/8" or more) so take care installing it. Hard for one person with jackstands but possible esp. with the sway bar and bolts removed (they pop out of their support holes easily).

I installed 1/0 cable for the grounds and hot wire. Used tinned copper lugs everywhere (sizes used 1/4,5/16,3/8 and 1/2") except on the Mechman copper bolt - used the supplied Mechman copper lug. I hydraulic crimped and then soldered every lug. I coated every connection with dielectric grease. I ran the hot from the alt to the main engine fuse box placing a 250 amp fuse assembly inline near the box. I ran a ground from the alt to the driver side engine block using an unused pretapped hole (redundant ground since the alt attaches to the block anyway). I ran another ground from the alt to the large passenger subframe bolt (18mm - 1/2" lug) and then a run from there to the strut tower ground where there are two 6mmx1.0 threaded holes. I then ran one cable from there to the top bolt on the PCM bracket assembly. I originally had this ground going to the front radiator support bracket but I could not get the front top shroud to lay flat and decided not to cut it up so I moved the ground location instead. I lucked out and it reached the top PCM mounting bolt perfectly. Both the PCM bolts and the front radiator ground bolts are 6mmx1.0 so 1/4" lugs fit perfectly. I also ran a ground from the strut tower to the bat- and another power lead from the main fuse panel to the bat+ ...all redundant cabling in parallel with the existing wires. All the existing wires were left in place, cleaned and dielectric grease applied. The factory ground on the engine block was removed and cleaned but I did not use it for my new ground cables due to the accessibility. I scrapped paint off in all the grounding areas and metered all connections. Also found a loose grounding wire on the front radiator support frame. I haven't traced this out yet to determine what these two wires were physically grounding but maybe that has been my issue with some weird electrical issues I have had with the car over the last two years. For this project I ordered 15 feet of both red and black 1/0 cable in a kit with adhesive heat shrink (great stuff and thick!!) and used almost all of the black cable except for 3 feet. Cable is just over 1/2" thick so I used 5/8" ID split wire loom to cover it. Original cable and lugs from Windy Nation (also Selterm lugs from Amazon) and crimper tool and wire cutters from Amazon. This took me morew than a week working a few hours a day in 90 heat. I probably spent $300 in supplies and new tools. Wire is extremely thick but still very flexible and easy to work with. The soldering filled the lugs solid and also went an addition inch+ up into the cable so if you need a tight bend it must be bent before soldering the wire in the lug.

Although the Mechman pulley was slighly smaller than the stock pullley the new stock belt fit without any issues and tensioner placement was fine. Like I said in my other post, my idling is now very stable. I also noticed my stock boost gauge now seems to be reading very close to my aftermarket one...never did that before either ???? Hopefully everything stays as is for a year or two.

I attached two pictures to get an idea of the size of the cable thickness with the wire loom. There is room for all the cabling but it is tight. I also attached straps to make sure there would be no rubbing on the crankshaft pulley. I used zip ties all over the place too.
 

Attachments

  • alt2.jpg
    alt2.jpg
    146.4 KB · Views: 71
  • alt1.jpg
    alt1.jpg
    132.5 KB · Views: 62
  • alt4.jpg
    alt4.jpg
    89.1 KB · Views: 63
  • alt3.jpg
    alt3.jpg
    181 KB · Views: 63
Last edited:

Vinnie_B

"LIVE LIFE AT FULL THROTTLE"
Established Member
Premium Member
Joined
Jun 22, 2021
Messages
1,973
Location
Michigan
Notes on my Mechman alternator installation.

Bought the standard Mechman for my 2010. Box says 240 amps....included sticker shows output of 208 amps at 800rpm idle and 279 amps at 1800rpm cruise. Seems almost equvalent to the Nations.

After the Mechman install I noticed the alternator wasn't aligned very well (flush) with the crankshaft ribbing just eyeballing it... a straight edge on the crank confirmed it. Reinstalled the original alt and it aligned much better. Matched the two alts up side by side and the pulleys were lined up perfectly so that wasn't the issue. Reinstalled Mechman and used some force to keep it as far forward towards the radiator as possible as I tightened it up. It now aligned like the original did - still not perfect but much better. There is some play in the alt aluminum mounting holes and bolts (least 1/8" or more) so take care installing it. Hard for one person with jackstands but possible esp. with the sway bar and bolts removed (they pop out of their support holes easily).

I installed 1/0 cable for the grounds and hot wire. Used tinned copper lugs everywhere (sizes used 1/4,5/16,3/8 and 1/2") except on the Mechman copper bolt - used the supplied Mechman copper lug. I hydraulic crimped and then soldered every lug. I coated every connection with dielectric grease. I ran the hot from the alt to the main engine fuse box placing a 250 amp fuse assembly inline near the box. I ran a ground from the alt to the driver side engine block using an unused pretapped hole (redundant ground since the alt attaches to the block anyway). I ran another ground from the alt to the large passenger subframe bolt (18mm - 1/2" lug) and then a run from there to the strut tower ground where there are two 6mmx1.0 threaded holes. I then ran one cable from there to the top bolt on the PCM bracket assembly. I originally had this ground going to the front radiator support bracket but I could not get the front top shroud to lay flat and decided not to cut it up so I moved the ground location instead. I lucked out and it reached the top PCM mounting bolt perfectly. Both the PCM bolts and the front radiator ground bolts are 6mmx1.0 so 1/4" lugs fit perfectly. I also ran a ground from the strut tower to the bat- and another power lead from the main fuse panel to the bat+ ...all redundant cabling in parallel with the existing wires. All the existing wires were left in place, cleaned and dielectric grease applied. The factory ground on the engine block was removed and cleaned but I did not use it for my new ground cables due to the accessibility. I scrapped paint off in all the grounding areas and metered all connections. Also found a loose grounding wire on the front radiator support frame. I haven't traced this out yet to determine what these two wires were physically grounding but maybe that has been my issue with some weird electrical issues I have had with the car over the last two years. For this project I ordered 15 feet of both red and black 1/0 cable in a kit with adhesive heat shrink (great stuff and thick!!) and used almost all of the black cable except for 3 feet. Cable is just over 1/2" thick so I used 5/8" ID split wire loom to cover it. Original cable and lugs from Windy Nation (also Selterm lugs from Amazon) and crimper tool and wire cutters from Amazon. This took me morew than a week working a few hours a day in 90 heat. I probably spent $300 in supplies and new tools. Wire is extremely thick but still very flexible and easy to work with. The soldering filled the lugs solid and also went an addition inch+ up into the cable so if you need a tight bend it must be bent before soldering the wire in the lug.

Although the Mechman pulley was slighly smaller than the stock pullley the new stock belt fit without any issues and tensioner placement was fine. Like I said in my other post, my idling is now very stable. I also noticed my stock boost gauge now seems to be reading very close to my aftermarket one...never did that before either ???? Hopefully everything stays as is for a year or two.

I attached two pictures to get an idea of the size of the cable thickness with the wire loom. There is room for all the cabling but it is tight. I also attached straps to make sure there would be no rubbing on the crankshaft pulley. I used zip ties all over the place too.
What is your voltage @ Hot Idle?
 

XP900

Active Member
Established Member
Joined
Sep 27, 2020
Messages
340
Location
NY
What is your voltage @ Hot Idle?
I usually see it around 14.3 volts....tool in my cigarette lighter that matches what I read on the battery directly. Sometimes I see it within the range of 14.1-14.5 ...only saw it hit 13.9 once for a second or so....Never saw it hit 12.9 like my stock alt did. I haven't used the power probe breakout box on this car yet (maybe you recommended it?) but I used it on my Escape and liked it. When I return home I'll test the breakout box on this car too. The Mechman exceeded my expectations so I'm glad I didn't spend the extra $200 on the Nations which I think has the same warranty period included.
 

Vinnie_B

"LIVE LIFE AT FULL THROTTLE"
Established Member
Premium Member
Joined
Jun 22, 2021
Messages
1,973
Location
Michigan
I usually see it around 14.3 volts....tool in my cigarette lighter that matches what I read on the battery directly. Sometimes I see it within the range of 14.1-14.5 ...only saw it hit 13.9 once for a second or so....Never saw it hit 12.9 like my stock alt did. I haven't used the power probe breakout box on this car yet (maybe you recommended it?) but I used it on my Escape and liked it. When I return home I'll test the breakout box on this car too. The Mechman exceeded my expectations so I'm glad I didn't spend the extra $200 on the Nations which I think has the same warranty period included.
Just as what i expected 14.2-14.5. Thats very good!! Highly recommend Power Probe Breakout Box. Great tool. Yes, I certainly do have one myself for diagnosing CAN issues for my customers. BTW......great job on the install.....(y)


Vinnie_B

"LIVE LIFE AT FULL THROTTLE"
Established Member
Premium Member
Joined
Jun 22, 2021
Messages
1,973
Location
Michigan
Just for comparison from our stock Motorcraft Alternators to a Mechman. Last year datalog from my 2013 SS w/stock oem alternator, 45 minute cruise (Green is Voltage ,Red is RPM). It was HOT that day and the stock Alt still performs well. At higher rpm, output really doesnt increase or change much. But at the end of the cruise while sitting idle for short periods, you can see at the end of the data log how much the output starts to drop off at HOT IDLE. Still maintained a 13.9 avg from start to finish which isnt bad at all but the mechman/upgraded wiring is just alot better and stable IMO.


2013 SS Stock Alternator.jpg
 
Last edited:

XP900

Active Member
Established Member
Joined
Sep 27, 2020
Messages
340
Location
NY
Your alt output seemed to be higher than mine since I don't recall ever seeing it hit 14 or above when driving. When mine hit 12.9s a few times (directly at bat) during warm idling for a few minutes I figured I might was well replace it since I was taking it off the road for a couple of weeks anyway.

I traced out the loose small factory ground wires on my radiator bracket (G102 and G103 - the leftmost connection of the two on the radiator bracket). These wires provide gound for the PCM, MAF sensor, DLC, and a few other things. I don't know if this was the true issue possibly causing the lower alt output and rough / missing idling. I also had intermittent PATS failures the last couple of years which I always managed to resolve by simply plugging in a hand scanner I kept in the car. Powering up the scanner seemed to make the PATS start working again. I don't see a direct link of PATS to this ground location but I'm waiting to see if that issue is resolved too (hopefully).
 

Vinnie_B

"LIVE LIFE AT FULL THROTTLE"
Established Member
Premium Member
Joined
Jun 22, 2021
Messages
1,973
Location
Michigan
Your alt output seemed to be higher than mine since I don't recall ever seeing it hit 14 or above when driving. When mine hit 12.9s a few times (directly at bat) during warm idling for a few minutes I figured I might was well replace it since I was taking it off the road for a couple of weeks anyway.

I traced out the loose small factory ground wires on my radiator bracket (G102 and G103 - the leftmost connection of the two on the radiator bracket). These wires provide gound for the PCM, MAF sensor, DLC, and a few other things. I don't know if this was the true issue possibly causing the lower alt output and rough / missing idling. I also had intermittent PATS failures the last couple of years which I always managed to resolve by simply plugging in a hand scanner I kept in the car. Powering up the scanner seemed to make the PATS start working again. I don't see a direct link of PATS to this ground location but I'm waiting to see if that issue is resolved too (hopefully).
Being the alternator is mounted to the engine block your engine ground strap would be the biggest culprit from a grounding perspective. It Could of been B+ as well??
 

XP900

Active Member
Established Member
Joined
Sep 27, 2020
Messages
340
Location
NY
My main engine ground - large one under engine in pass side was very tight and clean with no corrosion when I pulled it to check. My battery connections are cleaned every time I work on it so they never have any corrosion. I may have my old alt checked out and then keep it as a spare... but I want to see it go above 14V before I trust it. Just not sure who could do it properly once its off the car.
 

Users who are viewing this thread


Top