Alum diff bushings, not the normal ??'s

NotOrange...

New Member
Established Member
Joined
Dec 2, 2007
Messages
130
Location
Saskatoon
Here is my progress from work today... I only took a few pics but whatever...

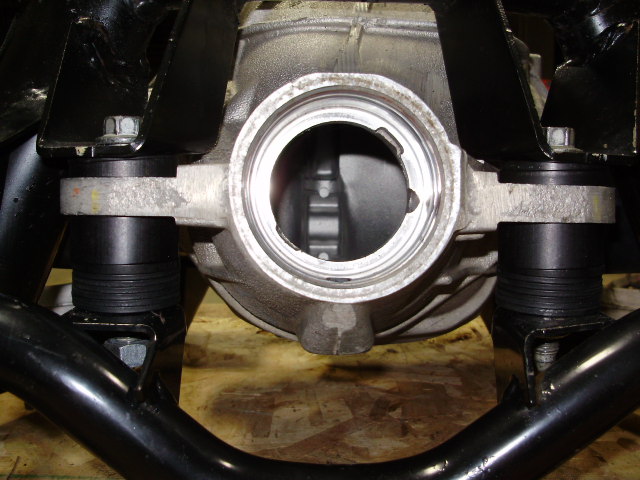
I do have a question for all you new-edgers... how are the front aluminum diff bushings supposed to look... Like the setup I mean. I didn't find any good pictures, and I'm sure the way it's sitting now is wrong, so I'll put up my pics for a laugh :rockon::rockon:

I know this is wrong so it's not all tight and snug, but I wanted some idea how it's supposed to look, the instructions really didn't do much justice.

Anyways... if you have pics of the setup please show and tell so I have some kind of idea to go on...

Thanks and enjoy my "I'm-sure-they-are-wrong-setup" pics. :shrug::shrug:


CIMG0856.gif

CIMG0857.gif

CIMG0858.gif

CIMG0859.gif

CIMG0860.gif

CIMG0861.gif

CIMG0862.gif
 

97V8SHO

F-22 Crew Chief
Established Member
Joined
Sep 8, 2003
Messages
665
Location
Some where out there
Are toughs poly bushings? Why didn't you get the FTBR solid set?

To answer your question I have no idea sorry. But if you haven't thought about it yet try fulltiltbuggieracing.com and check out his pics and vids, might help.
 

NotOrange...

New Member
Established Member
Joined
Dec 2, 2007
Messages
130
Location
Saskatoon
Yes they are the MM poly bushings...
I would have gone with the FTBR subframe bushings, I however got those as a gift a while back. So it was either use them or try to sell them and get maybe $5 and a can of coke. They are easy enough to do if they don't suit my needs though.

I looked on the site and I didn't see what I was looking for... thanks though.

I'm basically looking for how the washers are supposed to look. I have more of the blue ones and also more just "washer" washers, I don't know who it's supposed to look, honestly. Like use more blue ones on top, use only the washers on the top and bottom where they touch the "ears" etc...
 

NotOrange...

New Member
Established Member
Joined
Dec 2, 2007
Messages
130
Location
Saskatoon
Oh and I did finish the UCA's (with the FTBR kit) Awesome by the way!!! I just didn't take any pics as I wanted to get out of there, day off...

All thats left is the Lowers (also the FTBR kit)... once again Thanks guys!! you have a customer for all my IRS needs :)
 

97V8SHO

F-22 Crew Chief
Established Member
Joined
Sep 8, 2003
Messages
665
Location
Some where out there
From what I've looked at and read (I'm assuming here) that the just washer bit is good like you have it and the blue ones are to set the angle. So it needs to be mounted in the car to find this. I plan on buying bruce's kit tomorrow and will be doing this soon so if you figure it out please post up.
 

Silver03Termi

New Member
Established Member
Joined
Apr 14, 2009
Messages
1,552
Location
dayton ohio
In all seriousness, Im pretty sure you add and remove washers, AFTER the IRS is back in the car to set the angle correctly. The FTBR instruction detail this.

"Here is a photo of the front diff support. This particular photo shows a Terminator set-up with the smaller bushing on top and the thicker bushing on the bottom. The object with a Terminator is to raise the front nose of differential up as high as you can without rubbing anywhere on the subframe. A New Edge car would have the thicker bushing on the top and the thinner one on the bottom. Obviously the driveline angles need to be checked once the IRS goes back into the chassis and the shimming washers can be moved at that time to raise or lower the nose of the differential housing for proper placement."
FTBR%20front%20diff.jpg


Contact bruce when you're ready for the good bushings.
 

BreBar21

Born in the G-Code
Established Member
Joined
Feb 2, 2003
Messages
8,894
Location
Orlando
You should definitely invest in the 00r/03/04 differential crossmember while you're at it.

You do not use all the flat steel washers. Those are used to adjust the pinion angle. You'll need to measure that once you get everything back in the car and tweak the stack accordingly. You have the blue washers set up right, but you want the "slot" in the convex washer to face forward.
 

BreBar21

Born in the G-Code
Established Member
Joined
Feb 2, 2003
Messages
8,894
Location
Orlando
Not sure how bashing a vendor answers his question?

Also, for the record, I've the MM diff bushings in my car for something like 4 or 5 years now with ZERO issues.
 

REX-RACER

Testing w/ the live data!
Established Member
Joined
Jan 16, 2004
Messages
3,669
Location
H-town by way of STL
From what I've looked at and read (I'm assuming here) that the just washer bit is good like you have it and the blue ones are to set the angle. So it needs to be mounted in the car to find this. I plan on buying bruce's kit tomorrow and will be doing this soon so if you figure it out please post up.

I think that's about right, the washers are to adjust the angle and by the looks of that picture you have too many washers on top. I just put in an MM kit myself but it was an older one I had bought years ago and never had the chance to install until I was pulling the pumpkin for a gear swap this winter. The kit I have isn't adjustable, i.e., it didn't come w/ extra washers so I just went "over-under" until I used all of the washers in the same manner they came out of the stock set up.

Just for reference I went on the FTBR site to see what was what w/ the pinion angle adjustment and essentially Bruce's FAQ said in a nutshell that you can measure it out w/ angle finder w/ the rear-end and transmission in the car and on level ground BUT if you can't do that generally speaking the the higher the pinion angle the better. Based on that info I would say you need to be looking to more of the adjustment washers on the bottom.
 

NotOrange...

New Member
Established Member
Joined
Dec 2, 2007
Messages
130
Location
Saskatoon
Thanks everyone... Especially for the "helpful comments" lol... Silver03Termi you could good will money into my paypal for me to get the FTBR bushings I'm missing... really, you could. ;)

As long as I have the basic Idea down I'll be okay. I'll have to drive about 1/2 an hour (in the spring) to the shop once the subframe is back together in the car at home, so I didn't want the pinion angle too out to lunch. ( I know I have to set that up with the frame back in the car)

Brebar, I'll change the slotted ones to face forward, I didn't rememeber reading that in the instructions...

and Rex-Racer: I read that too about the angle needing to be higher on our models so on Monday I'll switch those around, but thanks for the headsup on that...

I'll probably post more pics next week too, just incase the pics I have helps anyone out for when the decide to do this.


BTW a vice and airhammer makes short work of those UCA bushings :) in case someone has that option when doing them. ie. Clamp the bushing in the vice like the nut and bolt would attach, move it back and forth until the rubber seperates and the metal attachments start moving more freely. Then the middle rubber section will easily come out and just air hammer on the lip of the cup until it bends over and starts coming out of its position then airhammer inbetween the large lip and the arm. It takes literally 30 seconds per bushing. I wish I took pics of that part but I was rushing. If I can do the LCA's the same way I'll defeninately take pics...

Have a great New years weekend all!!!
 
Last edited:

REX-RACER

Testing w/ the live data!
Established Member
Joined
Jan 16, 2004
Messages
3,669
Location
H-town by way of STL
You should definitely invest in the 00r/03/04 differential crossmember while you're at it.

+1 on this! I had one of those lying around also so I put it in as well. Just as much effort as putting the stock 99/01 piece back in but obviously provides more support.
 

marshal wall

New Member
Established Member
Joined
Nov 18, 2010
Messages
58
Location
West coast
here is one way of installing the Maximum Motorsports aluminum IRS bushings.
Keep in mind that you will need an angle finder to set the final pinion angle.
pix_angle_locator.jpg


MMFP_0609_27_Z+Ford_Mustang_Corba_IRS_upgrade+new_bushings.jpg
 

Users who are viewing this thread


Top