1990 LX coupe Build

oatburner99

Member
Established Member
Joined
Jan 15, 2011
Messages
199
Location
Temple, TX
EDIT, realized I had not made a build thread, so here ya go
The car is a 1990 LX 5.0 with a 5spd. It actually is a canadian model so everything is in kilometers.
The car is a true 5.0 coupe also. It has 135,000 miles on it and was obviously babied most of it's life. When I got the car the only thing that had been done to it was a set of flowmaster 3 chamber mufflers and a set of FRPP shorty headers. Since I've had the car, I've put a short belt on, installed a offroad H-pipe,and a set of 2 Chamber flows. I've also installed a FRPP aluminum driveshaft, along with a Pro 5.0 short throwshifter. Not soon after that I picked up a complete 8.8 rear end with 3.55 gears installed in it. Well being the caroriginally had 2.73's, they had to go. So in when the 3.55's and oh my god what a difference. It totally woke the car up. I know some of you are going to ask why the hell does a LX coupe have a Gt front end on it. Well the previous owner aparently had a fender bender, and this is what was put on. I like it and like the fact that i Have fog lights for when it's crappy outside.

So the bad. I blew the clutch up. So after some quick reactions. I was back on the road. Now the paint. Well the Texas sun has not been nice to this car. It has massive amounts of clear coat that is peeling. So that leaves me to painting the car here before to long.

40299_143002709051903_100000265241216_324674_6549963_n.jpg

38654_143002749051899_100000265241216_324677_4337876_n.jpg

39953_143002792385228_100000265241216_324679_656744_n.jpg

40180_143002805718560_100000265241216_324680_2022328_n.jpg

40213_143002839051890_100000265241216_324682_1719040_n.jpg

38662_143002959051878_100000265241216_324689_2813649_n.jpg


Some goodies:
Picked these up from Justin:
62306_157562217595952_100000265241216_407963_2515122_n.jpg

60193_157562237595950_100000265241216_407964_7304572_n.jpg

60193_157562240929283_100000265241216_407965_7919198_n.jpg


8.8 with 3.55 FRPP gears:
38617_144999875518853_100000265241216_335930_3765647_n.jpg

36814_144999915518849_100000265241216_335931_463907_n.jpg

39931_144999938852180_100000265241216_335932_650197_n.jpg


Picked these up, gonna get em cleaned up and roll on them for a little bit,
till I get a set of 5 lug cobra's...well actually 2 sets... :)
155726_170899119595595_100000265241216_491731_8327139_n.jpg
 

oatburner99

Member
Established Member
Joined
Jan 15, 2011
Messages
199
Location
Temple, TX
Got the big and lils on the coupe. Picked these up from SVO, spent HOURS and HOURS polishing these. Still have a long way to go, but they at least are sealed up for now. This wheel and tire combo totally changed the look, feel of the car. Really happy with them. Thanks JEFF!

Here's what they looked like...PRE-POLISH
155726_170899119595595_100000265241216_491731_8327139_n.jpg

163881_183927098292797_100000265241216_589147_1071743_n.jpg

162830_183927238292783_100000265241216_589148_4032641_n.jpg

163957_183927384959435_100000265241216_589149_6079978_n.jpg

166535_183927491626091_100000265241216_589150_2721467_n.jpg

167108_183927618292745_100000265241216_589151_1818990_n.jpg

165189_183927768292730_100000265241216_589152_1997928_n.jpg

168523_183927938292713_100000265241216_589153_4194726_n.jpg

I apologize in advance for the dirty car....there was no way in hell I'm washing it in 30 degree weather with a 15 mph wind.
 

oatburner99

Member
Established Member
Joined
Jan 15, 2011
Messages
199
Location
Temple, TX
well got rid of the big and littles to pay for new tires that are going on these:

IMG_9857.jpg

IMG_9856.jpg

IMG_9862.jpg


IMG_9861.jpg


These should show up Monday....
Nitto NT555's
fvpjlkxfopxu.jpg
 

oatburner99

Member
Established Member
Joined
Jan 15, 2011
Messages
199
Location
Temple, TX
Got some more goodies today.....wife helped...LOL
IMG_9865.jpg


Found a little monkey taking up residency:
IMG_9867.jpg


IMG_9869.jpg


IMG_9870.jpg


IMG_9871.jpg


Little bit mo meat
IMG_9872.jpg


Got almost all the parts I need for my 5lug conversion:
IMG_9885.jpg
 

oatburner99

Member
Established Member
Joined
Jan 15, 2011
Messages
199
Location
Temple, TX
Well I'm just a little bit closer.....here's something for ya'll to chew on.....wheel setup will be going on this weekend :p

IMAG0035.jpg


IMAG0034.jpg


IMAG0033.jpg


Pics will be posted as soon as I get more :p
 

oatburner99

Member
Established Member
Joined
Jan 15, 2011
Messages
199
Location
Temple, TX
Well got the wife to take pictures of the coupe after the 5 lug swap. She's not happy with the pictures at all, so we're going to try again tomorrow. Anyway here's the ones she took.
Camera= Canon Rebel XTI
ry%3D400

ry%3D480

ry%3D480

ry%3D480

ry%3D480

ry%3D480

ry%3D480

ry%3D480

ry%3D480

ry%3D480

ry%3D480

ry%3D480

ry%3D480


Car is going to paint shortly...and eibach's are in it's VERY near future...4x4 option was made more obvious after the wheels swap...
 

oatburner99

Member
Established Member
Joined
Jan 15, 2011
Messages
199
Location
Temple, TX
Well this mod if finally done. Didn't take too many pictures. I read thread after thread about this mod. Some people said do it this way, other's said this way. This is how I did mine. Pretty straight foreward if you ask me.

Dirty Engine Bay
264437_224529257565914_100000265241216_887384_6022224_n.jpg


As some of you have read you MIGHT have to notch out your alternator bracket. I had to on mine. Took a die grinder and dremel to grind mine down a bit. I borrow the pictures from another thread so you can see what you need to do:
BEFORE
251060_224528630899310_100000265241216_887375_7313853_n.jpg

AFTER
259837_224528600899313_100000265241216_887373_1633496_n.jpg


The top bolt hole on the fox is threaded (3/8) if I remember correctly. With the 3g alternator, you can either put in a helicoil, or you can do what most people do and go get a 2in 3/8 bolt,lock washer and nut to bolt up the top of the alternator. The bottom mount retains the factory bolt
265045_224529137565926_100000265241216_887383_2528626_n.jpg


New 4gauge power wire going from the alternator to the start solenoid. Some threads were different than other's here. Some said put a waffle fuse, or a fusible link on your new hot wire going to the solenoid. Some said close to the alternator, some said close to the start solenoid. I chose to put it close to the alternator. Well after some looking around (2hrs) No-one around here had a fusible link. So I ended up putting a 140 Amp Circuit breaker in. 4gauge in, 4 gauge out. This way if something goes wrong and I blow a fuse I'm not paying $5 a fuse.

New 4 gauge wire:
251123_224528977565942_100000265241216_887382_7652292_n.jpg


Circuit Breaker:
252858_224528697565970_100000265241216_887379_29198_n.jpg

Spliced Stator wire:
260119_224528860899287_100000265241216_887381_172551_n.jpg

Belt Clearence:
264041_224528677565972_100000265241216_887378_5844421_n.jpg


That's pretty much it. Only other problem that I ran into was the pulley that was on my stock Fox 75 amp alternator was not the same size that was on my 3g alternator.My belt that I had wasn't big enough. So I ended up just changing out the belt.

This mod is leading up to this:
Taurus Fan
261215_224528657565974_100000265241216_887377_2889836_n.jpg


Picked up thisNew Shifter knob, with a "modified shift handle" also.
263891_224528650899308_100000265241216_887376_6136891_n.jpg
 

oatburner99

Member
Established Member
Joined
Jan 15, 2011
Messages
199
Location
Temple, TX
Ok so after reading a RETARDED amount of threads all over the interwebs, I figured I'd tackle this mod.

Installation of a Early 90's model 2 speed Taurus electric fan on my 90 Notchback.

Parts:
Taurus Fan:
outside.jpg


Hayden Fan Controller:
3647.jpg


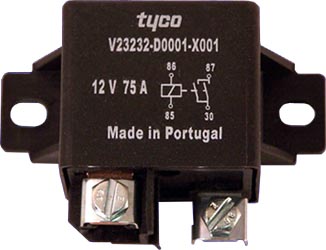
75 Amp Relay :
75AmpRelay.jpg


40 Amp female fuse:
A15927-2T.jpg


Radiator zip ties:
images


10ft of 8 gauge wire
10ft of 12 gauge wire
Butt splices
Ring Terminals
Zip Ties
Electrical tape

Ok so I picked up my taurus fan for 28 bucks at our local wrench a part. The weekend before I picked up my 3g alternator for 28 bucks also.
Anyway, Here is my horrible wiring diagram, with my chicken scratch writing. Before I did anything, I wrote this down.
264678_233163616702478_100000265241216_897109_2993132_n.jpg


Had a few spots where I just couldn't figure out. The write ups that are on the net vary so much, that you don't know who is right/wrong blah blah blah. So after a call and
long chat with a professional who doesn't do this for a living, finally got things ironed out. So first I did the wiring for the fan itself.
268339_233164403369066_100000265241216_897128_6133000_n.jpg

Installed my 40 amp fuse:
268594_233163736702466_100000265241216_897112_3895499_n.jpg

269099_233164330035740_100000265241216_897127_4214412_n.jpg

Installed my 75 amp Relay:
263785_233164136702426_100000265241216_897124_2865577_n.jpg

Grounded the relay:
261626_233164246702415_100000265241216_897125_5114829_n.jpg

264591_233163653369141_100000265241216_897111_2826914_n.jpg

Now that that's all installed, time to rip out the old stuff. Pulled out the mechanical fan/clutch/shroud and overflow bottle. Reinstalled the 4 water pump bolts back
into the pulley.
Like every other write up, most talked about using weather stripping. I went the same route. 3/8 x 1/2 roll of weather stripping. I'm going to redo
mine. I think that I can do something better. But this will get me by for right now. The bottom of the fan fit's nicely into the bottom (factory) shroud
clips. But leaves you scratching your head for securing the top. Some write up's had you flip the fan upside down, and trim this piece off and
grind here. I didn't want to do that. So I mounted it the way it was stock. Went to the parts store and got some radiator pull through zip ties for the top
install. Talk about a pain in the ass. I would strongly recommend that you pull your radiator support arms (that hold the radiator in place) off so you can
lean the radiator and fan assembly forward so you can tighten up the retainers. So I installed the fan:
264771_233163860035787_100000265241216_897114_280435_n.jpg

270450_233163953369111_100000265241216_897115_3918326_n.jpg

265023_233163640035809_100000265241216_897110_5528598_n.jpg

The picture above also show's where I mounted my controller. Figured I'd keep it there, that way I could adjust it if need be. Didn't really
have any other place to put it. All in all it worked out pretty good.

Fan installed:
270652_233163800035793_100000265241216_897113_6964943_n.jpg


For the overflow bottle, I still need to work on that. But for the time being I have two of the radiator pull through ties holding it on to the radiator. Hopefully
I'll make something out of sheet metal that will support it on the bottom.

The controller install was pretty self explanatory, I chose to only use the high speed side on the taurus fan. Flow's just fine and keep's my car @ 190 degree's with the
a/c on max and it's 105 outside. Pay attention to color wire's and look really hard at the factory wiring and where you going to tap into. I ended up wiring the fan the wrong
way and it was blowing air into the radiator instead of pulling. I missed the iddy biddy red strip on the wire. I tried to shrink wrap all my connections, some of them I just didn't
have the right size, so I made due with what I had. One note, as far as how to wire up the controller's 12v constant hot, and 12v "KEY ON" I didn't want my fan to run after I have
shut the car off. Things happen and mechanical/electrical parts can crap out. So I wired my controller's 12v constant hot and 12v "KEY ON" hot together to a 12v "KEY ON" source.
Which ended up being the PURGE SOLENOID connector. Both wire's are black so your going to have to figure out which wire is hot and which is ground.

Picture of purge solenoid (borrowed from another forum) which is located on the passenger side below the airbox, and inboard of the frame rail. you can't miss it.
solenoid01.jpg


The rest is a piece of cake. hope this helps, like I said there are SOOOOOO many write up's out there, and it can get kinda overwhelming on which one to do.
Any questions/suggestions lemme know. This is a rough install. I want to dress the wiring up better, seal the shroud on the radiator better....so by no means is
this completely done, but then again when is our mustang projects EVER done! ;D
 

oatburner99

Member
Established Member
Joined
Jan 15, 2011
Messages
199
Location
Temple, TX
Well went to the track last night. Track prep was lacking as usual. Next track night is going to be at Lonestar Motorsports Park, Home to Hennessey Performance. Alot better facility so I've been told. Anyway here's my times....went from a 14.7 last time out, to a 14.3, but still have alot of practice to do. Seriously lacking in the reaction time department, Uploading pictures and video now...in the meantime here's the times (keep in mind this is on street radials also:

1st Pass
Reaction=.5010
60ft-2.53
1/4=15.46
mph=94.70

2nd Pass
Reaction=.8766
60ft=2.26
1/4=14.51
mph=95.08

3rd Pass
Reaction=.5745
60ft=2.28
1/4=15.30
mph=91.26

4th Pass
Reaction=.1138
60ft=2.27
1/4=14.73
mph=94.24

5th Pass
Reaction=.5930
60ft=2.50
1/4=14.38
mph=90.58

6th Pass
Reaction=.4371
60ft=2.31
1/4=14.64
mph=95.28

7th Pass
Reaction=.4094
60ft=2.35
1/4=14.73
mph=95.73

8th Pass
Reaction=.3655
60ft=2.35
1/4=14.49
mph=96.65

9th Pass

Reaction=.6634
60ft=2.557
1/4=15.1
mph-95.79

10th Pass=
Reaction=.8040
60ft=2.32
1/4=14.52
mph=95.79

11th Pass
Reaction=.8094
60=2.32
1/4=14.52
mph=96.26

Pictures and video coming....as far as times...I did a 14.7 last time I went out...so making some forward progress with a 14.3 Still my times are all over the place...need to get consistent.

My first run of the night:
310465_260183017333871_100000265241216_1010567_8036977_n.jpg


Old Iron, vs new Iron:
298315_260183064000533_100000265241216_1010568_2422310_n.jpg


Didn't lose to bad:
308980_260183094000530_100000265241216_1010569_4584012_n.jpg


312219_260183144000525_100000265241216_1010570_91305_n.jpg


Going for another run:
294817_260183167333856_100000265241216_1010571_7115194_n.jpg


Staging:
308515_260183577333815_100000265241216_1010581_148131_n.jpg


310462_260183607333812_100000265241216_1010582_1011453_n.jpg


320626_260183687333804_100000265241216_1010584_4966458_n.jpg

Last Run:
301370_260183774000462_100000265241216_1010587_2294149_n.jpg
 

oatburner99

Member
Established Member
Joined
Jan 15, 2011
Messages
199
Location
Temple, TX
Alright no more 4 wheeling for the notch. Picked up a set of Saleen Racecraft springs, and me and my buddy Justin put them on this morning. Went on with no problems. Only worry that I had was that I have a REALLY REALLY steep driveway, and I was worried about scraping while trying to get the car in the garage. But I squeaked by. Overall the springs feel awesome. The car handles like it's on rails (in combination with the subframes) but the ride isn't bone jaring or beat you to death. Very happy with the outcome. Only thing I've got to work out a little more is roll the fender lips. Still rubs on the tire, in the front and the back. Easy enough fix. Excuse the cell phone pics, the sun was STUPID bright early this morning which caused the glare. Here's some pics:

Springs:
310466_267290559956450_100000265241216_1038454_1679654_n.jpg


Before the spring install (at Reborn's house)
313022_267286516623521_100000265241216_1038432_371669_n.jpg


298997_267286636623509_100000265241216_1038433_4818556_n.jpg


307792_267286769956829_100000265241216_1038434_8076684_n.jpg


Stock vs Saleen's
313762_267287029956803_100000265241216_1038437_6702122_n.jpg


Out with the old:
300017_267287243290115_100000265241216_1038439_6105015_n.jpg


All done:
317262_267287346623438_100000265241216_1038440_1962141_n.jpg


All installed got glare? :
317647_267287526623420_100000265241216_1038442_5471021_n.jpg


307932_267287706623402_100000265241216_1038443_5745055_n.jpg


308682_267287823290057_100000265241216_1038444_6404434_n.jpg
 

oatburner99

Member
Established Member
Joined
Jan 15, 2011
Messages
199
Location
Temple, TX
So here's a little update (sorry been working alot and have no life)

Just a quick picture of the car lowered again, better than the sucky phone pictures.
300932_293101554042017_100000265241216_1142772_1758002616_n.jpg

313333_293101707375335_100000265241216_1142775_2054277557_n.jpg


Main news, I picked up 1 other polished cobra wheel (already had 1 spare) so I can mount some Drag radials on them, and not tear up my nitto's when I go to the track. Maybe this will get me to the track more often too lol...
309761_293101640708675_100000265241216_1142773_85245026_n.jpg

Picked these up as well, although now that I have my other cobra wheel, these will be up for sale shortly:
381517_293108060708033_100000265241216_1142782_137224416_n.jpg

317282_293108124041360_100000265241216_1142783_1956888336_n.jpg

312924_293108220708017_100000265241216_1142784_834294223_n.jpg


car needs some love, I picked up the door to body weatherstripping kits from LRS last weekend, need to get those changed out, before it starts raining. Thats about it....I'll post up more when I get it :)
 

oatburner99

Member
Established Member
Joined
Jan 15, 2011
Messages
199
Location
Temple, TX
Little update,

So I started to notice that the car was running a little bit warmer than normal. Found out my water pump was seeping out of the weep hole. In my garage the floor has an epoxy coating on it, which makes leaks really noticeable. That is if you don't have carpet down underneath your car (like I did) and didn't notice it leaking.

Well it got to the point where I would fill it up in the morning before work, drive to work (8miles) drive home and the radiator would be almost empty.
So I picked up a new Ford Racing water pump, new thermostat, new gasket's and ARP's waterpump bolt/stud kit from LRS. Luckily for me (with the help of a knowledgeable friend, not one bolt busted off. Had 2 that were really questionable. Like as your trying to loosen the bolt, it kind of has that "dead" feeling to it, and you start thinking "oh ****, please don't break....please don't break." Well the praying worked, no broken bolts. Found that it was the original water pump that came on the car. 21 years old. Not bad :) Anyway it finally let go between the shims and the timing cover gasket. Here's a couple of pics:
Just a lil leak:
387801_321681134517392_100000265241216_1234216_1442829376_n.jpg

374923_321681184517387_100000265241216_1234217_1951540194_n.jpg

Out with the old, prepped and ready for the new one:
390131_321681217850717_100000265241216_1234218_965914901_n.jpg

FAIL:
378985_321681254517380_100000265241216_1234219_344258327_n.jpg

USED plain and simple (147,000 mile water pump)
391942_321681281184044_100000265241216_1234220_671077094_n.jpg

Old and new:
383793_321681304517375_100000265241216_1234221_329918528_n.jpg

Buddies water pump bolt:
376977_321681447850694_100000265241216_1234225_594123849_n.jpg

390567_321681484517357_100000265241216_1234226_1571075279_n.jpg

390386_321681537850685_100000265241216_1234227_1414638491_n.jpg

All Done!
381552_321681557850683_100000265241216_1234228_223642865_n.jpg

ARP studs/Bolts and new bypass hoses :)
387387_321681597850679_100000265241216_1234229_732500440_n.jpg


Coming up next is this:
386442_318480874837418_100000265241216_1225742_1416332905_n.jpg

180741_189049344447239_100000265241216_621946_6863995_n.jpg

179044_189049497780557_100000265241216_621947_1537630_n.jpg

180823_189049624447211_100000265241216_621948_5911382_n.jpg
 

oatburner99

Member
Established Member
Joined
Jan 15, 2011
Messages
199
Location
Temple, TX
Noticed this:

BBK longtubes 2.5 on the ball and socket are actually 2.25.
389890_329907950361377_100000265241216_1266568_959687253_n.jpg


Then the ports on the flange have big welds inside. Plan is to smooth them out:
381806_329908180361354_100000265241216_1266569_1554846251_n.jpg


Tools of destruction, diamond cut rotary bits
378071_329908550361317_100000265241216_1266571_1944500088_n.jpg
 

oatburner99

Member
Established Member
Joined
Jan 15, 2011
Messages
199
Location
Temple, TX
So finally got a little bit of work done. I've been procrastinating for some reason. So I finally got off my butt and got some work done.

Spent today working on my Explorer Gt40 upper intake. This thing looked like it was set on fire and beat with a wet chain. So I gave it a little love today:

Got started with the paint stripper:
393861_350343221651183_100000265241216_1332433_2082083332_n.jpg


430979_350343288317843_100000265241216_1332434_177620799_n.jpg


420933_350343324984506_100000265241216_1332435_1827433518_n.jpg


405782_350343741651131_100000265241216_1332437_495201803_n.jpg


All cleaned up ready for primer:
402303_350343791651126_100000265241216_1332438_1098909624_n.jpg


419549_350343821651123_100000265241216_1332439_1064786834_n.jpg


426950_350343891651116_100000265241216_1332440_1272298346_n.jpg


424242_350343938317778_100000265241216_1332441_55838557_n.jpg


403357_350343991651106_100000265241216_1332442_1583567782_n.jpg


1st Copy of Primer:
430693_350344031651102_100000265241216_1332443_1654005911_n.jpg


2nd Coat:
394000_350344084984430_100000265241216_1332444_1392366593_n.jpg


3rd Coat:
393988_350344134984425_100000265241216_1332445_338510526_n.jpg


Final Coat:
418271_350344164984422_100000265241216_1332446_241615029_n.jpg


Lower fins prepped:
397144_350344214984417_100000265241216_1332447_630012069_n.jpg


422153_350344248317747_100000265241216_1332448_170976833_n.jpg


409109_350344291651076_100000265241216_1332449_578065202_n.jpg


Plan is to Paint it black, clear it over and polish up the intake plate. Letting the primer dry and then on to the black :)
 

oatburner99

Member
Established Member
Joined
Jan 15, 2011
Messages
199
Location
Temple, TX
Well it's just in primer, but here's the first coat:

405803_361238693894969_100000265241216_1362455_272372910_n.jpg

and I FINALLY found one of these...my god you'd think these things were made of gold or something:
421576_360307383988100_100000265241216_1360196_1511738406_n.jpg


and these new center caps were given to me by a good friend, cause she's just that cool!
426477_358327124186126_100000265241216_1355339_106252849_n.jpg

429356_359746777377494_100000265241216_1358513_1860077395_n.jpg
 

oatburner99

Member
Established Member
Joined
Jan 15, 2011
Messages
199
Location
Temple, TX
Well these showed up today....the first of the parts wave landed on the home front :)
421351_367190993299739_100000265241216_1380204_415466540_n.jpg


Trick flow bushings should be here shortly....come on mail man LOL

419304_367805839904921_100000265241216_1381875_974566878_n.jpg
 

Users who are viewing this thread


Top