The 69 Mustang - It better run this year...

Ackbar00

The Peoples Choice
Established Member
Joined
Oct 28, 2004
Messages
425
Location
Dayton, OH
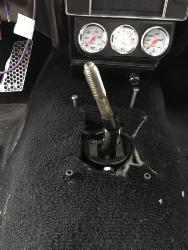
Well. I got SUPER lazy over the winter. Just really did not do much of anything, so time to get back at it. I expect to be driving it this year baring any major issues. So, here we go...

Pretty much how I left it
iZJiNwe.jpg


First up was the clutch cable. Everything I heard from Modern Driveline was it would not work with LT headers. And they are right, the cable sits right on it as I showed earlier. So My plan to wrap the cable and the header looks like it will work. Nothing seems to be in a bind and Ill be damned surprised if that thing gets burned.

4p2V19S.jpg


With the header installed.

rz2aWgK.jpg


Passenger header installed

cC7DXEg.jpg


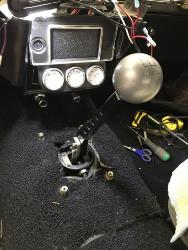
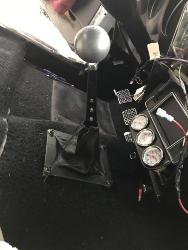
Wiring. Finally getting it sorted out (Regardless what the pic shows). Charged the battery a bit and tested it key on, got my MSD box to light up, so I must be on the right path.

aXxyLJ7.jpg


Broke my first part. Was putting the temp gauge probe in and the fitting snaped. Lucky was able to back out pretty easy

Q9TnQNO.jpg


Test fitting the fox fan. Will use it for now, will prolly change to an electric by the end of the year.

QPAXo2s.jpg


Driveshaft is to long. Working with a local shop to sort that out.

PRfnvpA.jpg


Got the carb all sorted out. Fuel, linkage, wiring, etc.

ZqNFqEJ.jpg


And how she sits. Have PS, alternator, and cooling all sorted now. Next steps are getting a belt on, the driveshaft and getting the distributor in.

yqhwMlV.jpg


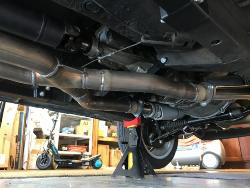
Hopefully getting closer to firing it. Pretty sure this is the exhaust I am getting:
Magnaflow 15816: Street Series Cat-Back Exhaust System 1967-1970 Mustang 289/302/351/390/428 V8 | JEGS

Should sound pretty good. I was thinking of side pipes, but pretty sure my subframe connectors would be in the way. This should be quieter and look better.
 

Ackbar00

The Peoples Choice
Established Member
Joined
Oct 28, 2004
Messages
425
Location
Dayton, OH
Progress. How aggressive are the heads and cam on that 302?

1.90 Edelbrock Performers and a "B" cam. I am looking for 325 Wheel HP. I had a similar Fuel Injected setup on my old 93 and with a stock cam it made 300 wheel.

Combo is a 90 302
Above mentioned parts, carb
Convert from a C4 to a T-5
Send It.

Here are the prior Threads of me working on the car:
https://www.svtperformance.com/threads/finally-back-in-a-mustang-a-69.1109017/
https://www.svtperformance.com/threads/the-69-mustang-2018-edition.1160707/#post-16025981
 

Ackbar00

The Peoples Choice
Established Member
Joined
Oct 28, 2004
Messages
425
Location
Dayton, OH
Made some big progress today. It is now ready to start and tune on the carb. My friend that is helping with that was out, but I was able to get it fire a few times.

Got my new aluminium driveshaft back. Everything seemed to fit good when I installed it.
BDcxiXE.jpg


Test fitting the raditor and my old upper brackets. They no work.

kky8aob.jpg


I had a problem with my lower radiator hose hitting my fuel pump. I can only assume the hose I had originally sourced was wrong, because it would have rubbed a hole in it. So got some silicone couplers and an 90 degree bend and made a new hose.

C0Xnt28.jpg


R7Tsgp9.jpg


Got the fan and radiator overflow all sorted and installed.

Bpmgk8U.jpg


And here it is. I ended up getting the 69 upper radiator bracket. Had to modify it some, but I think it turned out pretty good.
unjUBVU.jpg


TzuJadF.jpg


Started trying to get the shifter setup worked out. I have an idea of what I am going to do now, so that meant order more parts. So that will be for next time.
 

CobraBob

Authorized Vendor
Established Member
Premium Member
Single Barrel Sirs
Joined
Nov 17, 2002
Messages
105,488
Location
Cheshire, CT
Nice project '69 Mustang. Great year!

How do you like the Holley Brawler (Street) carb? What size is it? 650CFM?
 

Ackbar00

The Peoples Choice
Established Member
Joined
Oct 28, 2004
Messages
425
Location
Dayton, OH
The brawler has good reviews, but cant speak to it yet as we have not really started it. It is a 650

For a shroud? Nothing. I plan on replacing it with a electric fan later. I imagine it will be fine for now.
 

Ackbar00

The Peoples Choice
Established Member
Joined
Oct 28, 2004
Messages
425
Location
Dayton, OH
The shifter setup.


So I had lots of issues. First I bought a Lokar plate, it sucked. Next i bought the leather boot for the 69. it matched up with the bolts holes already in the trans tunnel. Well, that bastard would not sit over the shifter, it sat right on top of it. Its base would need to be clearanced and I was convinced it would tear the leather. I cut some holes in the carpet and ran some bolts through them trying to make that work.


CgU7YUF.jpg


The more I played with that, i realized I would be putting the bolts in blindly and nothing was securing the Lower shift boot. What to do....


After an obscene google search, i found these threaded inserts:


s-l500.jpg


With these, I could thread into the existing holes, use a washer to hold the lower shift boot, and space it up, so that the leather boot would secure on top of the shifter. Winning!


2EonZQi.jpg


Next, poke the inserts up through the carpet. No more blind man feeling his way around in an orgy.

4pmWReX.jpg


Next up was the shifter handle and the knob. i tried to use the fox handle, and it was just to far forward to be comfortable. Especially in 1 and 3 gear. So I found this handle on EBay. Feels like a Nascar now lol. the knob, i was just going to get a black Hurst, but this grey one from Twisted Shifters caught my eye, so I went with it.


04sdp9h.jpg


And done. Used some stainless washer and some hex bolts to finish it off. Still need to trim the tie strings a little, but it feels pretty good and turned out killer.


lKfz6Y8.jpg


[URL='https://i.imgur.com/13T33B1.jpg%5b/img']https://i.imgur.com/13T33B1.jpg[/img[/URL]]


[IMG]http://[URL='https://i.imgur.com/13T33B1.jpg%5b/img']https://i.imgur.com/13T33B1.jpg[/img[/URL]]
 

Attachments

  • CgU7YUF.jpg
    CgU7YUF.jpg
    48.9 KB · Views: 134
  • s-l500.jpg
    s-l500.jpg
    22.1 KB · Views: 152
  • 2EonZQi.jpg
    2EonZQi.jpg
    53.5 KB · Views: 133
  • 4pmWReX.jpg
    4pmWReX.jpg
    70.7 KB · Views: 127
  • 04sdp9h.jpg
    04sdp9h.jpg
    53.4 KB · Views: 137
  • lKfz6Y8.jpg
    lKfz6Y8.jpg
    59.3 KB · Views: 138
  • CgU7YUF.jpg
    CgU7YUF.jpg
    48.9 KB · Views: 142
  • s-l500.jpg
    s-l500.jpg
    22.1 KB · Views: 188
  • 2EonZQi.jpg
    2EonZQi.jpg
    53.5 KB · Views: 132
  • 4pmWReX.jpg
    4pmWReX.jpg
    70.7 KB · Views: 125
  • 04sdp9h.jpg
    04sdp9h.jpg
    53.4 KB · Views: 141
  • lKfz6Y8.jpg
    lKfz6Y8.jpg
    59.3 KB · Views: 137

Ackbar00

The Peoples Choice
Established Member
Joined
Oct 28, 2004
Messages
425
Location
Dayton, OH
So I got it to fire, then I ran into a few issues

Ok, first step was the water pump. It was leaking out of the bottom of it. Spent 60 seconds starring at it and said F it. Pulled it apart. On Fox Water pumps, there is a metal plate with a gasket to the pump body. I think that gasket was leaking. So I cleaned it all off and used plenty of Permatex instead. Gave it a good 24 hour cure and no more leaks. Still, was disheartening to spend that many more hours on something.


vNEps7x.jpg


I had to adjust the clutch cable some more. Its way to long winded to talk about what I did. Lets just say this kit is not all its cracked up to be and maintenance on it is a chore. Guess time will tell on it....


Next, I hated the Mustang script badges on the side. So I replaced them with black 2015 5.0 emblems. I was able to cover 2 of the 3 holes. IF I ever have the car painted or body worked, Ill have them filled in.


2BIqrhe.jpg


Was able to drive it out of the shop to the front under its own power. :)


3iphdZi.jpg


And I wrapped up everything under the hood (its back on as well).


ivQ6xoX.jpg


KiSApB8.jpg


It went on its maiden drive yesterday to have its exhaust put on and should be done sometime this week. It seemed to drive pretty good considering how deafening it was.
 

Ackbar00

The Peoples Choice
Established Member
Joined
Oct 28, 2004
Messages
425
Location
Dayton, OH
Ok. So here are the pics of the Magnaflow installed. The exhaust shop did a great job using existing hangers and not drilling a bunch of extra holes in the car. It REALLY made the car a lot quieter. (That’s a good thing). It does sound great and I’ll get of vid of here sometime in the future.


So the next issue. When I got home from the exhaust shop, I noticed my fuel pressure was bouncing around “0”. Thought that was a bit weird. One of the things I read, was the fuel lines could be clogged. They were the factory 69 ones, so I figured, why not. So I ordered the factory replacements. Right after I ordered that, I was like, why don’t I just order -6AN? The new fuel filter I ordered was a Russell and it had -6 ends. So I bought a cheap -6 kit from Amazon. I figure Ill send back whatever one don’t work. Lol.


So first up, the -6AN. Looks nice. The first fitting I try to put on it, it frayed worse than any other hose I have ever used. I mean, it was plain shit. So that went back to Amazon. Guess that means the replacement 3/8 gets the nod. It installed pretty good. Had to teak a few things to make it work with the Russell filter and even put some heat wrap where it cross over the tailpipe.


Start the car and take it for a drive. Feels fine, but when I get back, the Fuel Pressure is still around “0”. Like WTF? On the vintage forums, the swear up and down that these liquid filled gauges don’t work right when they get warm. I ran my inferred temp heat gun on it and its only around 140*. And I never remembered my turbo car’s 0-100 doing it. But hey, a new one not liquid filled was $12, ordered that. It came in, replaced, took for a good drive and what do you know, the FP was right at 6 psi after the drive. I’m still not 100% convinced that was it, so I will have to keep testing. Going to see about getting it to the dyno and do some tuning on it here soon. It’s pretty gassy smelling and I only have 10* of timing in it.
 

Attachments

  • CStH16h.jpg
    CStH16h.jpg
    78 KB · Views: 218
Last edited:

CobraBob

Authorized Vendor
Established Member
Premium Member
Single Barrel Sirs
Joined
Nov 17, 2002
Messages
105,488
Location
Cheshire, CT
Well, you certainly too the logical progression of possible causes. Hopefully that FP gremlin is gone for good. Keep us posted. Soon enough you'll be enjoying regular use on the street.
1635563105290246~c5_100x100.jpg
 

Ackbar00

The Peoples Choice
Established Member
Joined
Oct 28, 2004
Messages
425
Location
Dayton, OH
Been a little while since my last update. First update is the best one :)


I converted the seats last year to a set from a 2004, mainly because I got a killer deal on the fronts. $40. Wasn’t super keen on the tan, but I found a rear seat in the junkyard for $37, and they were LIGHTYEARS ahead of what was in it. I thought it looked nice, but I have been keeping my eye out for something else since then…

Old Seats:


2DVNfuA.jpg


NcnCs66.jpg


So on Stangbangerz, someone posted a 95 roller up for sale. Said it had some nicer black leather seats in them. Saw some pics and asked how much. $50 for the front and rear!! Cut me a hell of a deal. Rears are from an 04, but the front are from an 05 Mustang. They were a bit more tricky to fit the 69 rails, but with spacers and a drill anything is possible.


New Seats. SOOOOOOOO much better.


ASTzdfr.jpg


BMmkPPR.jpg


Funny part of the story. So the 2005 Mustang seats have the leaver on the back of them up high. I guess it’s a common problem for the plastic lever to break. These were. The fix, is to get them in metal. I got a set from UPR, $45 shipped, almost as much as I paid for the seats, lol.


Next, the Fuel pressure issue seemed to sort itself out s the gauge seems to be reading correctly, so that was nice.

So right after the seats got installed, I took the car to work for the first time. Drives like a champ on the highway! 80MPH is 2000 RPM, its awesome. On way home, I hit some back roads and lay into the car for the first time. By the time I hit 3rd gear, the clutch pedal feels all funny. Get it home quick and let it cool down. Come back and it is major stiff, so I work it a lot and it gets better. So I call modern Driveline. In short, he said it was heat. Told him about all the preventive steps I took and talks to me about heat transfer. Since the cable was sitting on the blanket, he was positive that was the issue. So how to fix.


He said any shorty header will work. Now the main reason I went with my Tri-Y’s was they were cheap and I had the slave cylinder setup from them. But if you remember, that didn’t work and they had me switch to the cable setup. They would not warranty. Kind of pissed me off, but I figured it was ONLY $135. I hit my Vitality goals at work and got a $200 Amazon gift card, so that bought me a set of Headman Shorties. Painted them up pretty good, had the exhaust redone and back in business.


Yeah, gonna cause shifting issues….


nNOwz1s.jpg


Old Tri-Y’s. And that turbo blanket I used was all shades of jacked.


C3Gf0Pi.jpg


Headman Shorty Headers


qGt4MZA.jpg


qqbxQy6.jpg


Sounds the same, and I doubt I really lost any power.


Quick Rev’s dyno was down, so my friend that has helped build engines over the years helped my street tune the carb and played with timing. Car is a whole new animal, feels really good. Only thing we really need to do is I need to change the springs in my dizzy to get the timing to advance earlier. It’s a bit sluggish below 3000 RPM. I want to change the fan because I think it’s a bit ugly, but the car runs so cool. Not sure if I will or not. I also got a Raptor shift light, but do not have that installed yet

Last piece, I noticed my hood scoop was actually functional. It just had some Styrofoam shoved in the opening. Pulled that all out and got an Edelbrock lid to match my airfilter. Looks good now


PYVkPXo.jpg
 

CobraBob

Authorized Vendor
Established Member
Premium Member
Single Barrel Sirs
Joined
Nov 17, 2002
Messages
105,488
Location
Cheshire, CT
Nice progress! Your project is now moving along at a steady pace. The motor, with that exhaust, sounds awesome.
 

Users who are viewing this thread


Top