SN95 Rollercoaster

Real98roush

Well-Known Member
Established Member
Joined
Sep 11, 2013
Messages
501
Location
Las Vegas
Midday Saturday I was bored... went into the garage and put the car on jack stands. Grabbed the engine support and started pulling apart the front end

58f04eb5df378f6559c1fb1c98910963.jpg


The old junk
44b559db777589e430ef0db63ac6c6ba.jpg


MM K- member
Non-offset A-arms
03/04 Steering Rack
Spherical tie-rods
Solid Rack bushings
Oil filter relocation kit
Bilstein shocks with MM coil over kit
07de8e2ce47b9918c8a858323b35b43a.jpg


IG: @sn95mystic

SVTP: SN95 Rollercoaster
 

Real98roush

Well-Known Member
Established Member
Joined
Sep 11, 2013
Messages
501
Location
Las Vegas
Started with the oil filter relocation.
851853580b4c2b0f2dd0386cc28ddeb3.jpg


First time working with Fragola push lock fittings. What a pain! Failed to get the fittings in the first 2 attempts using motor oil and trying to muscle them in the tubing. Couldn’t get further than 75% of the fitting seated.

Boiled water put some grease on the fitting and got them installed.
f254012c7afe68fa2dcd8d38a3222538.jpg


If you use this method, let it sit in the water 3-4 minutes, pull the tubing out of the water (wear gloves) and ram the fitting in the tubing. Don’t stop until it’s fully seated. I stopped the first time and had to work really hard to get it fully seated.
b33e370fa4d0c722a1c506d061d9d760.jpg


56247b3a13e571680ef5d736401ab604.jpg

9a67a582f29ff247b7aeff616504cfe3.jpg
the kit moves the filter to the front above the drive side fog light.
7b8f00af54736dbbd4521161545ff627.jpg


IG: @sn95mystic

SVTP: SN95 Rollercoaster
 
Last edited:

Real98roush

Well-Known Member
Established Member
Joined
Sep 11, 2013
Messages
501
Location
Las Vegas
The car didn’t handle bad, the coil overs made noise, but I’m excited to see how it handles when I’m done because I found the motor mounts and ball joints were trashed.

Motor mount
11fb5e2309eddd901a6ef7326ada1dd7.jpg


Ball joint (both looked like this)
5bb143205f13617722f5b75db37d97d9.jpg


IG: @sn95mystic

SVTP: SN95 Rollercoaster
 
Last edited:

Real98roush

Well-Known Member
Established Member
Joined
Sep 11, 2013
Messages
501
Location
Las Vegas
3d859a0ca945efb99c615abb3e67f201.jpg

IG: @sn95mystic

SVTP: SN95 Rollercoaster
 

Attachments

  • 9ea4f10267ac92f6b8f1fe6dd8536656.jpg
    9ea4f10267ac92f6b8f1fe6dd8536656.jpg
    311.9 KB · Views: 236
Last edited:

Real98roush

Well-Known Member
Established Member
Joined
Sep 11, 2013
Messages
501
Location
Las Vegas
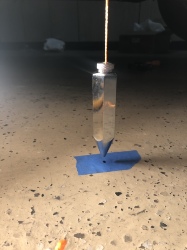
Replaced the motor mounts and bolted in the k-member. Set the rear points to square the k-member. Then called it a night

9ea4f10267ac92f6b8f1fe6dd8536656.jpg


178b70a02201c5ced0ce9a13ff7bca29.jpg


Found the easiest way to mark the point is to put a dot on the tape before putting the tape on the ground. Line it up and stick it directly below the plumb bob point. It’s critical that the points are set exactly the same. Using the rear control arm bolt, drape the string over the top and let it hang. You may have to bend some metal to ensure nothing is touching the string. If you hang the bob to the front of the bolt, you must do the exact same thing in the other side. The spec is within 1\8”, so take your time setting the points.


IG: @sn95mystic

SVTP: SN95 Rollercoaster
 
Last edited:

Real98roush

Well-Known Member
Established Member
Joined
Sep 11, 2013
Messages
501
Location
Las Vegas
Haven’t been able to work on my car after work due to poor lighting in the garage.

492295c1b0aeb15ffcd68f3bc2b54a1f.jpg


Got home from work on Friday and the doorbell rang. FedEx dropped a package. Figured it was something my wife ordered, but I noticed my name on the label :what’s in the box: a good friend sent me a gift...

e8631426b1dcfc9f0b55d6175c1be5ec.jpg


(6) 48” LED Lights. Plug style that daisy chain together like Christmas lights! So badass! Couldn’t be more grateful!

0294defb51af82275fe7be7361a904a8.jpg


Went out with the wife for Valentine’s Day dinner, so I didn’t touch the car. Like a kid before Christmas, I didn’t sleep well, because I was so excited to get into the garage and button up the front suspension.


IG: @sn95mystic

SVTP: SN95 Rollercoaster
 

Real98roush

Well-Known Member
Established Member
Joined
Sep 11, 2013
Messages
501
Location
Las Vegas
Saturday morning I rush into the garage to square up the k-member. While I was setting the front point I realized my jack stands were in between my front and rear points. :facepalm: I didn’t think about this when I initially started the project. Moved the jack stands to allow for measurements and reset all my points.

424b87c270217f741c22ba8114bc35f3.jpg


Took measurements and found I was in luck. Front to back was 1/16” proud on the drivers side and dead nuts side to side.

296a0ccf3552472d3e50fb5221c57718.jpg


Torqued the k-member, lowered the motor and torqued the motor mounts. Took measurements again to ensure nothing moved during the process. :allgood:

fd35fd79fb7e7815447f5707a083ecd6.jpg


IG: @sn95mystic

SVTP: SN95 Rollercoaster
 

Real98roush

Well-Known Member
Established Member
Joined
Sep 11, 2013
Messages
501
Location
Las Vegas
k-member, a-arms, and steering rack with solid rack bushings installed. Relocated the driver side brake line and ground that were in the way of the new k-member.
6d1f6dcfebb8b5779692ec4d79ba9776.jpg


The MM outer tie-rods require drilling the spindle to 5/8”. Needs to be done with a drilling machine or a press. Didn’t have either, so I went on a goose chase this afternoon.

Bought a cheap drill press at Harbor Freight but I was unable to secure the spindle.


IG: @sn95mystic

SVTP: SN95 Rollercoaster
 

96GT226410

Well-Known Member
Established Member
Joined
Mar 2, 2017
Messages
825
Location
Vernon, NJ
k-member, a-arms, and steering rack with solid rack bushings installed. Relocated the driver side brake line and ground that were in the way of the new k-member.
View attachment 1552280


The MM outer tie-rods require drilling the spindle to 5/8”. Needs to be done with a drilling machine or a press. Didn’t have either, so I went on a goose chase this afternoon.

Bought a cheap drill press at Harbor Freight but I was unable to secure the spindle.


IG: @sn95mystic

SVTP: SN95 Rollercoaster
Nice progress! I drilled out my spindle in a bench vise with an electric drill. I also had to open mine up to 5/8" for the MM bumpsteer kit.

Sent from my SM-N960U using the svtperformance.com mobile app
 

Real98roush

Well-Known Member
Established Member
Joined
Sep 11, 2013
Messages
501
Location
Las Vegas
Nice progress! I drilled out my spindle in a bench vise with an electric drill. I also had to open mine up to 5/8" for the MM bumpsteer kit.

Sent from my SM-N960U using the svtperformance.com mobile app

I smoked 3 $18 Dewalt drill bits so far. I’m going slow using oil. So frustrating

1880da6d0d0f9382c2d28d44d3511d85.jpg


What’s the secret?


IG: @sn95mystic

SVTP: SN95 Rollercoaster
 

Real98roush

Well-Known Member
Established Member
Joined
Sep 11, 2013
Messages
501
Location
Las Vegas
Called a friend for advice. He told me to come over if I want my problem solved. Lends me a reamer bit. Cut right through the spindle in less than 30 seconds

e54406b5a9d05dbc6b73cd9a6e885a12.jpg
aad91085022ec8ad3feb354fcec63c02.jpg
c5054bab8cbc3ae54b3ff567424c1a97.jpg


IG: @sn95mystic

SVTP: SN95 Rollercoaster
 

98 svt

Well-Known Member
Established Member
Premium Member
Joined
May 16, 2005
Messages
23,999
Location
Massachoooosetts

Real98roush

Well-Known Member
Established Member
Joined
Sep 11, 2013
Messages
501
Location
Las Vegas
Purchased used CC Plates but didn’t get the spacers.
130f84a9215b771e321a1d56de59b2d3.jpg


A little paint and fresh hardware.
b1c52565f81785a4e1cc222fe7509bcf.jpg


Went to Lowe’s and found some spacers I thought might work.

10b24a1258c3f61c5b1ac2978978518b.jpg


They were close but wouldn’t fit on the shock shaft, so I busted out my new favorite tool; the precision reamer! Fit on the shaft perfectly. Cut a few down to size and installed the coil overs

c6f2002faf733e042865bd270b715b61.jpg


The the bump steer
2b82b8abf60f659b1d2343c646528d48.jpg


IG: @sn95mystic

SVTP: SN95 Rollercoaster
 

98 svt

Well-Known Member
Established Member
Premium Member
Joined
May 16, 2005
Messages
23,999
Location
Massachoooosetts
Purchased used CC Plates but didn’t get the spacers. A little paint and fresh hardware. View attachment 1552647

Went to Lowe’s and found some spacers I thought might work.

View attachment 1552648

They were close but wouldn’t fit on the shock shaft, so I busted out my new favorite tool; the precision reamer! Fit on the shaft perfectly. Cut a few down to size and installed the coil overs


IG: @sn95mystic

SVTP: SN95 Rollercoaster


That reamer = tool of the week
 

Real98roush

Well-Known Member
Established Member
Joined
Sep 11, 2013
Messages
501
Location
Las Vegas
Bought a poor mans big brake kit a few years ago.

S197 calipers, 14” GT500 rotors, pads and FTR brackets.

Next to the stock Cobra brakes
c36d72156d7bfa95f36b7059298b551a.jpg


FTR bracket to raise the caliper up
2065f0f086b17ea63df390d5142f4a0d.jpg


Unfortunately the caliper was about 1/4” too low. The caliper bracket wouldn’t clear the rotor. Opened the bracket holes a bit. It allowed me to get the bracket on but it still sat on the rotor.
9983f690795cffdd5938e8942ccfb896.jpg

b58eda02af266cabae79d4211171df69.jpg


Cool in theory but wouldn’t work. Not sure if I got a bad batch.


IG: @sn95mystic

SVTP: SN95 Rollercoaster
 

96GT226410

Well-Known Member
Established Member
Joined
Mar 2, 2017
Messages
825
Location
Vernon, NJ
Bought a poor mans big brake kit a few years ago.

S197 calipers, 14” GT500 rotors, pads and FTR brackets.

Next to the stock Cobra brakes
View attachment 1552655

FTR bracket to raise the caliper up
View attachment 1552656

Unfortunately the caliper was about 1/4” too low. The caliper bracket wouldn’t clear the rotor. Opened the bracket holes a bit. It allowed me to get the bracket on but it still sat on the rotor. View attachment 1552657
View attachment 1552658

Cool in theory but wouldn’t work. Not sure if I got a bad batch.


IG: @sn95mystic

SVTP: SN95 Rollercoaster
Maybe grind down the bracket a little bit...?

Sent from my SM-N960U using the svtperformance.com mobile app
 

Real98roush

Well-Known Member
Established Member
Joined
Sep 11, 2013
Messages
501
Location
Las Vegas
All done with the front suspension! Next week I’ll get the SFC’s installed so I can install the TA & PHB. Did a shade tree alignment with strings and jack stands. It’s drivable, but needs a professional alignment. Tracks slightly right and the steering wheel is slightly cocked right. I assumed this would be the case with all new parts.
e7f264de8a1c47aa4c3c474294188c56.jpg
bf5f00338122efcd580eeb9cdd90b16a.jpg


IG: @sn95mystic

SVTP: SN95 Rollercoaster
 

Users who are viewing this thread


Top