You are using an out of date browser. It may not display this or other websites correctly.
You should upgrade or use an alternative browser.
You should upgrade or use an alternative browser.
Out of the ashes, a Phoenix is born (Boss 302 teardown and rebuild)
- Thread starter ford20
- Start date
So this weekend I went to go and replace my old brake cooling ducts. They had seen better days that's for sure. The wheel well liners had rubbed up against them for 18k miles (I think. I forget how many miles are on the damn thing) and caused the rubber liner to wear away and caused holes in the ducts which I'm sure isn't that great for brake cooling.
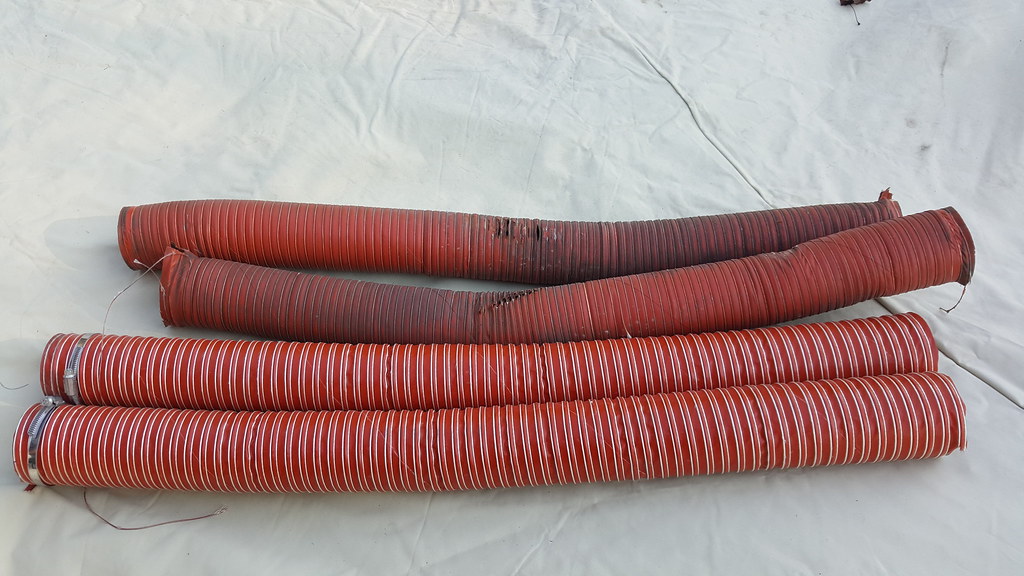
New ducts were cut to 35" and I put them in. As you can see, this is why the old ones had been rubbed to nothing.

So I cut the wheel well liner to give ample clearance so that this wouldn't happen again. I need to get some zip ties and zip tie the hoses to the wheel well liners to keep them in place. I have to say though getting them onto the cooling ducts was a major pain in the ass!
All nice and new now :clap:

I also got my braided clutch line installed as well this weekend. It was a fairly simple and easy thing to do. The little clip by the master cylinder was a pain to get out but still very manageable. Out with the old:
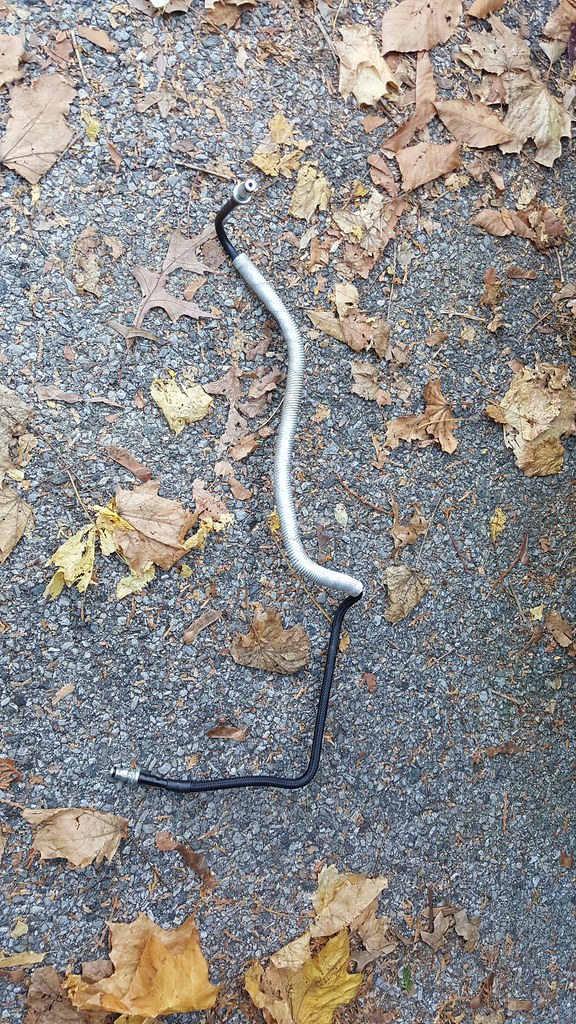
In with the new
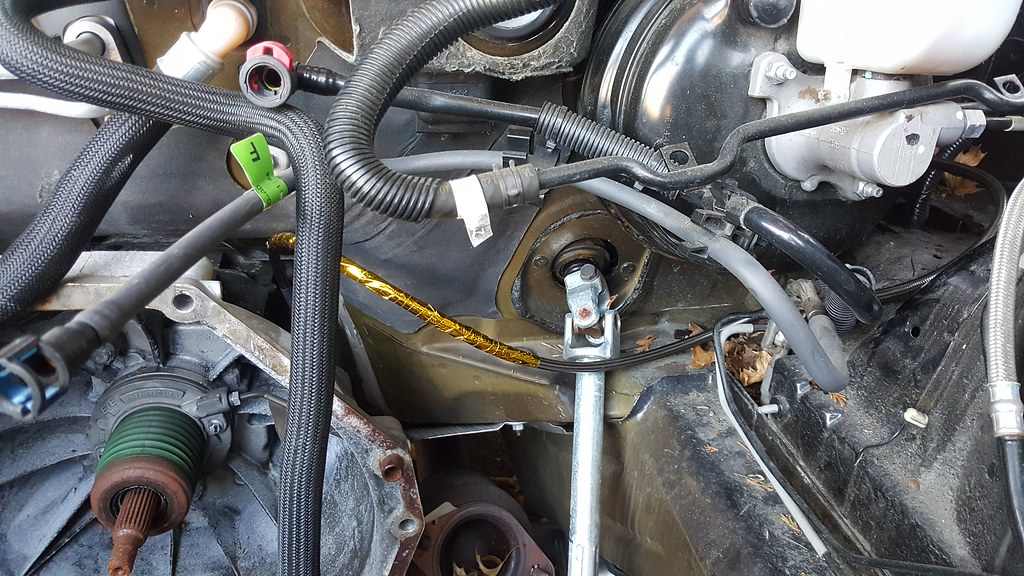
I had no idea what the metal surrounding the factory clutch line was so I figured it was either for heat resistance or for abrasion control so to speak so either way I grabbed some gold Heat Tape I had laying around and wrapped the line at the same point as the factory one was wrapped. Who knows if it will help or hurt but I figured why not, what's the worst that can happen.
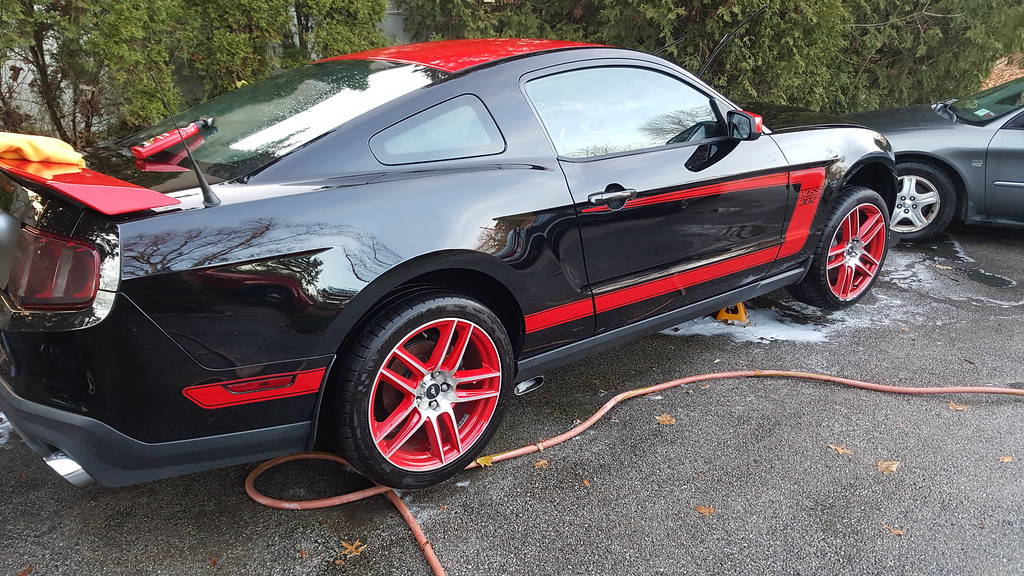
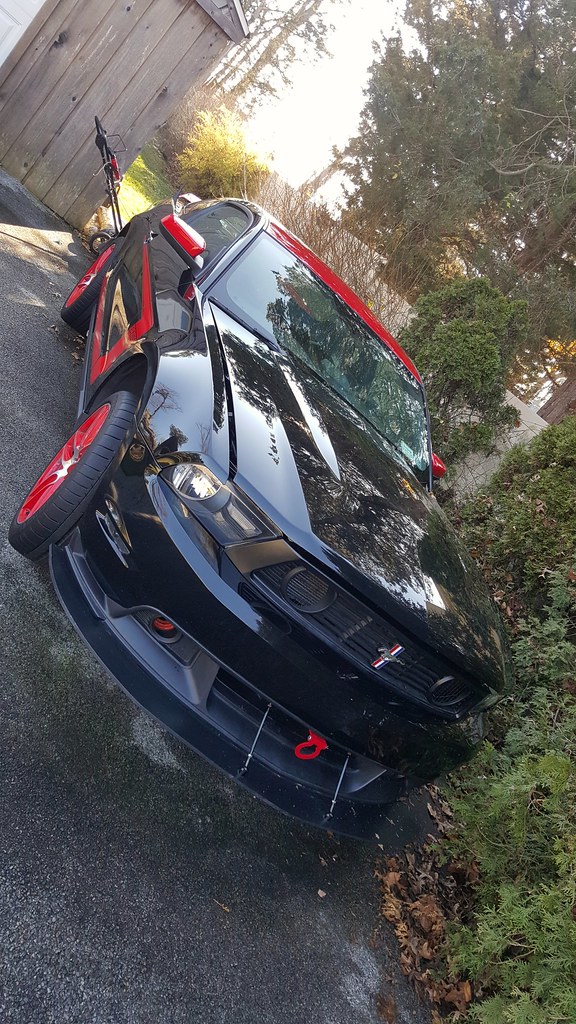
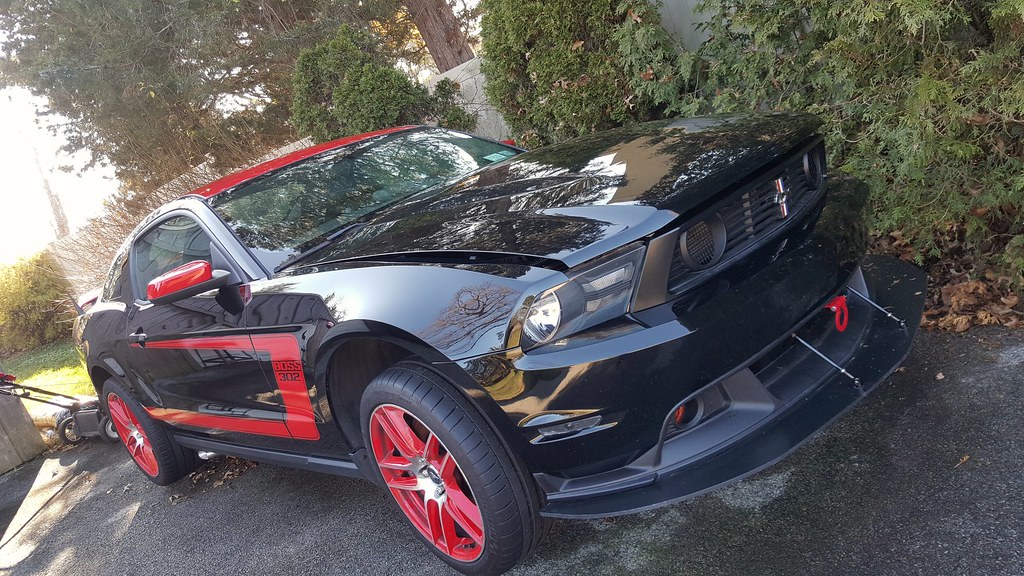
After that I cleaned the engine bay. As you can see, it was not at all pretty. So I ran some spray wax through that and cleaned it up all nice and nice. I then turned to the exterior and just washed it and gave it a quick claybar. I still have to do a quick spray wax to make it shine a bit more. Considering the fact that it has been sitting outside for the last year and 4 months I think it looks pretty damn good. You can see that it needs a correction when you get up close to it but hot damn it still shines pretty damn nice.
New ducts were cut to 35" and I put them in. As you can see, this is why the old ones had been rubbed to nothing.
So I cut the wheel well liner to give ample clearance so that this wouldn't happen again. I need to get some zip ties and zip tie the hoses to the wheel well liners to keep them in place. I have to say though getting them onto the cooling ducts was a major pain in the ass!
All nice and new now :clap:
Parts Used
- Pegasus Auto Racing High Temperature Silicone Air Duct Hose, Orange - 3621-3.00-6 FOOT
I also got my braided clutch line installed as well this weekend. It was a fairly simple and easy thing to do. The little clip by the master cylinder was a pain to get out but still very manageable. Out with the old:
In with the new
I had no idea what the metal surrounding the factory clutch line was so I figured it was either for heat resistance or for abrasion control so to speak so either way I grabbed some gold Heat Tape I had laying around and wrapped the line at the same point as the factory one was wrapped. Who knows if it will help or hurt but I figured why not, what's the worst that can happen.
Parts Used
After that I cleaned the engine bay. As you can see, it was not at all pretty. So I ran some spray wax through that and cleaned it up all nice and nice. I then turned to the exterior and just washed it and gave it a quick claybar. I still have to do a quick spray wax to make it shine a bit more. Considering the fact that it has been sitting outside for the last year and 4 months I think it looks pretty damn good. You can see that it needs a correction when you get up close to it but hot damn it still shines pretty damn nice.
Hi Ford 20:
I'll try this again,
Yes indeed she is looking very good. I am looking forward to reading about your new engine's performance once together and in the Dyno Cell.
Good luck on your project.
302 Hi Pro
I'll try this again,
Yes indeed she is looking very good. I am looking forward to reading about your new engine's performance once together and in the Dyno Cell.
Good luck on your project.
302 Hi Pro
Is there way to swap the lifters without taking the camshaft out?
Or removing cam caps and lift the camshaft lil bit and carfully swap lifters and follower?
Or removing cam caps and lift the camshaft lil bit and carfully swap lifters and follower?
Is there way to swap the lifters without taking the camshaft out?
Or removing cam caps and lift the camshaft lil bit and carfully swap lifters and follower?
The followers you can do it without removing the cams. I think there was a video a few years back of a guy doing it on a 2V but the lifters I don't think so. You would have to remove the cams to do that.
Any new info on your engine build?
What cam specs you went with?
What cam specs you went with?
I should be dropping off the engine to JPC next week to get them to take a look at it and see what if anything went wrong so hopefully it will be all done in around March or so or at least I am hoping haha.
As for the cam specs, they are RGR cams but I can't give out the information on the grinds as they are his and I don't want to give out some sort of propritary information.
As for the cam specs, they are RGR cams but I can't give out the information on the grinds as they are his and I don't want to give out some sort of propritary information.
Great progress! Can't wait to see the final product.
Subn great thread
I'm wondering if those bungs in the combustion chamber are for future direct injection ports.
Well, since the motor, I turned my attention to getting everything else ready for the car going down to JPC. I started with the VMP voltage booster (It is the same thing as a Boost-a-Pump except that Kenne Bell owns that name) and it is so stupid simple that even a caveman could do it. Once again, I had my helper with me once I pulled the trunk mat out of the car.
So I laid out everything for this install. As you can see there is not much to it.
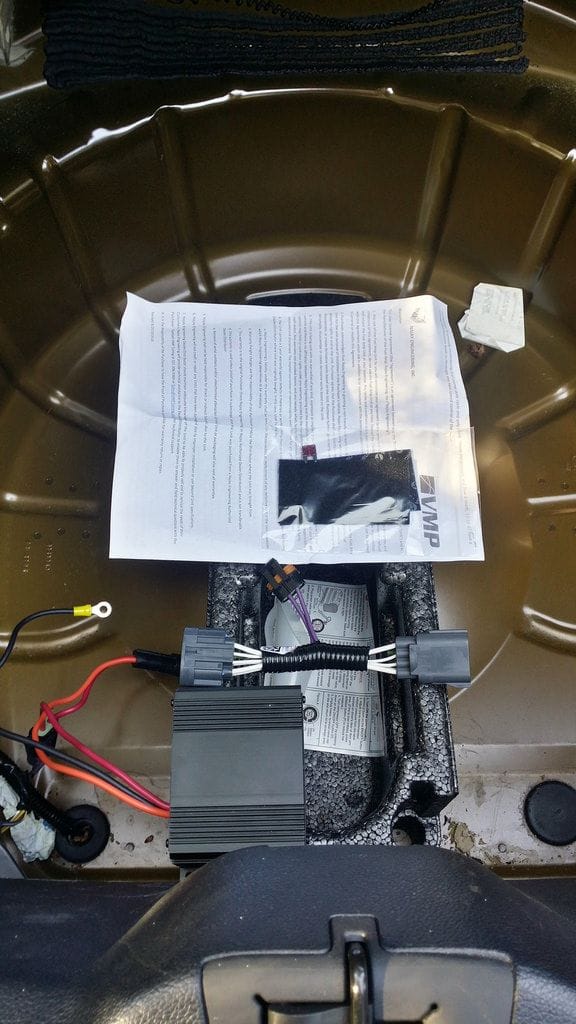
It was so simple, I used the adhesive strips and placed them on the back of the voltage booster and then attached it to the side of the tire well. I then disconnected the FPDM connection and plugged it into harness and then the harness into the voltage booster. I grounded the wire into the ground bolt that is sitting at right behind the factory plastic
trunk piece.
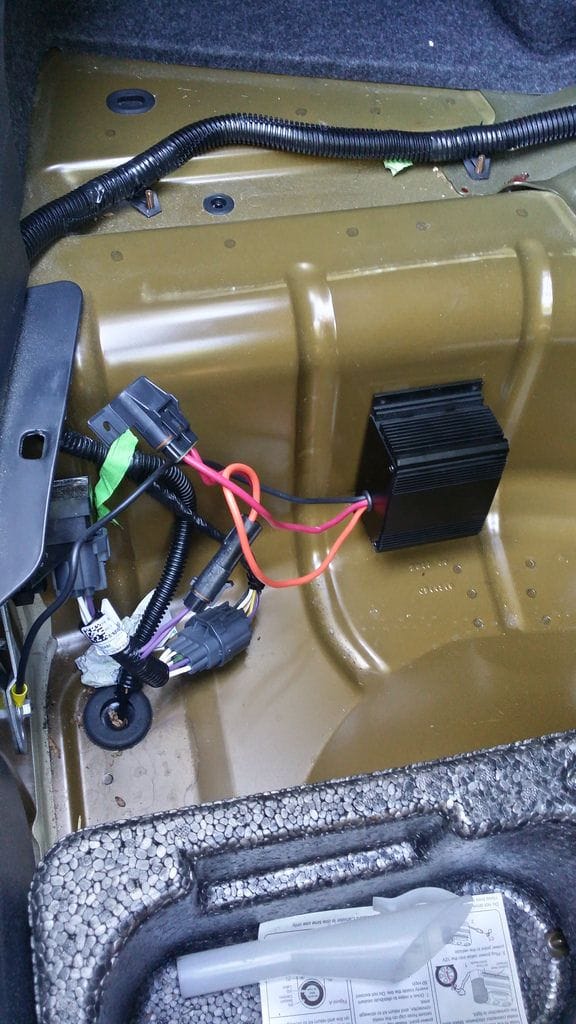
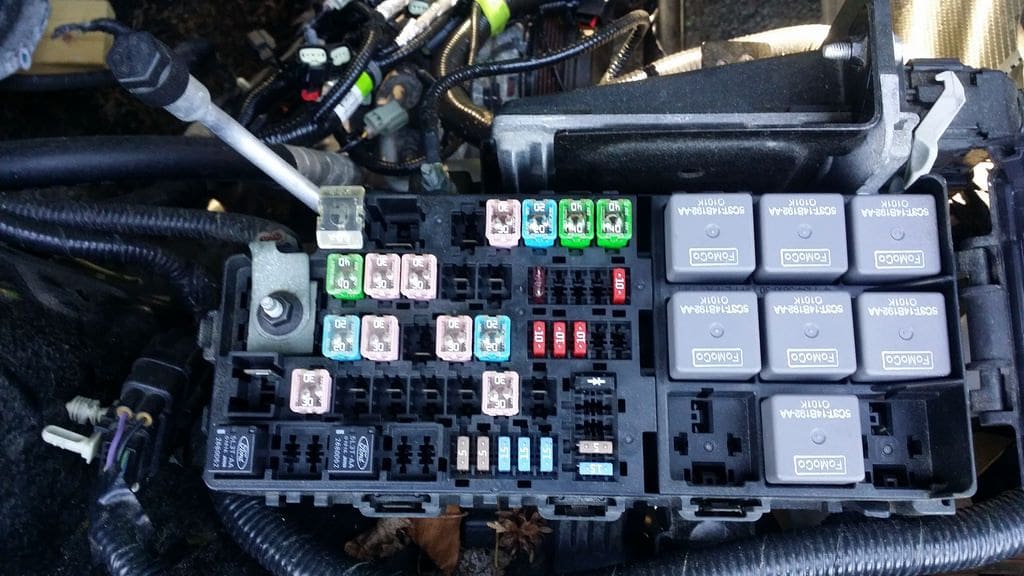
I then moved my way to the fuse box and put the supplied fuse in location F13 in the fuse box
Since my battery is so beyond dead at this point I tied some twine to the emergency trunk latch in the trunk this way I could just pull on the twine and it will pop the trunk in case I needed to get into the trunk for whatever reason.
So I laid out everything for this install. As you can see there is not much to it.
It was so simple, I used the adhesive strips and placed them on the back of the voltage booster and then attached it to the side of the tire well. I then disconnected the FPDM connection and plugged it into harness and then the harness into the voltage booster. I grounded the wire into the ground bolt that is sitting at right behind the factory plastic
trunk piece.
I then moved my way to the fuse box and put the supplied fuse in location F13 in the fuse box
Parts Used
- VMP Plug and Play Voltage Booster - vmppnpamp
Since my battery is so beyond dead at this point I tied some twine to the emergency trunk latch in the trunk this way I could just pull on the twine and it will pop the trunk in case I needed to get into the trunk for whatever reason.
I'm wondering if those bungs in the combustion chamber are for future direct injection ports.
I do believe that when Ford introduced the 5.0 they had made mention that there were provisions for DI in the future if they wanted to persue it.
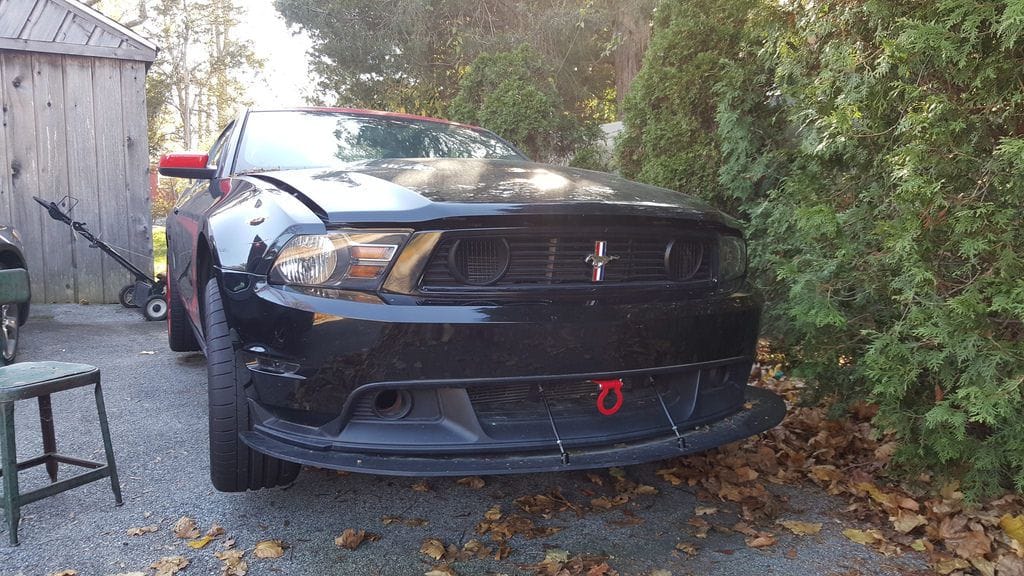
One of the biggest problems of the Boss 302 is the cooling especially on the 2012 models. With the smaller grill opening and lack of heat ventilation they tend to overheat pretty well on track. One of the many solutions is to run a billet style grill such as the Roush, Saleen or CJ grill. Just as an FYI the Cobra Jet grill is nothing more than a GT/CS grill that is completely open for maximum airflow.
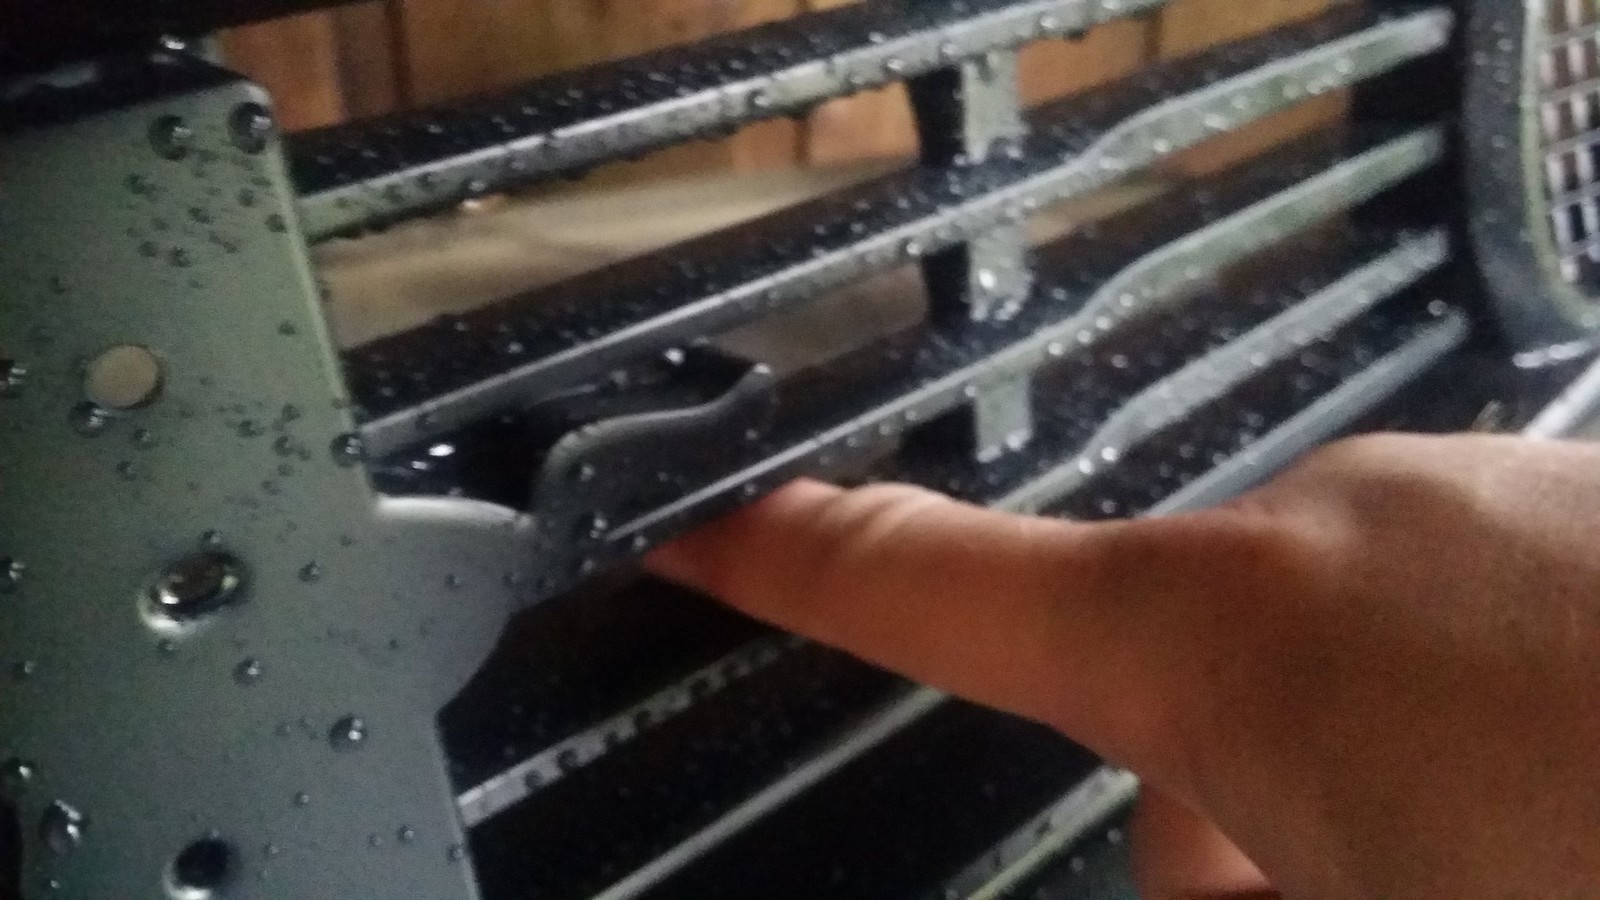
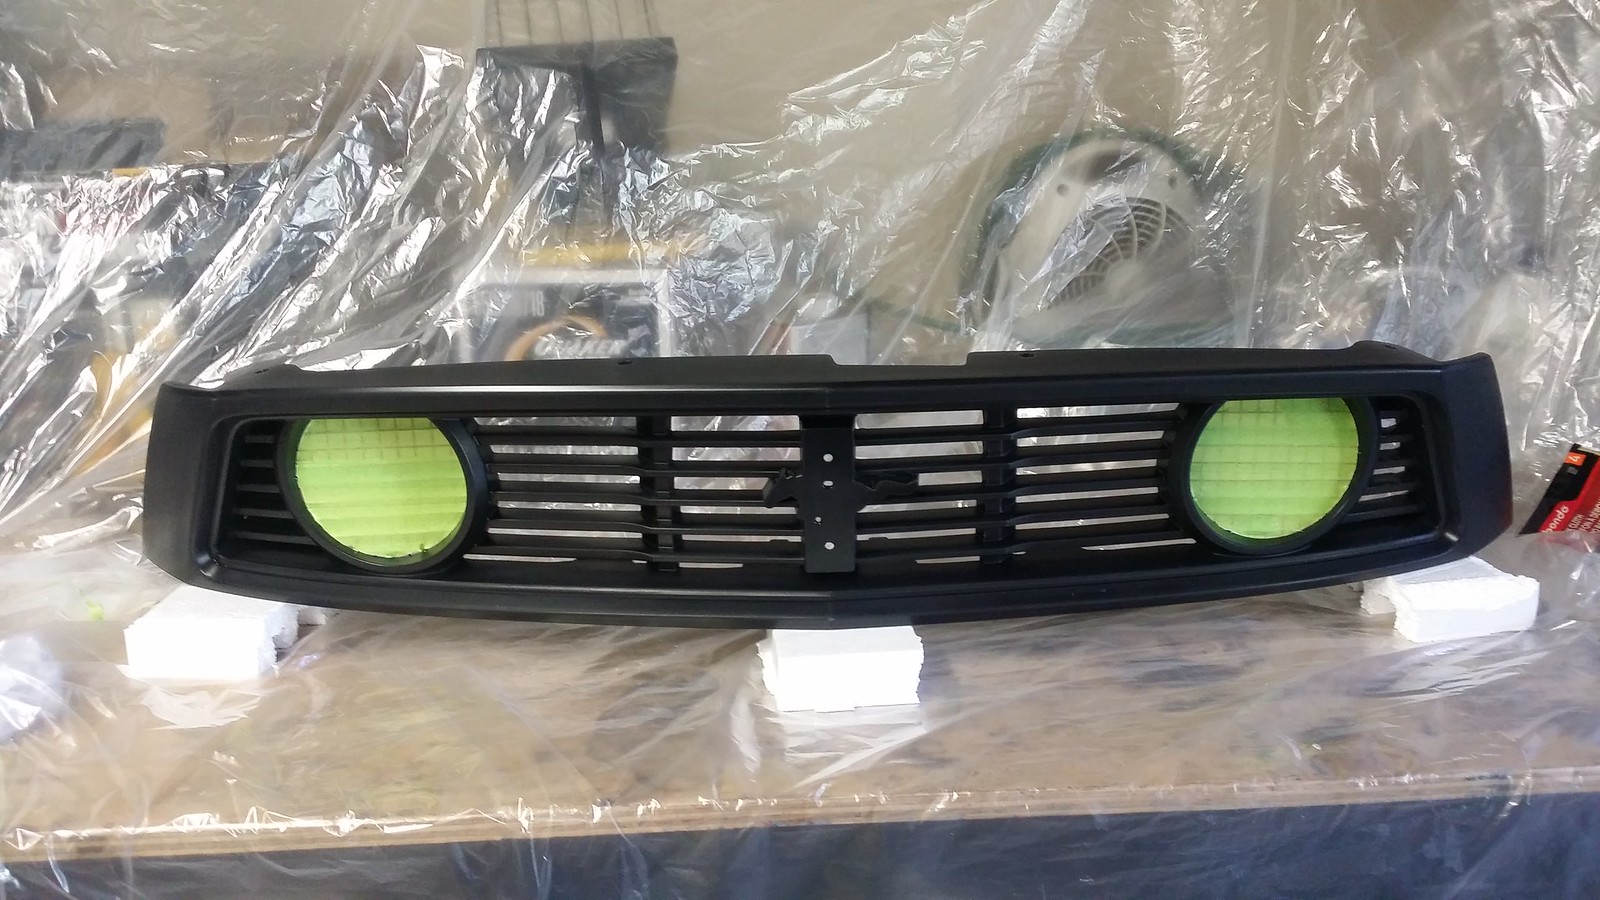
That being said, I love the styling on the Boss 302 grill along with the Boss 302S grill. The problem with the Boss 302 S grill is that it tapers down towards the backside of the grill so the actual opening isn't that big. in order to combat this I decided I would take a dremel and open up the back side a bit more by removing a lot of the plastic on the upper portion of the grill slats. I also removed the plastic pieces along the grill that are covering the air inlet in hopes to bring more air into the inlet to the factory intake.
I took a drill and drilled out holes as such this way I could get the sanding drum from my dremel in there and sand away at it.
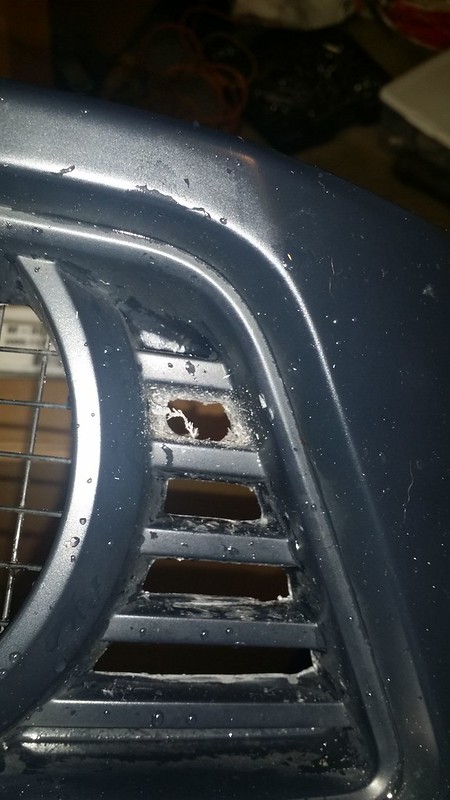
When I first started this I was barely able to get my finger in the openings up to the end of my finger nail. Now I can get all up in this bish! It doesn't seem like much, but hopefully this will allow more air to pass through the radiator into the grill.
You can see that from the first picture it is crappy ABS plastic colored and it just gives the front of the car sort of this unfinished look. SO I grabbed some black vinyl and decided I would wrap the grill. I have wrapped things before without issue but let me tell you, this was a pain in the butt!
This is what it looked like after the first attempt. From far away it looked good but once you got up close it looked like poo to me.
You can kind of see it in the lower left hand corner of the grill it starting to peel up. no matter what I did, I couldn't make the vinyl stick in these corners so I ended up pulling it off and decided I would just paint it black. I masked everything off and let it hit it with some Ford black.
Kind of looks like an RTR car with the bright green fog lights haha. At this point I popped it back into the car.
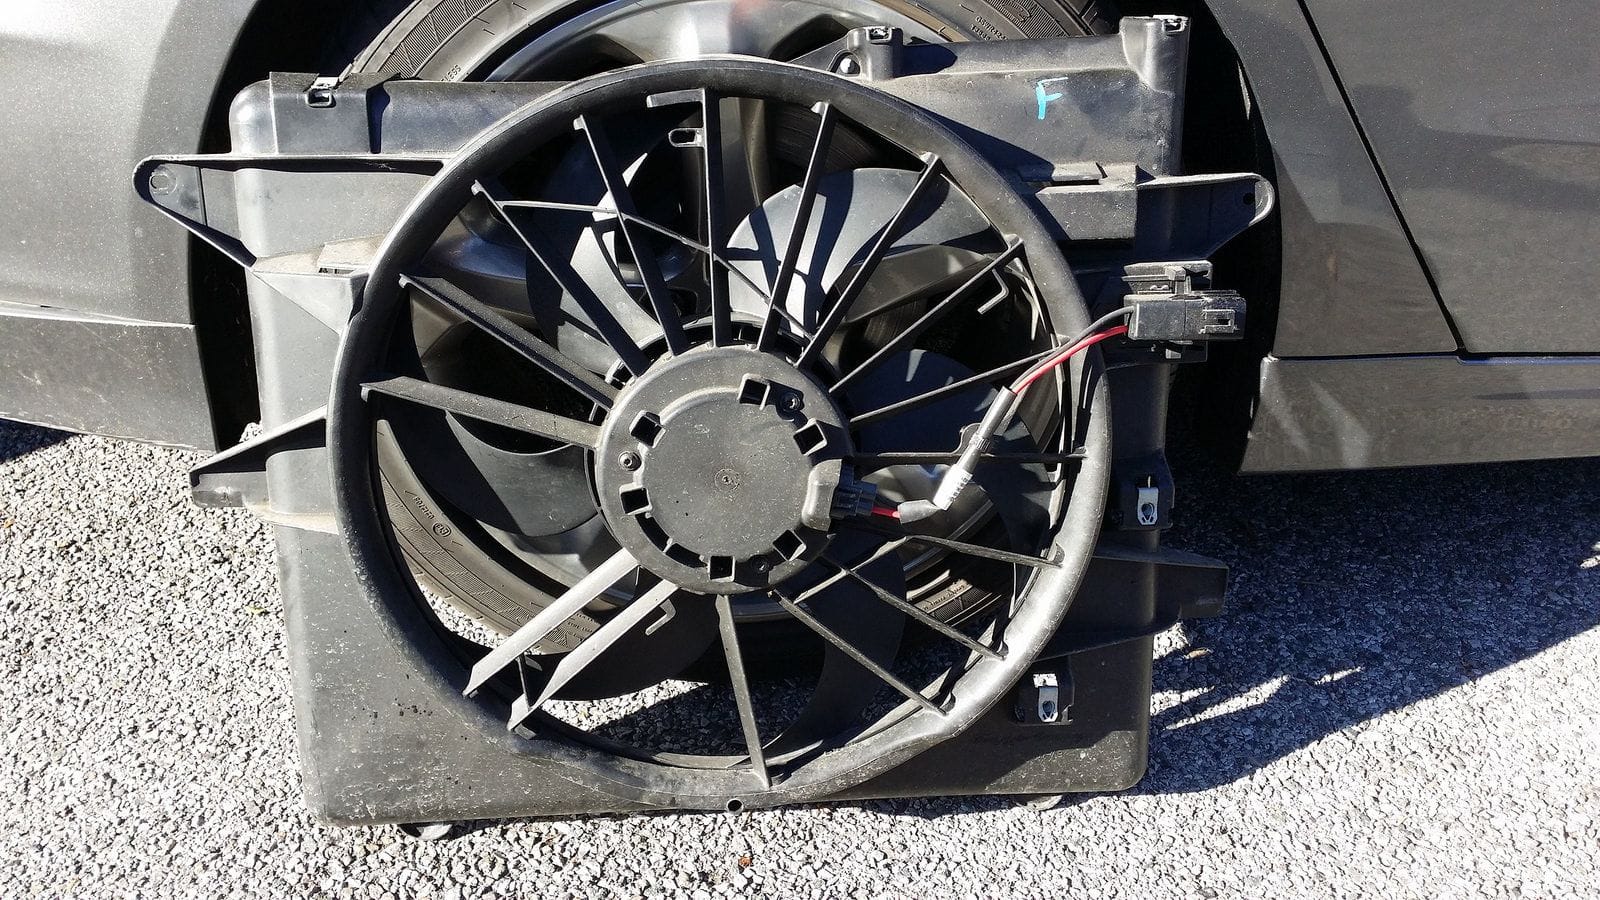
To continue on with the cooling theme I also picked up a GT500 cooling fan. There are people who put this on and said that it really hasn't lowered their oil temps much if any but I would imagine that with the more airflow being able to get through to the grill with the added slats it has to do something.
Boss 302/GT cooling fan
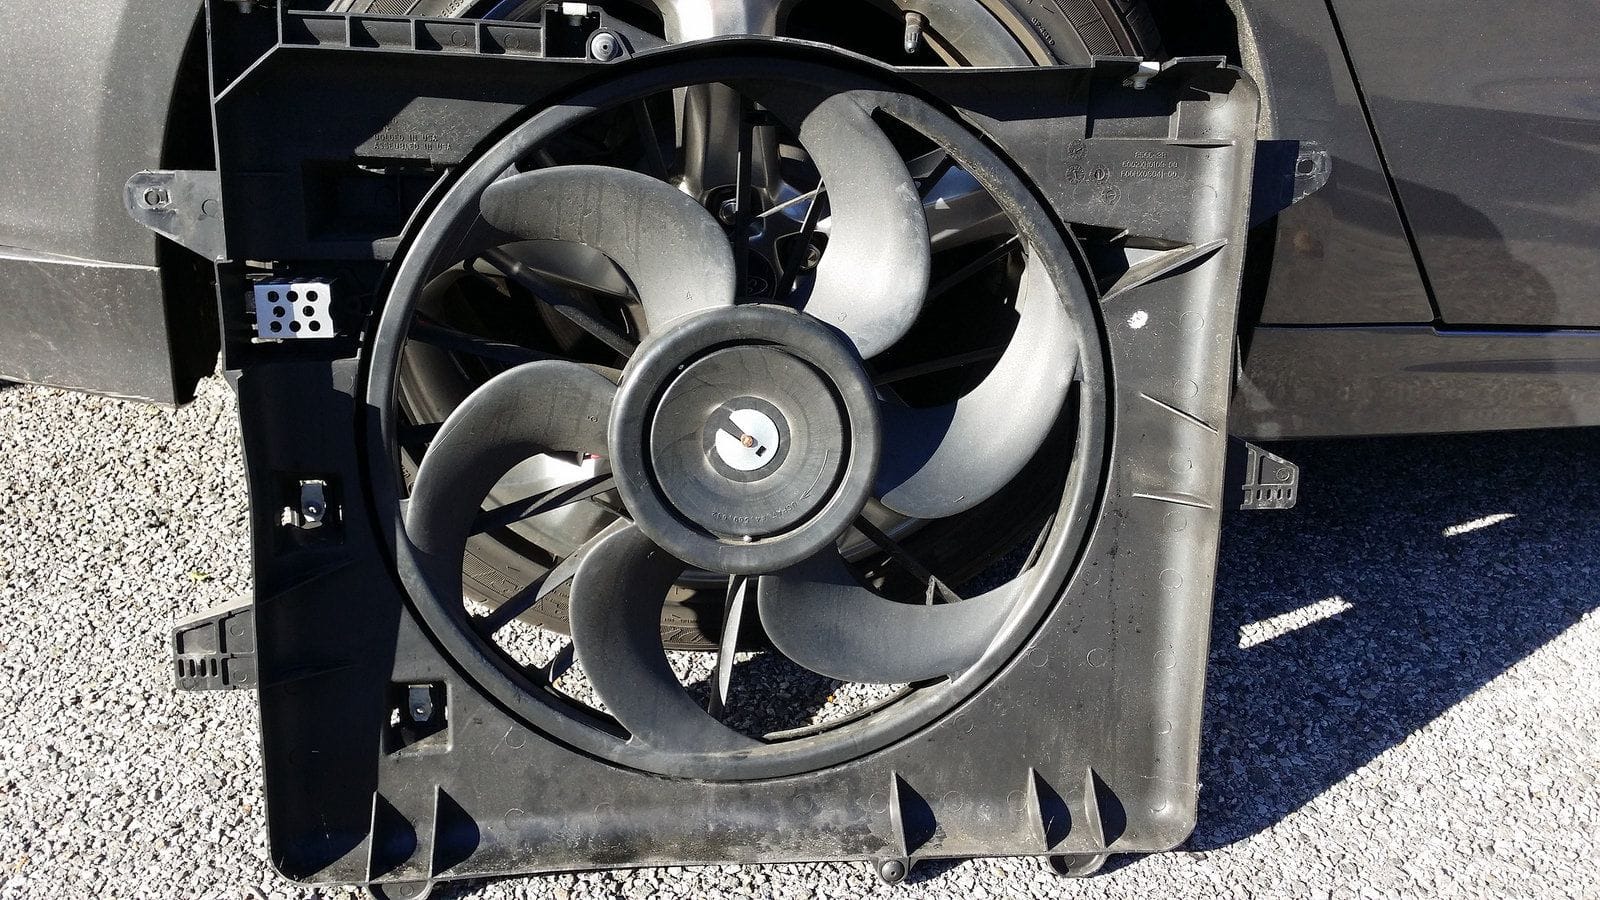
GT500 Cooling Fan
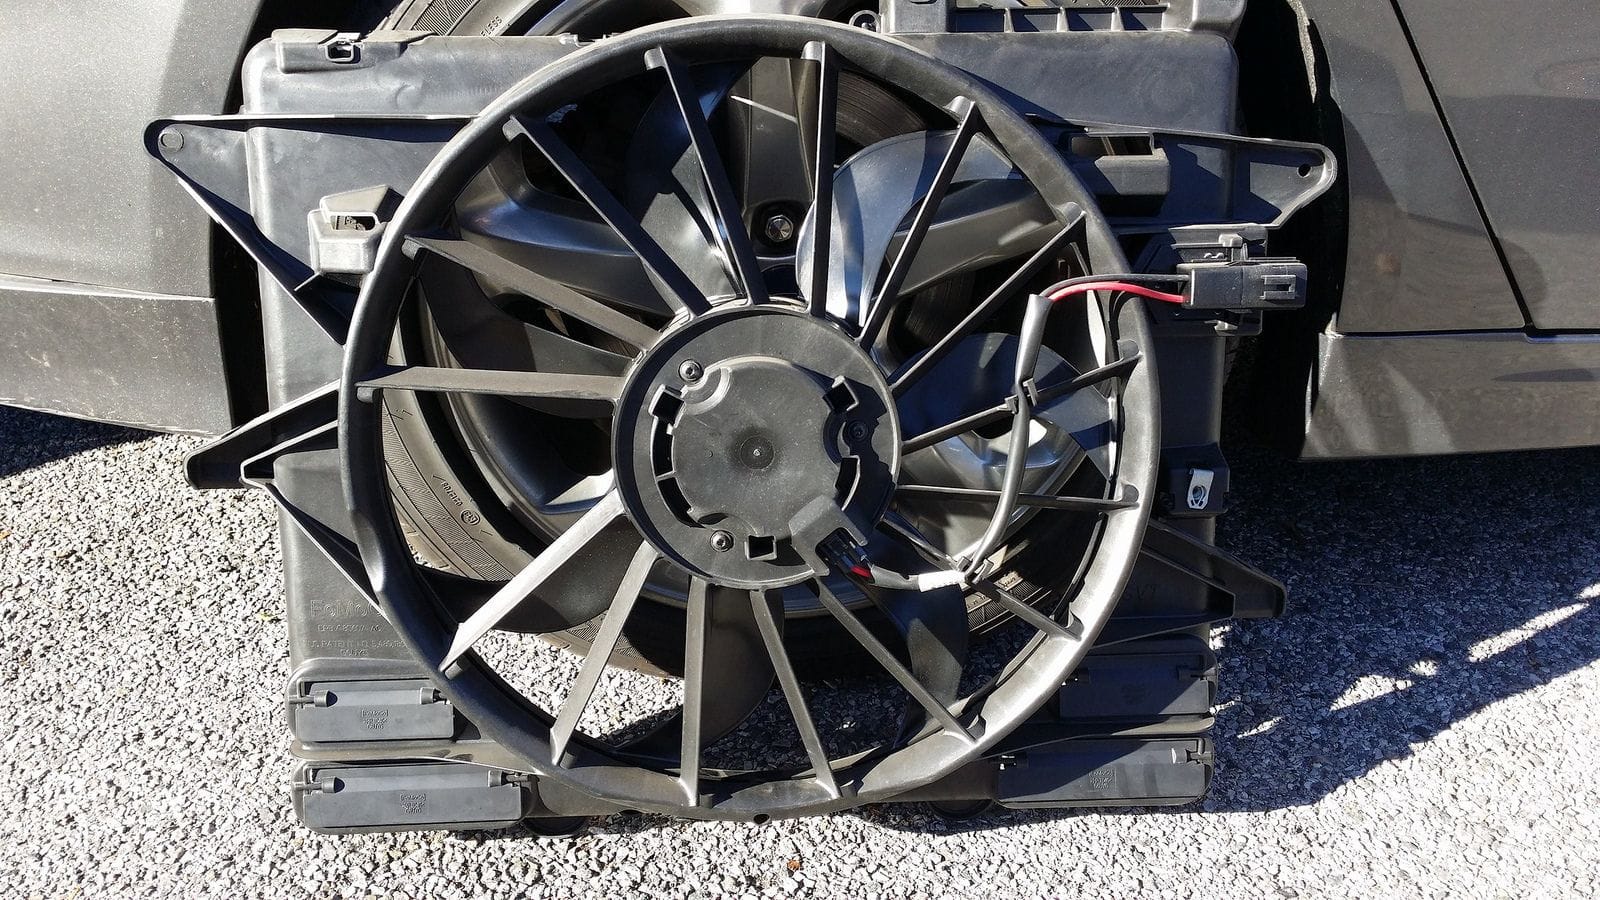
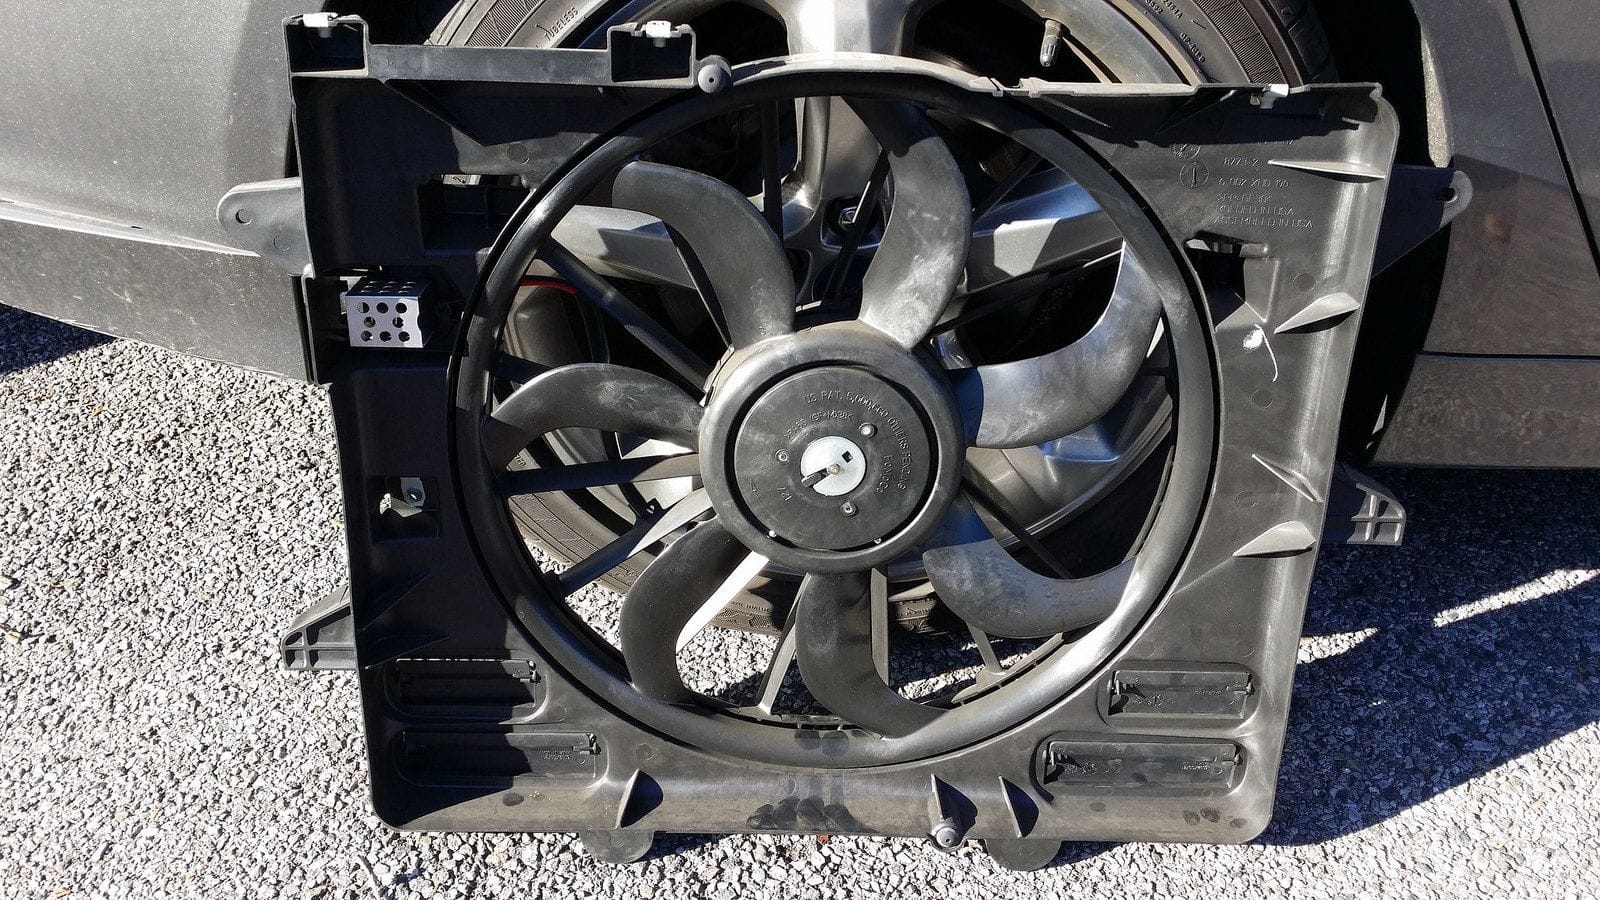
You can see the difference not only in the size of the fans but also the shape of the fan blades along with the flaps along the bottom to allow more air through the shroud at high speeds.
That being said, I love the styling on the Boss 302 grill along with the Boss 302S grill. The problem with the Boss 302 S grill is that it tapers down towards the backside of the grill so the actual opening isn't that big. in order to combat this I decided I would take a dremel and open up the back side a bit more by removing a lot of the plastic on the upper portion of the grill slats. I also removed the plastic pieces along the grill that are covering the air inlet in hopes to bring more air into the inlet to the factory intake.
I took a drill and drilled out holes as such this way I could get the sanding drum from my dremel in there and sand away at it.
When I first started this I was barely able to get my finger in the openings up to the end of my finger nail. Now I can get all up in this bish! It doesn't seem like much, but hopefully this will allow more air to pass through the radiator into the grill.
You can see that from the first picture it is crappy ABS plastic colored and it just gives the front of the car sort of this unfinished look. SO I grabbed some black vinyl and decided I would wrap the grill. I have wrapped things before without issue but let me tell you, this was a pain in the butt!
This is what it looked like after the first attempt. From far away it looked good but once you got up close it looked like poo to me.
You can kind of see it in the lower left hand corner of the grill it starting to peel up. no matter what I did, I couldn't make the vinyl stick in these corners so I ended up pulling it off and decided I would just paint it black. I masked everything off and let it hit it with some Ford black.
Kind of looks like an RTR car with the bright green fog lights haha. At this point I popped it back into the car.
Parts Used
- Boss 302S grill - M-8200-MBR
To continue on with the cooling theme I also picked up a GT500 cooling fan. There are people who put this on and said that it really hasn't lowered their oil temps much if any but I would imagine that with the more airflow being able to get through to the grill with the added slats it has to do something.
Boss 302/GT cooling fan
GT500 Cooling Fan
You can see the difference not only in the size of the fans but also the shape of the fan blades along with the flaps along the bottom to allow more air through the shroud at high speeds.
Parts Used
- GT500 Cooling Fan - M-8C607-MSVT
Since my car has been sitting for so long I definitely needed a new battery and I wanted to go ahead and go with something a little bit lighter than stock. JPC Racing built this really cool looking and functional battery tray and breather combo right here and used a Braille B2015 battery.

Considering I already have my Peterson Breather Can, I couldn’t justify spending all of the money on the new setup right away. I might go ahead and grab it in the future, but as of now I couldn’t do it. So I went out and bought the same Braille B2015 battery which should be perfect for what I will use it for. It is very small and compact and only weighs 15 lbs. which will save me about 16lbs. off the front end and have enough CCA to get the car up and running without issue. The problem is that the battery is MUCH smaller than the factory battery so I would have to fabricate a way to keep it in place. Since weight savings is life bc racecar I decided to make it out of Carbon fiber. So I went out and bought a 12” x 24” sheet of Carbon fiber and some carbon fiber 1” angle to make and reinforce the battery box with. After taking my measurements I went ahead and fabricated the box. Here it is with the front and back all mocked up followed by the sides.
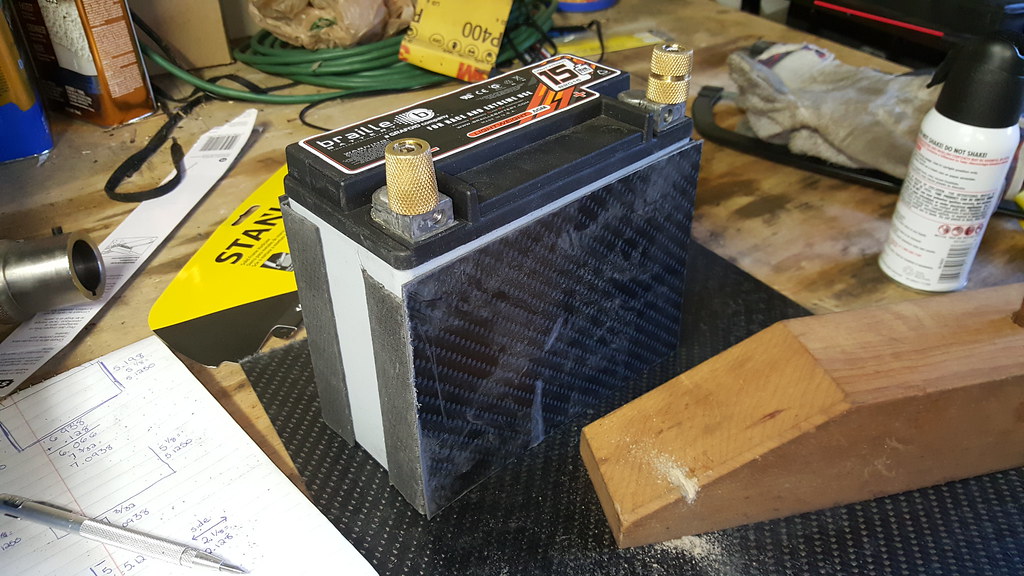
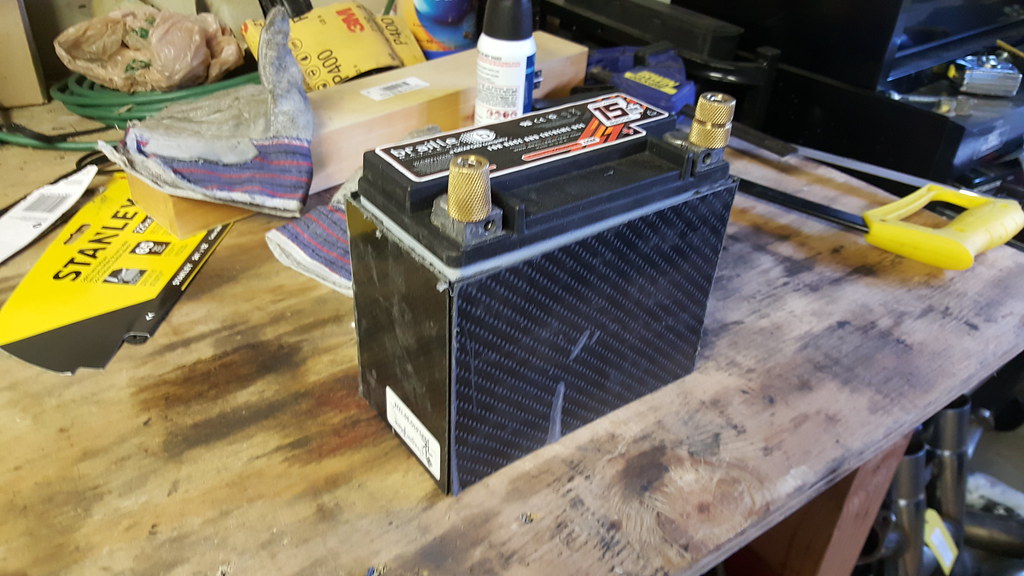
In order to cut the carbon fiber I used a hacksaw and a tungsten carbide blade as it will not cause the carbon fiber to chip or splinter as you cut it like it would with a wood cutting or metal cutting blade. You should also wear gloves and a long sleeve shirt when cutting carbon fiber as in my research, it is very much like fiberglass as the particles can get stuck in your pores and cause all sorts of itching everywhere and it is a worse sensation than fiberglass is. Also, some sort of mask would be advisable as well as safety goggles just in case. I’m still sneezing Carbon Fiber dust out of my nose 4 days later so it would be a nice thing to have thought about at the moment.
From there I cut the bottom of the carbon fiber piece to fit in the battery tray to give it a sort of finished look to it. After a lot of sanding I got it to sit nice and flat in the tray
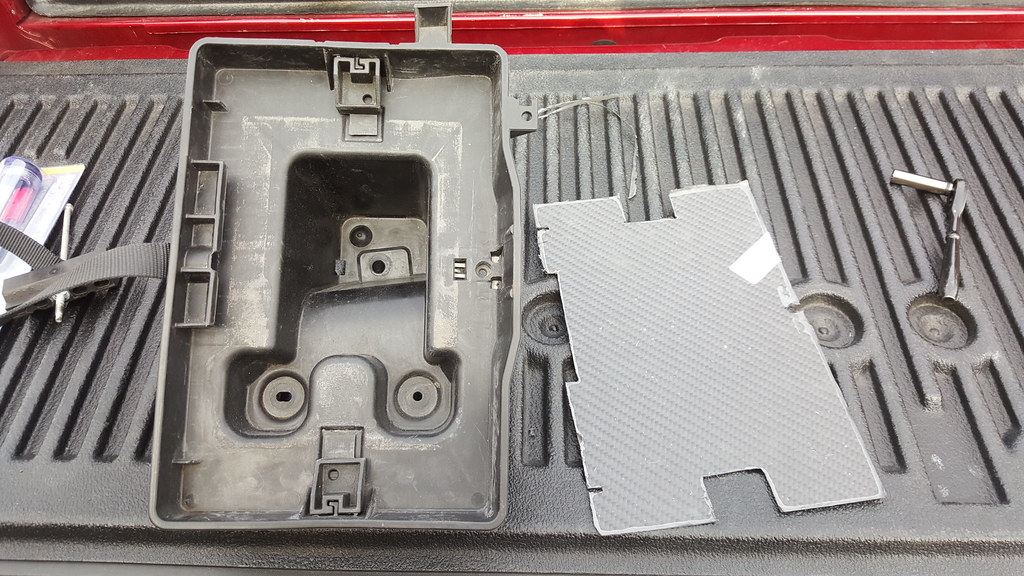
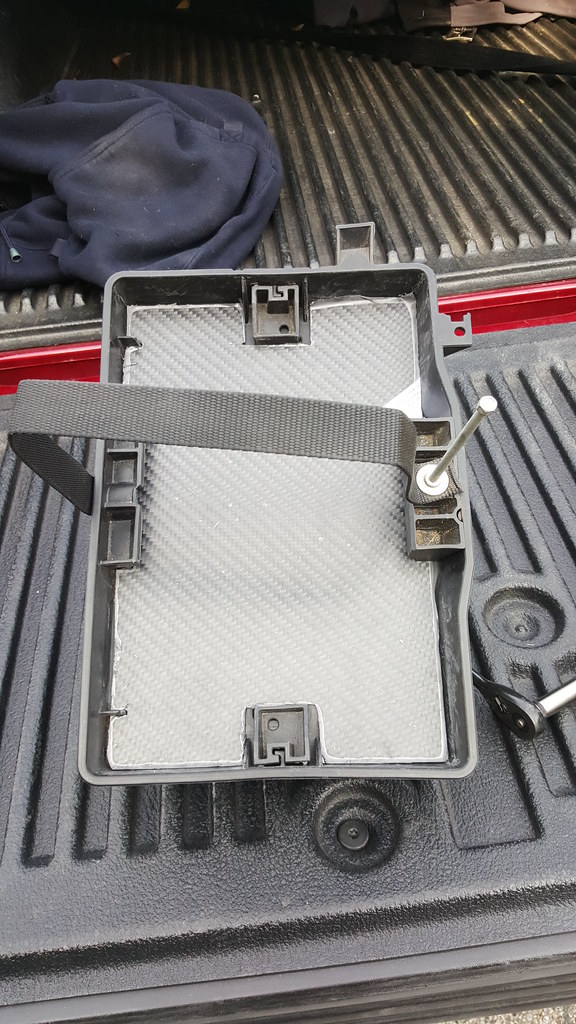
I still have to cut the bottom try so that I can put the bolts in and take them out with ease as well as cut the insert for the nylon strap to go through since I am changing the way it mounts. I am thinking of mounting it to the battery tray down here with 2 rivets in the same way that the factory strap is mounted assuming I can fit a rivet gun in that space so that the rivet is mounted directly to the strap the way it is from the factory.
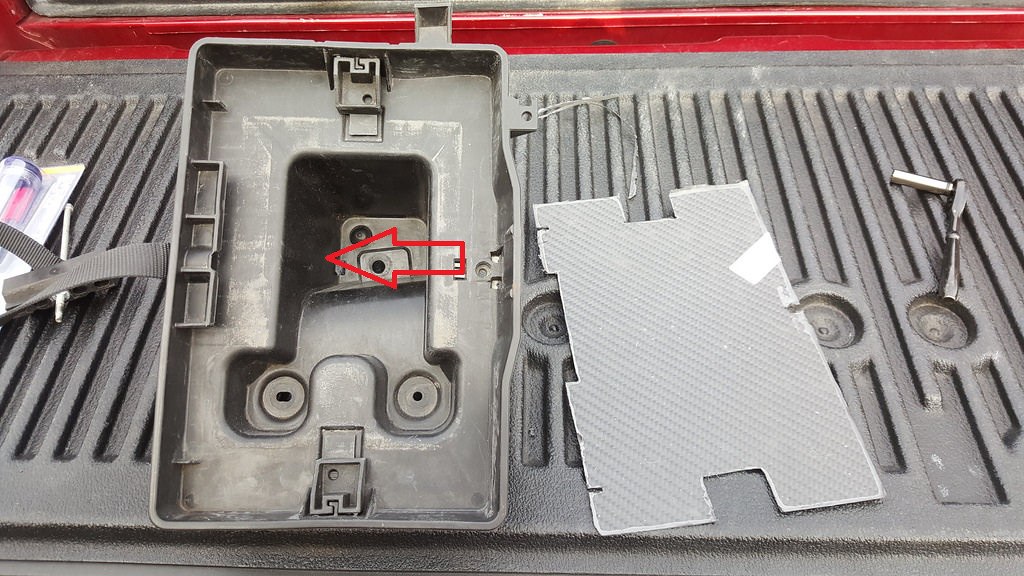
I ended up buying these rivets from McMaster-Carr and looking at the material thickness range I think I will be in good hands considering the plastic at that spot I believe is .118” judging by the plastic closest to it where I could take a measurement and the nylon strap is .074-.080” so with any luck this will work. This rivet appears to be almost the same rivet used ts the factory except that the factory one has a large washer for lack of a better term built into the back of the rivet where this one doesn’t.
Anyway, I got the box all mocked up and grabbed my 3M 110 Epoxy and started epoxying the Carbon Fiber angle onto the sheets of Carbon Fiber. I opened up the box a little bit more to allow the battery to be put in easier so there is a little bit of a gap where you can see the carbon fiber angle, but nothing too bad. Here is where I ran in to a bit of an error as per the norm with me. When I got my epoxy, they sent me a mixing nozzle for a 200ml tube which has a large round ended hole when I actually got a 50 ML tube which has a rectangular attachment that fits into a slot. So I ended up modifying it and it sort of worked. The epoxy barely made it through the tube before leaking out on me so I aborted that idea and cleaned everything off. So I went to the Home Depot and grabbed some Loctitie Epoxy which has a mixing nozzle in it that is a similar mounting design, only problem is that it was too small :/. So I finally got the correct ones from the vendor yesterday and went ahead and started epoxying all of the pieces together. Today I will go ahead and finish the supports for the bottom so that I can mount it to the bottom tray once I cut all my holes and put the strap into the battery tray etc.
Considering I already have my Peterson Breather Can, I couldn’t justify spending all of the money on the new setup right away. I might go ahead and grab it in the future, but as of now I couldn’t do it. So I went out and bought the same Braille B2015 battery which should be perfect for what I will use it for. It is very small and compact and only weighs 15 lbs. which will save me about 16lbs. off the front end and have enough CCA to get the car up and running without issue. The problem is that the battery is MUCH smaller than the factory battery so I would have to fabricate a way to keep it in place. Since weight savings is life bc racecar I decided to make it out of Carbon fiber. So I went out and bought a 12” x 24” sheet of Carbon fiber and some carbon fiber 1” angle to make and reinforce the battery box with. After taking my measurements I went ahead and fabricated the box. Here it is with the front and back all mocked up followed by the sides.
In order to cut the carbon fiber I used a hacksaw and a tungsten carbide blade as it will not cause the carbon fiber to chip or splinter as you cut it like it would with a wood cutting or metal cutting blade. You should also wear gloves and a long sleeve shirt when cutting carbon fiber as in my research, it is very much like fiberglass as the particles can get stuck in your pores and cause all sorts of itching everywhere and it is a worse sensation than fiberglass is. Also, some sort of mask would be advisable as well as safety goggles just in case. I’m still sneezing Carbon Fiber dust out of my nose 4 days later so it would be a nice thing to have thought about at the moment.
From there I cut the bottom of the carbon fiber piece to fit in the battery tray to give it a sort of finished look to it. After a lot of sanding I got it to sit nice and flat in the tray
I still have to cut the bottom try so that I can put the bolts in and take them out with ease as well as cut the insert for the nylon strap to go through since I am changing the way it mounts. I am thinking of mounting it to the battery tray down here with 2 rivets in the same way that the factory strap is mounted assuming I can fit a rivet gun in that space so that the rivet is mounted directly to the strap the way it is from the factory.
I ended up buying these rivets from McMaster-Carr and looking at the material thickness range I think I will be in good hands considering the plastic at that spot I believe is .118” judging by the plastic closest to it where I could take a measurement and the nylon strap is .074-.080” so with any luck this will work. This rivet appears to be almost the same rivet used ts the factory except that the factory one has a large washer for lack of a better term built into the back of the rivet where this one doesn’t.
Anyway, I got the box all mocked up and grabbed my 3M 110 Epoxy and started epoxying the Carbon Fiber angle onto the sheets of Carbon Fiber. I opened up the box a little bit more to allow the battery to be put in easier so there is a little bit of a gap where you can see the carbon fiber angle, but nothing too bad. Here is where I ran in to a bit of an error as per the norm with me. When I got my epoxy, they sent me a mixing nozzle for a 200ml tube which has a large round ended hole when I actually got a 50 ML tube which has a rectangular attachment that fits into a slot. So I ended up modifying it and it sort of worked. The epoxy barely made it through the tube before leaking out on me so I aborted that idea and cleaned everything off. So I went to the Home Depot and grabbed some Loctitie Epoxy which has a mixing nozzle in it that is a similar mounting design, only problem is that it was too small :/. So I finally got the correct ones from the vendor yesterday and went ahead and started epoxying all of the pieces together. Today I will go ahead and finish the supports for the bottom so that I can mount it to the bottom tray once I cut all my holes and put the strap into the battery tray etc.
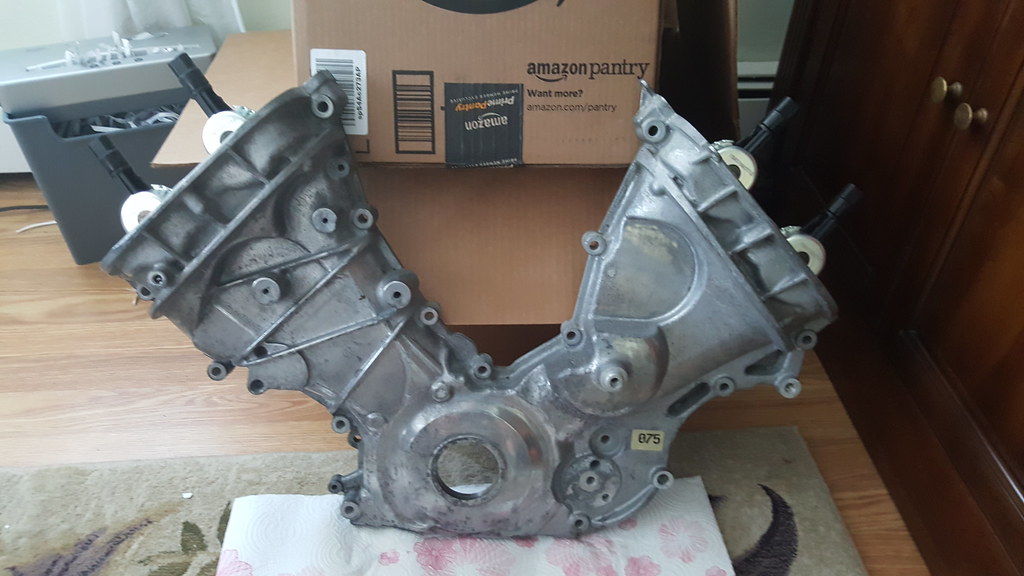
In other news, if you remember I had the rusting issue with some of the items on the inside of the engine, so I went ahead and sprayed them down with some WD-40 and used a brass wire brush to remove the layer of surface rust that I had on those parts and so that I didn’t do any to damage any of the aluminum parts on the engine or the engine itself.
Sorry no after pics haha.
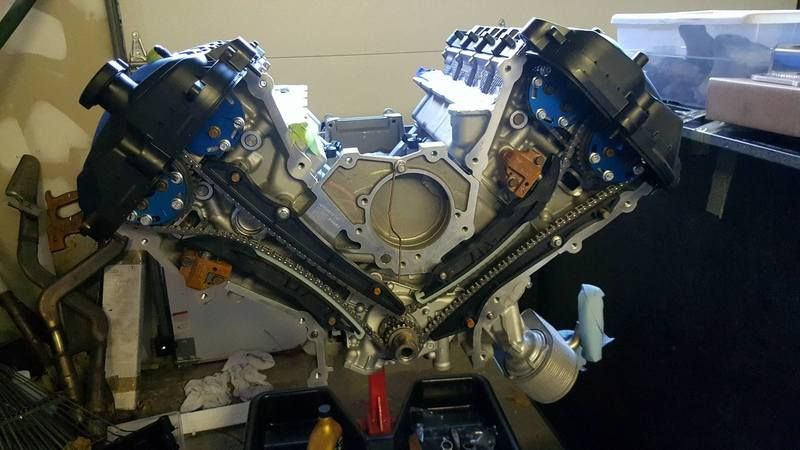
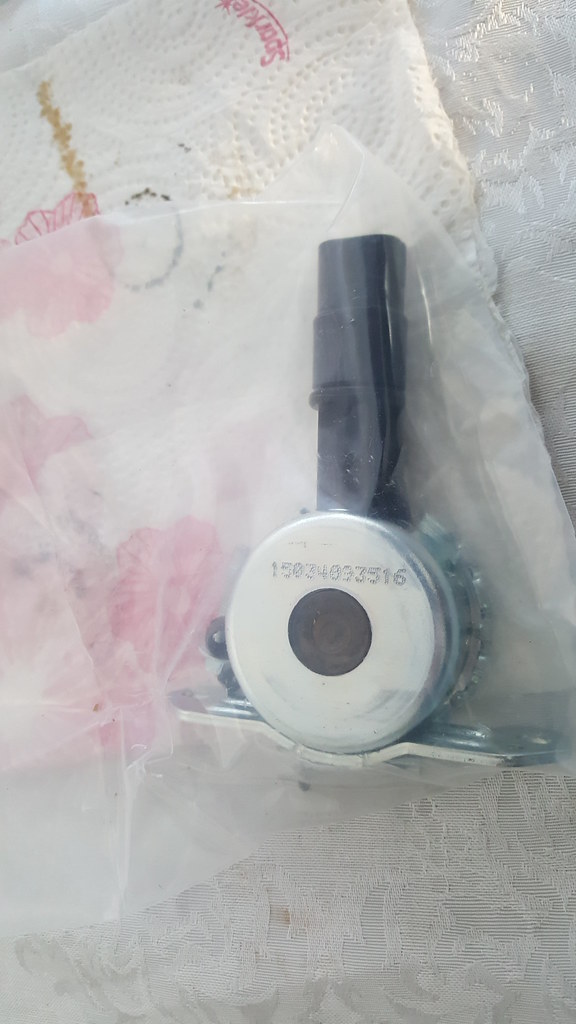
Everything came out looking perfect so I went ahead and grabbed my front cover and VCT actuators and installed those. It was a very easy process although I couldn’t find any torque specs on them so I used the German Specs for the Actuators.
These are the actuators that you have to use with the wiring harness that I got from Ford Racing. They were from cars built after 2/27/12 so they looked different than what I had previously in my engine since it was built on 12/30/2010.
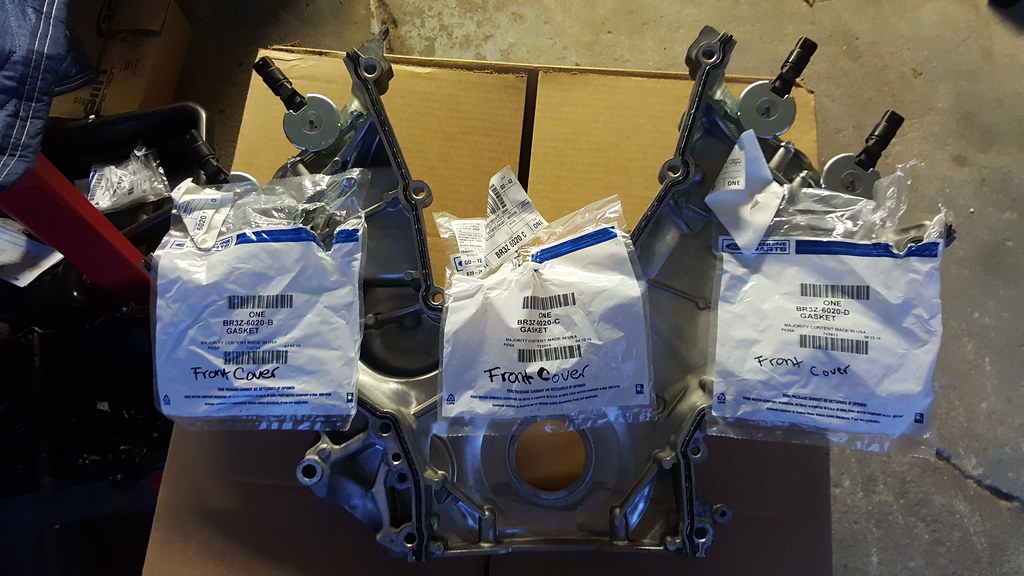
So once I got those bolted in I went ahead and grabbed my gaskets for the front cover and put them on as such:
Then I went ahead and put the engine mount brackets on the engine as such since you have to use a combination of studs and bolts. I will get the part numbers for the studs and for the bolts when I can get my notebook back since I sent it down there with the engine so they can use that for reference. I think the front cover & the engine mount brackets are two of maybe 15 items that aren’t brand spanking new for this engine. That is one reason why this has been taking so long to get done. Damn near every nut, bolt and whatever else has been bought from Ford or JPC so that added to the expense for sure.
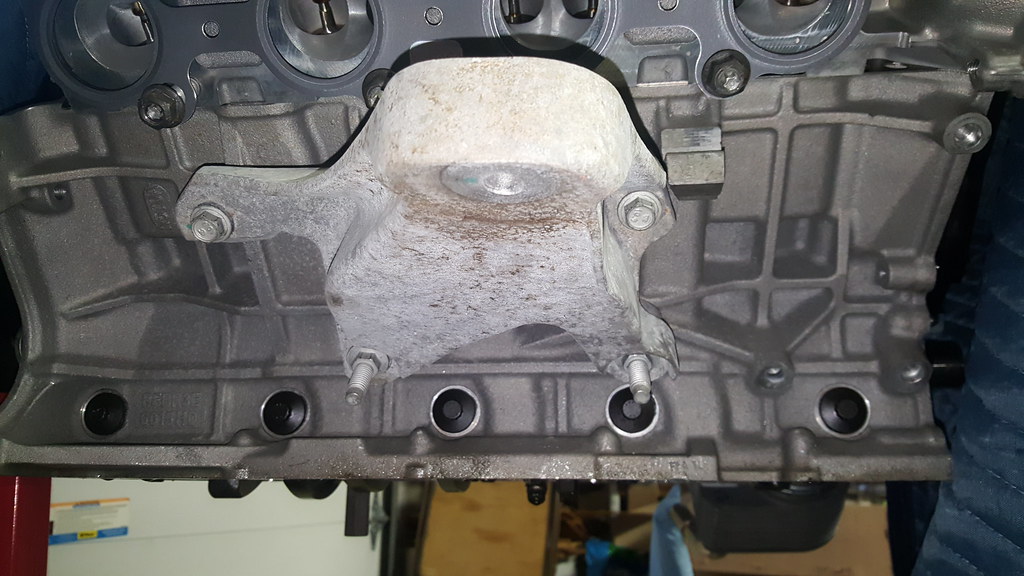
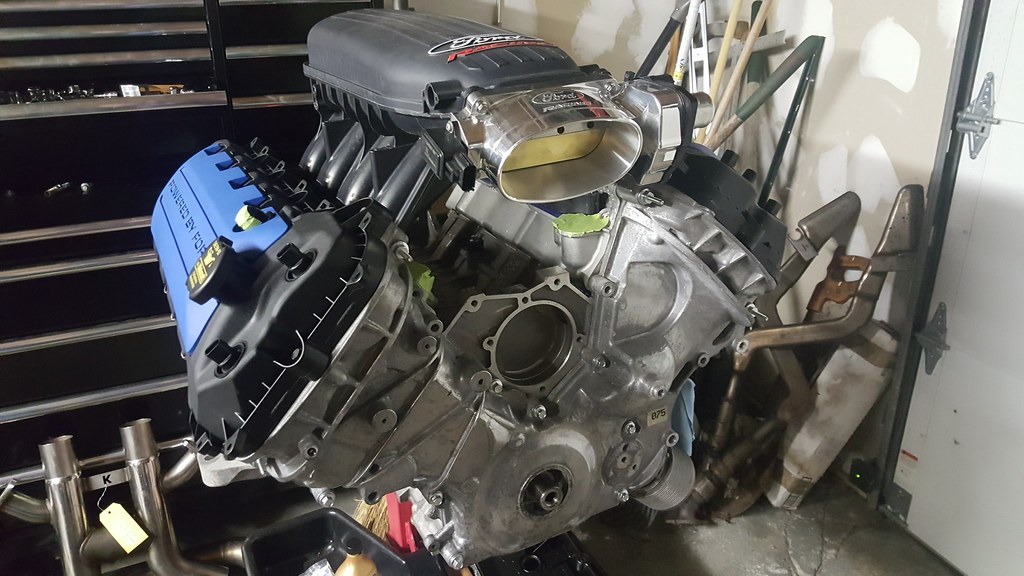
Here it is in all its glory! I wish I took a picture of the front cover with all the bolts in the correct place as it took me a while to figure out where they all went from a variety of pictures, but these are just the 8 10mm bolts that are installed along with the 2 studs IIRC.
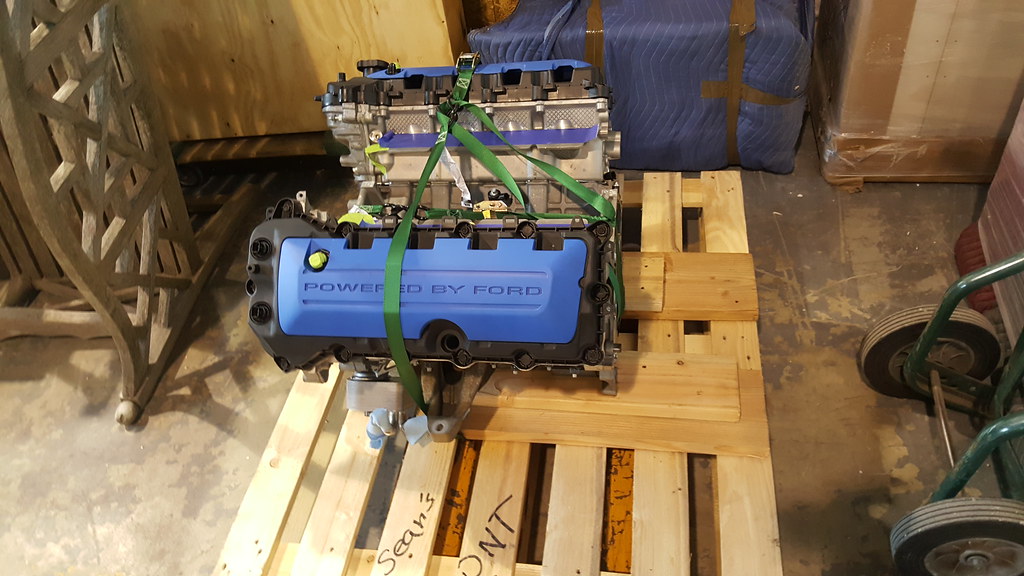
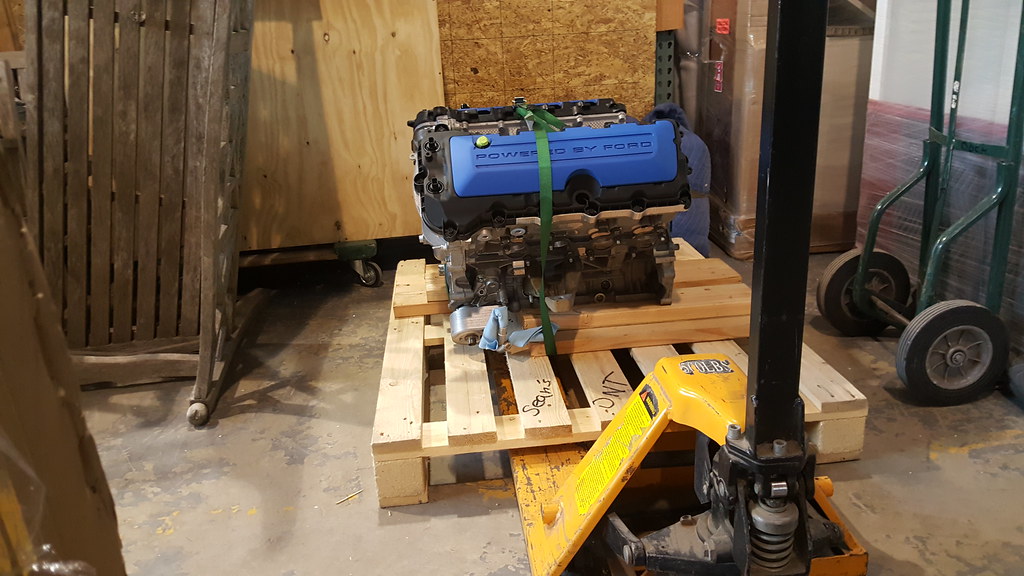
From there I put the engine on the pallet and screwed it into the wood than strapped it to the pallet and sent it down on one of our trucks that was heading down to DC. You could throw this thing off an airplane and the motor wouldn’t budge haha.
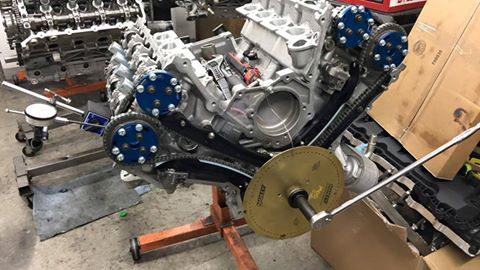
So the motor got to JPC and they got to work on it. The intake cam was degreed correctly and the exhaust cam was off by a few degrees if I am remembering correctly. They said that the motor rotated freely and they had no issues so I have no idea what the heck the case was. I swear to God this thing stopped rotating on me. The good news though was that it rotated freely without issue. I just spoke with Eric and the motor is now done so I will have to figure out how to get my car down there. I tried renting a trailer from UHaul and they said my truck wasn’t good enough to tow my car so I will have to find another trailer to tow it down there soon.
Sorry no after pics haha.
Everything came out looking perfect so I went ahead and grabbed my front cover and VCT actuators and installed those. It was a very easy process although I couldn’t find any torque specs on them so I used the German Specs for the Actuators.
These are the actuators that you have to use with the wiring harness that I got from Ford Racing. They were from cars built after 2/27/12 so they looked different than what I had previously in my engine since it was built on 12/30/2010.
So once I got those bolted in I went ahead and grabbed my gaskets for the front cover and put them on as such:
Then I went ahead and put the engine mount brackets on the engine as such since you have to use a combination of studs and bolts. I will get the part numbers for the studs and for the bolts when I can get my notebook back since I sent it down there with the engine so they can use that for reference. I think the front cover & the engine mount brackets are two of maybe 15 items that aren’t brand spanking new for this engine. That is one reason why this has been taking so long to get done. Damn near every nut, bolt and whatever else has been bought from Ford or JPC so that added to the expense for sure.
Here it is in all its glory! I wish I took a picture of the front cover with all the bolts in the correct place as it took me a while to figure out where they all went from a variety of pictures, but these are just the 8 10mm bolts that are installed along with the 2 studs IIRC.
From there I put the engine on the pallet and screwed it into the wood than strapped it to the pallet and sent it down on one of our trucks that was heading down to DC. You could throw this thing off an airplane and the motor wouldn’t budge haha.
So the motor got to JPC and they got to work on it. The intake cam was degreed correctly and the exhaust cam was off by a few degrees if I am remembering correctly. They said that the motor rotated freely and they had no issues so I have no idea what the heck the case was. I swear to God this thing stopped rotating on me. The good news though was that it rotated freely without issue. I just spoke with Eric and the motor is now done so I will have to figure out how to get my car down there. I tried renting a trailer from UHaul and they said my truck wasn’t good enough to tow my car so I will have to find another trailer to tow it down there soon.
Users who are viewing this thread
Total: 2 (members: 0, guests: 2)

