My build thread: 2004 Cobra Vert #871.

olympic

Well-Known Member
Established Member
Joined
Dec 28, 2014
Messages
3,544
Location
Canada
Here's the + cable before installation.

20190609_015747.jpg


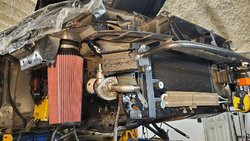
The ground cable for the battery is attached to the lower alternator bolt. I used this bolt as a distribution point for a couple ground straps. One is attached to an oil pan bolt to ground the block and the other is attached to sway bar bracket to ground the body.
20190627_210213.jpg


Also in this image you can see the MM sway bar relocation kit and poly bushings.

20190609_024737.jpg


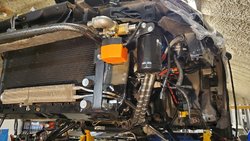
Another ground strap from the oil pan to the passenger side.

20190627_210320.jpg


A new set of radiator hoses from LMR.

20190525_174218.jpg


The thermostat housing was looking pretty nasty so I sand blasted it and gave it the POR15 treatment.

20190526_190840.jpg


Installed

20190526_202225.jpg


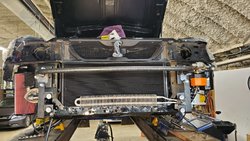
I really liked the style and design of the JLT High Boost intake but had read many reports of people having tuning and/or driveability issues with it. Likely due to the two 90 degree turns before the MAF. I figured I could alleviate this issue by installing air straighteners. I put one right at the inlet and another a few inches before the MAF. The screens are "trim to fit" and fit very tightly and are prevented from moving by 3 small screws through the plastic tube. The MAF sensor being used is and SCT BA2600.

20190515_180326.jpg


20190515_171300.jpg
 
Last edited:

olympic

Well-Known Member
Established Member
Joined
Dec 28, 2014
Messages
3,544
Location
Canada
Next on the list was a custom heat exchanger, reservoir and Killer Chiller setup I had cooked up in my head. It wanted it to have the following attributes:

-everything mounted in the front, no miles of hoses to the trunk.
-a larger coolant capacity, at least 8 liters (2 US gallons).
-the ability to switch between the heat exchanger and KC from inside the car.
-no mounting brackets visible on the front of the heat exchanger.

The parts list:

Gords heat erxchanger with fans.

20190523_194811.jpg


I made some custom brackets for it so it could be mounted without the brackets being visible from the front.

20190523_194446.jpg


The brackets attach to the HE with 4 stainless steel screws and riv-nuts installed in the frame of the HE. I drilled large holes in in the brackets to reduce weight and improve air flow.

20190523_194530.jpg


The reservoir I chose is actually an air tank used for air suspensions. It holds 9.5L and the dimensions were perfect for where I wanted to put it.

20190523_195008.jpg


Jabsco pump.

20190523_195140.jpg


Electric 3 way 1" NPT valve to switch between the HE and KC.

20190523_211751.jpg


Killer Chiller heat exchanger unit.

20190527_223425.jpg


Tube bumper, pump, 3-way valve, and HE brackets mounted up. The brackets include rubber isolators to protect the HE from vibration and chassis flex.

20190528_031905.jpg


20190528_031732.jpg


I made a custom bracket for the tube bumper on the drivers side so I could mount the 3-way valve and the remote filter.

20190528_031813.jpg
 

olympic

Well-Known Member
Established Member
Joined
Dec 28, 2014
Messages
3,544
Location
Canada
I made some mounting brackets for the res and installed hose barbs for the various connection. The feed line to the pump is 1", the rest of the system is 3/4". I drilled and tapped the tank with the proper NPT threads but the aluminum is quite thin so I used epoxy on the fittings. Once again the brackets were drilled to reduce weight and improve air flow since they will run across the A/C condenser. The black fitting at the bottom of the first pic is for a temperature probe so I can monitor coolant temp.

20190528_031652.jpg


20190528_031526.jpg

20190528_031607.jpg


Everything installed. The tank tucks nicely between the HE and grill. This area is blocked by the bumper cover anyways so I'm not expecting it to cause air flow problems. The face of the A/C condensor is not blocked at all. Air is can still flow from the grill and lower opening to the entire condensor and rad. All cold side hoses were insulated.

20190702_203744.jpg
20190702_203725.jpg


20190702_203811.jpg
 

Attachments

  • 20190528_031732.jpg
    20190528_031732.jpg
    381.7 KB · Views: 161
  • 20190528_031813.jpg
    20190528_031813.jpg
    354.7 KB · Views: 159
  • 20190528_031905.jpg
    20190528_031905.jpg
    373.6 KB · Views: 193

olympic

Well-Known Member
Established Member
Joined
Dec 28, 2014
Messages
3,544
Location
Canada
I installed a ball valve in the bottom of the res to aid in draining the system.
20190603_192305.jpg


Coolant tanks shined up and ready to go in. The True Forged intercooler tank will act as an expansion tank and provide a path for air to escape the IC system. I installed a -6 AN bulkhead fitting in the top left side of the tank for this purpose.

20190702_185147.jpg


Here is the -6 AN vent line leading the main res up to the True Forged tank. The outlet on the TF tank is also connected to the main res with a 3/4" hose for the movement of coolant during filling and expansion. Total coolant capacity turned out to be 14L (3.7 US gallons) with only about 1" of coolant in the expansion tank!! :eek:

20190706_201814.jpg


The stock radiator vent line was also replaced with AN fittings and hose.

20190706_201709.jpg


Next on the list is the Snow Performance methanol injection kit. I wanted to use the stock windshield washer reservoir as the res for the meth injection which meant mounting the pump in the drivers side front fender well and "tapping into" the WW res to supply the water/meth mix.

Meth pump with solenoid and -6 AN feed line. The solenoid is needed to prevent manifold vacuum from sucking meth through the system. The solenoid outlet is -4 AN.

20190524_202039.jpg


Here's the pump mounted on a custom bracket, wiring loomed up and fitted with a water proof connector. The module on the bottom is for the DRLs.

20190524_212923.jpg


Here it is tucked in the fender well behind the remote oil filter.

20190610_225927.jpg


Time to mod the WW res! I need to install a -6 AN bulkhead fitting for the supply line to the pump and a level sensor to warn me if the res is running low.
20190509_171731.jpg


Easy peasy!

20190524_220922.jpg


20190524_220959.jpg
 
Last edited:

olympic

Well-Known Member
Established Member
Joined
Dec 28, 2014
Messages
3,544
Location
Canada
This is the feed line from the res to the pump. I put an inline filter in there for some added protection.

20190524_214731.jpg


Installed. The WW system still works perfectly. Methanol injection fluid and good quality -40C winter windshield washer fluid are exactly the same so everything is compatible. I prefer to buy pure methanol and mix it 50/50 with water myself though.

20190524_224009.jpg


20190524_223917.jpg

A custom harness with water proof connectors to connect up the heat exchanger fans, 3-way valve, meth injection pump and res level sensor.


20190608_184654.jpg


I installed a junction block in the wheel well to feed power to the HE fans, etc and not clutter up the engine bay with wires.

20190610_230330.jpg


This is the other end of the harness in the interior which will connect to the switches and indicator LED's.

20190629_212653.jpg


Switches and LED's installed in the shifter bezel. From left to right: HE fan switch, 3-way valve switch(activates Killer Chiller), Green LED=meth injection active, yellow LED=low reservoir level.

20190629_180159.jpg


Back side.

20190629_180217.jpg


Lit up.

20190704_022800.jpg

The meth injection controller is mounted in the glove box and tee'd into the boost gauge line in the dash. It is set to turn the pump on 10% at 10 psi and ramp up to 100% at 16 psi.
20190706_201905.jpg


A quick walk around video with the engine finally running! :cool:

 
Last edited:

olympic

Well-Known Member
Established Member
Joined
Dec 28, 2014
Messages
3,544
Location
Canada
Almost forgot the fluids!

-Amsoil ATF for the power steering and T56 Magnum.
-10w30 Z-Rod for the engine
-75w140 Severe Gear for the diff.
-Slip-Lock diff additive.
-Whipple SC oil.
-Amsoil EA filter
-long life universal coolant to be mixed 70/30.

20190704_171328.jpg
 

olympic

Well-Known Member
Established Member
Joined
Dec 28, 2014
Messages
3,544
Location
Canada
New inner tie rods, bellows and MM outer tie rods.

20190526_202238.jpg


MM tubular control arms.
20190526_220837.jpg


Sandblasted and POR15's the steering knuckles.
20190530_013132.jpg


Bilstein struts, Eibach 300lb/in springs, MM coil over kit and swaybar relocation kit, Baer 6 piston calipers, 13" Eradispeed rotors braided SS flex line, new fender liners.

20190619_010619.jpg


Cleaned a few years worth of brake dust and grime out of the wheels
20190625_201837.jpg


A lot of the factory paint was scratched/damaged so I decided to strip it all off.

20190627_205241.jpg


Pulled the entire IRS for powder coating and upgrades. First up was carbon fiber clutch packs for the diff. The locking pin was broken in the diff but luckily it and came out without much fuss.
20180326_192915.jpg


New clutch packs soaking in friction modifier and oil.
20180326_195030.jpg


Everything cleaned up and back together.
20180326_225858.jpg

MM modified Ford Racing diff cover, new seals and Permatex Green RTV for diffs.
20180623_213824.jpg
 

olympic

Well-Known Member
Established Member
Joined
Dec 28, 2014
Messages
3,544
Location
Canada
I sandblasted all the small stuff in my cabninet. The subframe was done professionally.

20180512_193716.jpg


20180512_193727.jpg


Cleaned and painted the diff and installed a Strange pinion flange.
20180721_231753.jpg


MM solid diff mount installed.
20180721_231737.jpg


Everything back from powder coating. Went with "Sandtex black" which has a slight texture to the finish.
20180623_204324.jpg


20180623_204334.jpg


20180623_204350.jpg


20180623_204418.jpg


20180720_232429.jpg


Picked up a new gas tank cover since the factory one was pretty beat up.
20180623_204500.jpg
 

olympic

Well-Known Member
Established Member
Joined
Dec 28, 2014
Messages
3,544
Location
Canada
Stock axels cleaned up and painted with POR15.
20180808_165317.jpg


Bilstein shocks, MM coil over kit, Eiback 475lb/in springs
20180810_024136.jpg


20180815_225201.jpg


20180815_232856.jpg


20180815_232908.jpg


20180815_233232.jpg


20180815_233248.jpg


Everything together including ARP wheel studs and a 1/2" hub centric wheel spacer.
20180816_211746.jpg
 

Attachments

  • 20180808_165317.jpg
    20180808_165317.jpg
    201.1 KB · Views: 147
  • 20180810_024136.jpg
    20180810_024136.jpg
    206.6 KB · Views: 147

olympic

Well-Known Member
Established Member
Joined
Dec 28, 2014
Messages
3,544
Location
Canada
More polishing! I had planned on installing these resonaters in place of the Magnaflow tips but ended up not using them.
20180818_023626.jpg

20180818_023809.jpg


20180818_023914.jpg


20180820_023520.jpg


20180827_010009.jpg

20180820_023608.jpg

20180820_023657.jpg


20180827_010409.jpg

20180827_010312.jpg

20180827_010037.jpg
 

olympic

Well-Known Member
Established Member
Joined
Dec 28, 2014
Messages
3,544
Location
Canada
Here's some pictures of the custom headlights I made. I started off with dark smoked headlights, opened them up and heavily modified the insides to accomodate Morimoto 3" D2S projectors and LED RGB halos. I built these a couple years back and unfortunately lost the pics of the build process so I'll include a couple stock photos of what's inside.

morimoto_mini_d2s_5.0_bi-xenon_headlight_retrofit_projectors_1_22.jpg


profile_prism_rgb_xbt_led_halos_3.jpg


ocular_shrouds_1.jpg


Controller for the halos and 55w HID ballasts.
20190613_200309.jpg


I like the look of the dark smoked headlights but if I would do it again I would use the light smoked lenses for better night vision.
20190711_205540.jpg

Osram Night Breaker D2S bulbs.
20190711_205548.jpg

I replaced all the connecters with sealed waterproof plugs.
20190711_205640.jpg

20190711_205812.jpg

I managed to tuck the ballasts and relay in behind the grill.
20190711_205914.jpg


Matching plugs on the car.
20190711_210432.jpg
 

4sdvenom

Never Enough!
Established Member
Joined
Dec 2, 2003
Messages
2,439
Location
Ft. Wayne, IN
Everything is looking great. Great attention to detail for sure!

Maybe I missed it somewhere, but what are the two 1/2” 90 degree elbows that adapt to the hoses off your X pipe?
Crankcase evac?
If so and you have more info and pics of how they are tied in under hood I would appreciate it.
Thanks
Ken
 

olympic

Well-Known Member
Established Member
Joined
Dec 28, 2014
Messages
3,544
Location
Canada
Everything is looking great. Great attention to detail for sure!

Maybe I missed it somewhere, but what are the two 1/2” 90 degree elbows that adapt to the hoses off your X pipe?
Crankcase evac?
If so and you have more info and pics of how they are tied in under hood I would appreciate it.
Thanks
Ken

Yes it's a crank case evacuation system. Basically the PCV holes in each valve cover is attached the the exhaust system via a series of hoses and fittings. The fittings welded into the exhaust are from Moroso part# 97810.

mor-97810.jpg


The valve cover fittings are from MMR.

455460_.jpg


I'm actually just running the PCV system open to the atmosphere right now since my car liked to spit oil out the passenger side PCV which would get all over the back of the car via the exhaust. I've since switched to Lincoln valve covers with the PCV at the rear, away from the timing chain system which will hopefully solve the oil ejection problem. If it does I may reconnect the system to the exhaust.
 

MachME

2V Power
Established Member
Joined
Dec 29, 2005
Messages
5,896
Location
Z
Isn it going to be a problem pumping the oil up to that remote filter? Pressure lose etc? Nice build
 

olympic

Well-Known Member
Established Member
Joined
Dec 28, 2014
Messages
3,544
Location
Canada
Isn it going to be a problem pumping the oil up to that remote filter? Pressure lose etc? Nice build

The kit is a popular model sold by Maximum Motorsports, very well made. I'm not a fluid dynamics expert so I can't comment on the side effects but plenty of Cobra owners run it with no issues. The hoses and fittings are all -12 AN or 3/4" ID so there should be plenty of flow.
 

Users who are viewing this thread


Top