97 Cobra Restomod - Snow Pony

Makobra

Mostly Peaceful
Established Member
Joined
Nov 17, 2018
Messages
1,353
Location
Texas
I decided to make an official build thread. The objective is a sub-3200lb car with IRS that makes over 320hp all motor with 4.10 gears and looks awesome.

start.jpg


That's a 99 IRS I spend a few months restoring and modifying
allparts.jpg

irs3.jpg


irsin.jpg

Sold the cowl hood and scored this along with a GT bumper for my old cobra bumper. Yep, you read that right.
hood.jpg


I re-loomed the body harness in some nice mesh with cloth tape.
loom2.jpg

loom3.jpg

loom4.jpg

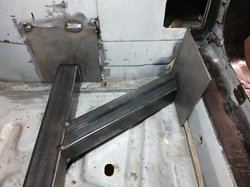
That was right before I finished cleaning out all the sound deadening crap.
looom5.jpg
 

Makobra

Mostly Peaceful
Established Member
Joined
Nov 17, 2018
Messages
1,353
Location
Texas
She's clean now and I'm about to order some team Z through the floor subframe connectors. In the meantime I'll get the rest of the excess seam sealer cleaned out.

clean3.jpg
I mean look at that seam sealer mess.
clean2.jpg
clean1.jpg


edit:
UPDATED BUILD SHEET

Parts / Platform / (gasket/seals)

DRIVETRAIN
forged rods 2012 Boss 302
forged pistons UNKNOWN
longblock 03 lincoln aviator 99 cobra
valve covers 03 lincoln aviator 99 cobra
cams 99 Cobra
intake manifold 03 Mustang Mach 1 99 cobra
ford racing 24lb injectors 99 Cobra 99 cobra
injector adapters 97 to 99 cobra
COP conversion 03 lincoln aviator 99 cobra
oil filter adapter 99 Mustang GT 03 Aviator/99 GT
aluminum driveshaft 99 cobra
Independent Rear Suspension 99 cobra 99 cobra
ford racing clutch 97 cobra
borg warner T45 trans 97 cobra 97 cobra
accessories (timing chain cover forward) 97 cobra
emissions garbage DELETED
BBK 255 LPH fuel pump 97 cobra 97 cobra
fuel sending unit 97 cobra 97 cobra
ford racing diff cover 99 cobra 99 cobra
ford racing Carbon clutch disks 99 cobra 99 cobra
ford racing 4.10 gears 99 cobra 99 cobra
Fuel lines 6AN fittings and lines
FAST fuel pressure regulator universal
aeromotive fuel rails 99 cobra
MMR inline thermostat housing universal Chevy 350 thermostat
MMR coolant crossover delete 97 cobra
radiator fan 99 cobra

Exhaust
JBA mid length headers 99 cobra 99 cobra
H pipe custom
Catback custom

Chassis
Team Z Through the floor SFC's 94-04 mustang
BC Racing BR coilover kit 03-04 cobra
MM delrin Control Arm bushings 99-04 cobra
MM Kmember 94-04 mustang
MM strut tower brace 99 cobra
Poly Subframe bushing kit 99-04 cobra
Poly Sway bar bushings 99-04 cobra
Poly Differential Mount Bushings 99-04 cobra

Electrical
Braille 21 battery universal
battery mount custom

Brakes
stainless lines 99 cobra
pads 99 cobra
rotors 99 cobra

Interior
Seats universal
Corbeau sliders 94-04 mustang
 
Last edited:

CobraBob

Authorized Vendor
Established Member
Premium Member
Single Barrel Sirs
Joined
Nov 17, 2002
Messages
105,480
Location
Cheshire, CT
This should be a great project. We're all looking forward to seeing it when it's done. Have fun with it.
 

PhoenixM3

Hello Kitty Slayer
Established Member
Premium Member
Joined
Jul 31, 2012
Messages
6,393
Location
Colorado Springs
I’ve removed sound dampening material with a heat gun and that’s not too bad. Is the seam sealer a pain to remove?
 

Makobra

Mostly Peaceful
Established Member
Joined
Nov 17, 2018
Messages
1,353
Location
Texas
It's a little easier. I'm just getting the excess out and will probably stitch or seam weld a lot of the interior sheet metal when I do the sfc's.

I think seam sealer is to cover generally used to cover up gaps in the manufacturing process. Ford really went Overkill on my car with the stuff.
 

Makobra

Mostly Peaceful
Established Member
Joined
Nov 17, 2018
Messages
1,353
Location
Texas
what are the plans to get the weight down that far?

Honestly, I don't know, its gonna be tight especially since I added 145 lbs of IRS to the back. That gets the car to around 3500

40-50 is the sound deadening
40 for the audio stuff (I'm going to try and get a 10lb system for tunes)
50 for console and rear seats
15 for door panels (adding a couple back for some lightweight door cards
15 for sideskirts
50 lost for lighter seats
60 for cruise/airbags/misc other things

Eventually I want to do a tubular k member up front but I have enough to worry about without adding on the aligning-an-aftermarket-k-member to the list.

Until I figure out exactly what I want to do with the interior I'll just have a dash, seats, and a steering wheel in the car so that'll save some weight as well :D
 

Makobra

Mostly Peaceful
Established Member
Joined
Nov 17, 2018
Messages
1,353
Location
Texas
Well I got the driver's side connector in what I think will be its final resting place. I thought the through the floor connectors might be an issue with my feet but after sitting in the car it seems like it'll be a non issue.

1.jpg


One slight quandry. I don't see how I could get the angle of the rail off since it slides inside the front subframe but the rear outrigger is a quarter inch off. I'm wondering if this might just be how it goes with a mass produced car or if team Z cut my outrigger a smidge too short.

Either way I think the solution is the same, get a quarter inch plate to fill the void.

Here's the gap.
gap1.jpg
 

Attachments

  • gap2.jpg
    gap2.jpg
    148.8 KB · Views: 884

GT350R

Active Member
Established Member
Joined
Aug 23, 2004
Messages
211
Location
Cleveland
Cool project but I think your weights are off. Only one I feel could be close is all the radio , wiring and speakers with box.
 

BackPressure

Member
Established Member
Premium Member
Joined
Dec 4, 2010
Messages
71
Location
Northeast AR
I’ve gutted my 98 and spent the time weighing all the parts I took out.
Here’s the results.

Passenger seat + bracket: 38.4 lbs
Door panels: 13.2
Center console: 8.2
Seatbelts + brackets: 6
Jack + tire iron: 5.4
Spare tire: 25
Spare tire cover: 9
Int. sail panels: 2
Door sill inserts + floor trim: 2.8
Front plate bracket: 0.2
Radio + speakers: 6.2
Rear speaker bezel/trim: 6.4
Trunk trim panels: 5.2
Floor mats: 3
Int. rear quarter panels: 6.6
Sound deadening: 4.6
Spare tire panel: 2.6
Rear seat base: 12.2
Rear seat back + bracket: 28
Carpet: 10
Mach 460 amps: 10
OEM Catback: 24.4


Sent from my iPhone using svtperformance.com
 

GT350R

Active Member
Established Member
Joined
Aug 23, 2004
Messages
211
Location
Cleveland
I stand corrected on a few of those. I would have never guessed that stuff would weigh so much after having recently had it in my hands
 

oooooh snap

Stable Genius
Established Member
Joined
Jun 21, 2010
Messages
1,883
Location
East
Very nice. I have Griggs upper and lower subs, and they do make a nice difference.

Why are you tying them into the rocker panels though? Does that add any significant rigidity? Griggs says things like the global west stiffeners that tie into the rockers from underneath, are a waste. While my car’s chassis does seem much more stiff with the in-floor subs, I do feel that the body of the car still has some shake to it, and was wondering about these braces. Although I am running coil overs and could probably benefit from a strut tower brace.
 

Makobra

Mostly Peaceful
Established Member
Joined
Nov 17, 2018
Messages
1,353
Location
Texas
i'm debating installing the front outrigger for that very reason to be honest. the rear piece is just not in the way of anything and I didn't have to cut the floor so it was kind of a no brainer.

that said, the outriggers keep each rail from twisting and provide a good foundation for a cage, at least I think that's the idea. Since I won't be rocking external connectors on the bottom of the car I'll take all the help I can get.
 

Makobra

Mostly Peaceful
Established Member
Joined
Nov 17, 2018
Messages
1,353
Location
Texas
Its beginning to look a lot like awesome! I recommend sectioning the front seat support for the reason displayed in this photo. the angle iron is holding the rail in place exactly where I want it while I get all the stuff lined up. I welded the outriggers all the way around after tacking them in place with the rail in the car.

Its a lot of in and out (drilling holes for the trans bolts etc) but its not the end of the world.

tworails.jpg
 

Makobra

Mostly Peaceful
Established Member
Joined
Nov 17, 2018
Messages
1,353
Location
Texas
A lot has happened. One of my hydraulic cylinders for the lift failed so I had to have it rebuilt. She's finally up in the air again and I got the TTF subframe connectors installed.

Here you can see my amateur welding in all its glory.

sfc3.jpg

sfc2.jpg

sfc1.jpg


Finally up in the air again. I've decided I'm going to drop the k member and everything in the rear and probably use POR15 to coat the bottom after I fix all of the years of neglect and inborn design flaws that came from the factory. Much of the rear will get seam welded and I think I'm going to redo the fuel lines to run at the top of the trans tunnel.
finally.jpg

dirty.jpg


Gross.
gross.jpg


and here's the old nasty not full length SFC compared to the team Z TTF sfc's. night. and. day.
sfcvssfc.jpg
 

Users who are viewing this thread


Top