96dreamer's Never Ending Build Thread

96dreamer

Well-Known Member
Established Member
Joined
Feb 22, 2007
Messages
2,239
Location
St.Louis
Took me a few weeks working on the heads after work to finish up the porting. No idea what they flow or if I made any improvements but I like to think I helped out.
20150208_211446_zpshqfgbcdv.jpg

Exhaust finished up on the first head. Finished out in 40 grit if i remember correctly.
20150210_210848_zpsiibdljdl.jpg
20150210_210904_zpsfztihk37.jpg

Intake port finished up with ~120 grit
2018-08-02_09-43-58.jpg

This is after they were finished being ported and had the valve job done on the Sunnen VS-20 machine. I also had the heads milled ~.010 before beginning the next step on the heads.
20150519_190602_zpsewdhcp1i.jpg

If you look closely you can see the beginning stages of timesert inserts being done on the far left spark plug hole.
20150519_190612_zps9qzjxpgo.jpg

Tap fully ran through. And all of them tapped for the inserts.
20150530_194452_zps3ijoyq1f.jpg

Shot looking down the spark plug hole at the fully installed insert. I could have sworn I took one from the combustion chamber side but can't find it in any of my albums. Final result is a fully threaded spark plug hole that should have no issues with blowing out in the future if I decide to add boost.
20150530_194521_zps2lbe8ylz.jpg

Next before assembling the heads I went through and bled down two full sets of lash adjusters. Came out with 24 that bled down fine and sorted through the rest to make a full set of 32. Extremely fun process.
20150303_184421_zpsjgcsdilh.jpg

Final install consisted of Factory valves cleaned up and tipped to proper height, new valve seals, new oem ford spring cups and retainers, BTR valve springs, new oil restrictors, bled down factory lash adjusters that were soaked and cycled in tranny fluid for a few days and copious amounts of Lucas assembly lube.
20150611_185348_zpsxlrkhwci.jpg

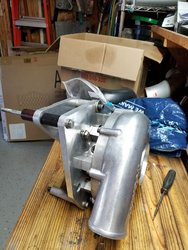
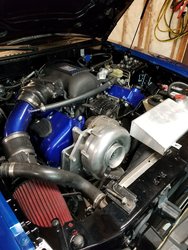
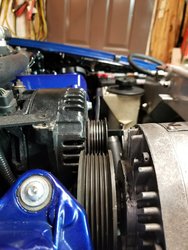
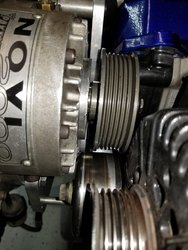
Putting these in order is proving to be a huge hassle. Between switching from photobucket to flickr then to google photos most of the original date stamps have been lost or modified. I'm doing my best to find as many of the pictures as I can.
 

96dreamer

Well-Known Member
Established Member
Joined
Feb 22, 2007
Messages
2,239
Location
St.Louis
In the middle of the build I got tired of dd'ing my old cavalier and picked up 2000 7.3 crew cab. Bought it around the time I tore down the motor.
92ebf3537a6d3dd05640a7ee9a9b185a.jpg


Heads done lets move onto the intake situation.
I bought a C lower to b upper a long while before I even had motor issues with the intent of going this route anyway.
20131120_175909_zpsadefcbfb.jpg

Bought a marauder intake off ebay and sold off the upper and spacer it came with.
Upper and lower paired for the first time.
20150321_173748_zpsqwg4yna9.jpg
20150321_173755_zpszcr0pbix.jpg

The spacer had a few gouges in it that I milled flat at work with a flycutter just to be sure I had a good sealing surface. That forced me to have to do a little clearancing between the back runner and spacer but nothing crazy.
20150303_191802_zpsmuffpgev.jpg

Figured if I spent all that time porting the heads I might as well go all in on the intake too. Marked a line all the way around and got to cutting.
20150305_193548_zpswmd5ytib.jpg
20150305_193554_zpssjmmjdqo.jpg

Got right to work hogging it out.
20150322_122509_zpsiuidpbkv.jpg

20150322_205802_zpsqenekvsi.jpg

Chips on chips on chips.
20150323_194841_zpsfemug54x.jpg
 
Last edited:

96dreamer

Well-Known Member
Established Member
Joined
Feb 22, 2007
Messages
2,239
Location
St.Louis
Starting to clean up the carbide burr marks on the runners
20150323_195649_zpse72r4xdf.jpg

Got a little carried away with porting on the end runner and blew through.
20150323_201732_zpstkhdut8n.jpg

Took it into work and had a co worker close it up
20150409_120952_zpsgeeo8gaw.jpg

Inner runners all cleaned up and the best shot I got of the intake ports cleaned up and injector bosses knocked down.
20150409_120946_zpsl2oj7k5c.jpg

Cleaned up the top of the intake, had the bottom welded back on and put a coat of wrinkle black on
20150514_193332_zpstatdqeav.jpg

Upper and lower bolted together after being finished up
20150514_192946_zpscnwzzgtn.jpg


The next few things I did i'm not 100% sure were necessary but at the time I was running a 175 wet shot and was worried about fuel puddling plus it never hurts to knock down on turbulence.

I overlaid the upper and lower gasket on the spacer and marked out all the spots that had extra material that could be removed.
20150330_182546_zpson6ouwxq.jpg

Using various cutty tools I removed all the black colored in sections
These are some of ledges I was worried about fuel puddling on and causing turbulence
20150330_182745_zpsvwar3uys.jpg

I sanded down all the areas on the upper that created ledges with 60 grit
20150503_131121_zps69kl0grk.jpg

Bolted them together with a piece of aluminum foil in between
20150503_132414_zpsfpmvgraj.jpg

Then I cut out the middle of the foil leaving the ledge covered with the foil and rolled the foil over all the edges on the adapter plate.
 
Last edited:

96dreamer

Well-Known Member
Established Member
Joined
Feb 22, 2007
Messages
2,239
Location
St.Louis
The idea with the foil was just to keep an epoxy from stick to the adapter. From there I mixed up the two part epoxy called Splash Zone and filled in all the ledges trying to make the transition from upper to adapter as smooth as possible. This stuff is super strong and used to repair boat hulls and props. It's water proof and resistant to most chemicals.
20150503_131246_zps6w1tfkmg.jpg
20150503_134441_zpsnn2u6zob.jpg


This stuff mixes up to make a terrible diarrhea green color but is pretty thick and kept form quite well. Here's the end result after letting it set up for a few days and peeling back the foil.
20150504_174558_zps6dsrlqnr.jpg
20150504_174607_zpshrd2dqfr.jpg
20150504_174613_zpsic39tb9d.jpg

I rolled some shim stock up and shoved it in the IAC hole before putting in the epoxy. It came out with a not so gentle twisting jerking motion but after being cleaned up left a pretty nice hole for the IAC port.
20150504_174622_zpsxhcjge5v.jpg

I didn't spend a ton of time smoothing out the transitions because I was tired of working on the damn thing at this point. Here is what it looked like after cleaning it up a little.
a42442d4b423d953625f03d9ce75a763.jpg
4f86f4058305f9471346fb237e537b74.jpg
88582ba0041f586b0855e1e7b2bf9a91.jpg

These pictures of the intake are all current from 5/15/19, thats about 4 years of being on the car and there are no signs of any epoxy coming off or showing any signs of doing so.
 
Last edited:

96dreamer

Well-Known Member
Established Member
Joined
Feb 22, 2007
Messages
2,239
Location
St.Louis
Been crazy busy with the car in its current state plus going to weddings every damn weekend so I haven't had time for updating this.

There wasn't much to do on the block prep wise but I improved where I could. Drilled and tapped for the larger timing dowels to avoid breaking them on a 2 step.
20150310_160120_zpshmywrobi.jpg

20150310_161315_zpsicrvrprz.jpg

Then once the pistons came in I was able to hone the block to fit the individual pistons.
New slugs
FB_IMG_1430518860122_zpsbv4tzysu.jpg
New vs old
20150504_191808_zpspxr2ynet.jpg

I have video of honing the block but it won't let me upload it. Here is the final cross hatch
20150601_210121_zps0dfyfaib.jpg

I decided to go with a gt500 windage tray as well. Modifications to fit it were very minor.
20150602_192713_zpsq7as0vzw.jpg
20150602_200125_zpsnug3ia6z.jpg

I had been building the motor in the garage but St.Louis summers were killing me in my garage so I set up shop in the basement.
11390210_10204273056728757_1390320285662144914_n.jpg

Crank laid in place and mains torqued to spec
20150607_140744_zpsxlf7gcup.jpg

Backlash looked great

20150607_143001_zpsvzawxp8t.jpg
 

96dreamer

Well-Known Member
Established Member
Joined
Feb 22, 2007
Messages
2,239
Location
St.Louis
Got the rest of the rotating assembly laid out and ready to go in.
20150609_182215_zpsikihautx.jpg

Then started the riveting process of filing rings. The stainless rings took a while to knock down even with a very nice electric ring filer I was able to borrow.
20150607_170511_zps49a2gd0s.jpg

Spinny bits installed in their final home
11535916_10204304027943018_5685429193366536448_n.jpg


Melling billet pump installed.
20405_10204304028343028_6411304554096228131_n.jpg

and windage tray/ pickup bolted in place
11535866_10204304028063021_1653049921654077826_n.jpg

Heads back on and torqued down, starting to look like a motor again. If you look close you can see the upgraded timing dowels and cobra engineering upgraded passenger side secondary tensioner.
10425051_10204341434118149_6789107251277111146_n.jpg

With everything bolted on I began the tall task of degreeing the cams in. I chose to use factory keyless gears and file them to get to my needed position. To get started I made an adjustable lash adjuster from a gutted adjuster, a flanged nut turned down and pressed into the adjuster and an old exhaust stud threaded into the nut.
20150616_181634_zps0rusf5ei.jpg
20150616_183537_zpsbgkooskp.jpg
20150616_191102_001_zps55n8zqav.jpg


Everything assembled including the massive degree wheel I made at work with a water jet and plotter printer
20150624_181745_zpsmjaat2sx.jpg

Good shot of the setup I had to measure valve lift.
 

96dreamer

Well-Known Member
Established Member
Joined
Feb 22, 2007
Messages
2,239
Location
St.Louis
Good shot of the setup I had to measure valve lift.
20150624_181753_zpsver3y54o.jpg

Pulling the passenger side back apart to file the gears
20150627_181027_zps3ka9txu8.jpg

And back together making sure to tension the primary chain to get proper readings.
FB_IMG_1435453529234_zpse0duf5b2.jpg

Engine assembled mostly dressed on the stand back in the garage
20150712_205201_zpsgrq8yrsk.jpg

Sitting on the k member with cltuch, long tubes and bell housing ready to go back in the car. You can also see the head cooling mod I built pretty well.
20150726_134409_zpstsobbw0u.jpg

Back at home. I'm getting too good at pulling the motor at this point
20150726_200130_zpsgrsqfxxa.jpg

100% back together and ready for the first start with the new motor.
20150815_005210_zps9ipyfndb.jpg
FB_IMG_1439685620165_zpso5cnlqeo.jpg

First start went great, started first try, no smoke, no leaks, good oil pressure.
First drive went just as good. Took it for a drive as soon as it was warmed up and coolant system burped. Wanted to get out and seat the stainless rings immediately. This was just leaving a stop light gently rolling into the throttle, bonus flyby from a beat up chevy truck.
 

96dreamer

Well-Known Member
Established Member
Joined
Feb 22, 2007
Messages
2,239
Location
St.Louis
Back from the dead again. After the motor rebuild I started doing little things to the car here and there. First thing was a HID retrofit. I pulled the lenses off the headlights dipped the interior and installed the bixennon housing. I didn't take a bunch of pictures of this unfortunately
20160309_182424_zpsxpxfavkg.jpg

I was deciding between leaving them chrome interior and painting the inside black here.
20160306_155458_zpsea6hadkl.jpg

I ended up keeping the painted version to hide the retrofit a little since I'm really not the biggest fan of the look but the light output is hard to beat.
20160309_204005_zpsaxlhqyvh.jpg

While I was doing the headlights I was also adding sound deadening material to the interior. It's not my proudest moment but at the time not to long after buying a house, engagement ring and building a pretty stout modular I was a little tight on funds so I ended up using the asphalt based peal and seal stuff from home depot/lowes. I will say that to date I have not noticed any negative effects from it. No smells or drips or peeling. Again not many pictures of this either.
20160308_192937_zpsmlh2zon9.jpg

I was very pleased with the outcome however. Car is noticeably less droney and the doors close with a nice thud.
Shortly after this I modified some door inserts. I used a torch to burn the fibers down as much as I could then covered them in Bondo. After it hardened I sanded them down, primed and painted them. Once i was satisfied I wrapped them in a carbon fiber and glued them back on.
20160405_165249_zpshk8o97fw.jpg

I had always liked the look of cars with the black roofs so I had a friend come over and give me a hand wrapping mine. Turned out pretty good but not perfect.
20160414_212506_zpspp6kbi23.jpg
20160414_212518_zps1renlw9y.jpg
 

96dreamer

Well-Known Member
Established Member
Joined
Feb 22, 2007
Messages
2,239
Location
St.Louis
One thing that had always bugged me about this car was the seats that came in it when i bought it. They are factory v6 seats from a new edge that have zero bolster. Well browsing craigslist one day a set of corbreau manual sliders for a sn95 popped up for a good deal along with some mint srt-4 bucket seats.
20160416_075825_zpsiy054fqi.jpg

I took the factory sliders off the neon seats and bolted/ welded the corbreau sliders onto the stock frames of the srt seats. Front of the seat is bolted into factory threaded holes and the rear I just laid a small bead down to the factory frame.
20160417_175418_zpsrvrghps6.jpg

Bolted up they fit in the car great. I'm a little taller, 6'2", and they sit a little lower than the factory seats which worked out great. They are a little snug for me but significantly better than what I had. Despite them being out of a neon I think they fit the car well and look great. I didn't save much weight going to them. They were a little lighter than the heavier weight and a little heavier than the manual seats.
20160417_190828_zps2yj4fbhr.jpg

Same weekend I bought the seats and sliders I picked up another toy.
20160419_193744_zpseigo445j.jpg
I bit the jeep bug hard as soon as I got it and took a break from messing with the mustang for quite a while. The jeep has transformed quite a bit and has it's own build thread over on jeep forum, https://www.jeepforum.com/forum/f177/2000-classic-refresh-3720713/
20190411_062534.jpg
 

lukasxpl

Member
Established Member
Joined
Jul 17, 2007
Messages
209
Location
Franklin Park
Good luck with your build as Im reading your thread it reminded me of someone (myself) lol when I was a dumb high school senior in 2007 when I bought my mystic cobra lol now its fully built 9s car.
 
Last edited:

96dreamer

Well-Known Member
Established Member
Joined
Feb 22, 2007
Messages
2,239
Location
St.Louis
I'm sure I missed some small updates with the car but the next exciting update is the Novi 2000 kit I bought used. It came with quite a few parts most of which I didn't end up using.
20170826_092638.jpg
First step in getting it installed and running was mocking everything up and making sure I could get it all fit nicely.
20170828_195748_1.jpg 20170828_195808.jpg 20170828_195836.jpg
The kit came with 6 rib pullies and an assortment of spacers that didn't make up a complete kit. So rather than mess with making a few new spacers for the 6 rib I went ahead with an 8 rib setup starting with a 10% overdrive damper.
20170830_181648_1.jpg
 

Attachments

  • 20170826_092638.jpg
    20170826_092638.jpg
    357.1 KB · Views: 166
  • 20170826_092638.jpg
    20170826_092638.jpg
    357.1 KB · Views: 144
  • 20170828_195748_1.jpg
    20170828_195748_1.jpg
    383.1 KB · Views: 133
  • 20170828_195808.jpg
    20170828_195808.jpg
    289.3 KB · Views: 138
  • 20170828_195836.jpg
    20170828_195836.jpg
    277.6 KB · Views: 151

96dreamer

Well-Known Member
Established Member
Joined
Feb 22, 2007
Messages
2,239
Location
St.Louis
Also had to modify the cross over and get rid of the overflow to mount the headunit. I added an inline thermostat to the upper hose and put in a 2v lower hose to get rid of factory thermostat housing. The surge tank was replaced with a small overflow. My radiator already had a cap on it so this allowed me to get rid of the factory style surge tank.
Modified crossover, raised and removed one of the nipples, all the 8 rib pullies installed and the new upper hose configuration.
20180430_202305.jpg
20180430_202426.jpg
Lower hose, I replaced the plastic T in the line with an aluminum housing with a drain petcock
20180430_202331.jpg
And here is a shot with the custom 8 rib blower pulley and the spacers shimmed out for proper alignment.
20180203_163020.jpg
I made up some custom spacers at work once I figured out what spacing I would need. I aligned the pullies with a laser alignment tool.
20181220_171451.jpg 20181220_203354.jpg
 

96dreamer

Well-Known Member
Established Member
Joined
Feb 22, 2007
Messages
2,239
Location
St.Louis
Good luck with your build as Im reading your thread it reminded me of someone (myself) lol when I was a dumb high school senior in 2007 when I bought my mystic cobra lol now its fully built 9s car.
Ha Ha that's awesome. I told myself years ago I would probably never sell the car. It doesn't cost me much to have it sit there for most of the year and I would be sick to sell outright knowing how much time and money has been put into it over the years.
 

brucesvt

Well-Known Member
Established Member
Joined
Aug 24, 2005
Messages
5,523
Location
Hell Paso TX
Man I feel old now. I remember when you first bought your car lol. These two pages just took me down memory lane. Glad to see your still at it.


Sent from my iPhone using svtperformance.com
 

96dreamer

Well-Known Member
Established Member
Joined
Feb 22, 2007
Messages
2,239
Location
St.Louis
Right around this time I ended up losing my job conveniently two weeks after I bought another truck and had the motor in my jeep drop a piston and take out the block. This put a pretty big damper on the mustang project. Truck in question 2001 7.3l with 140k.

20200215_170633.jpg 20200215_170652.jpg
I ended up finding another job about a month later, around the same time the transmission in the truck went out, FML. For those keeping track my jeeps motor blew up, I lost my job and the trans in my truck took a shit all within 3 months. Also had a my childhood neighbor and best friend unexpectedly pass away during that time so it was a pretty rough stretch.

But at this point the car was driveable. It had the blower mocked up and had the 8 rib pullies all swapped over with modified cooling system. I bought a cheap 6 rib belt and ran the car with the modified cooling system, 8 rib setup and 6 rib belt just to make sure the cooling system and pullies would all work correctly. I ran into two issues with the setup. The overdrive damper and stock water pump pulley would build a little pressure in the system and the used a/c clutch I got from the junkyard was slipping.
The pressurized cooling system ended up blowing one of the factory hoses I reused but I was able to cut it shorter on the side of the road and make it home. Turned out I had the thermostat in backwards
20180501_194944.jpg
I just put off the ac issue and didn't use the ac the rest of the year.

The winter I was mocking up the blower I also had to rebuild the motor in my jeep I blew up. It was so damn cold the water from the block was refreezing on the concrete floor. I told myself I was finishing the garage before the next winter. So the mustang didn't get touched for the remainder of the driving season.

I decided to go full in on redoing the garage to make it more enjoyable to be in since I spend a ton of time in there.
What it looked like before, remembered to take a before picture while starting the insulation.
5217b411117d5afc90c6b0247c9b5a31.jpg a02989c9acf8a98025ac465751e4823e.jpg

What I ended up with. Fully drywalled, insulated,heated garage with led lighting, new workbench and dedicated sub panel for welders, heaters and new outlets.
b38d89f2f055df6366d8dcb7fbf1e445.jpg 4dcde7c6e7a7a13a23ced899f1f9fd9f.jpg 572f06fb3b774081465238ea9b330680.jpg
 
Last edited:

96dreamer

Well-Known Member
Established Member
Joined
Feb 22, 2007
Messages
2,239
Location
St.Louis
Man I feel old now. I remember when you first bought your car lol. These two pages just took me down memory lane. Glad to see your still at it.


Sent from my iPhone using svtperformance.com
Trust me it's not making me feel any younger going back through the pictures lol. Some of the oldest ones I really had to dig to try and find. Wish I would have taken more pictures when I first got the car. It's really came a long way.
 

CobraBob

Authorized Vendor
Established Member
Premium Member
Single Barrel Sirs
Joined
Nov 17, 2002
Messages
105,485
Location
Cheshire, CT
Right around this time I ended up losing my job conveniently two weeks after I bought another truck and had the motor in my jeep drop a piston and take out the block. This put a pretty big damper on the mustang project. Truck in question 2001 7.3l with 140k.

View attachment 1635476 View attachment 1635478
I ended up finding another job about a month later, around the same time the transmission in the truck went out, FML. For those keeping track my jeeps motor blew up, I lost my job and the trans in my truck took a shit all within 3 months. Also had a my childhood neighbor and best friend unexpectedly pass away during that time so it was a pretty rough stretch.

But at this point the car was driveable. It had the blower mocked up and had the 8 rib pullies all swapped over with modified cooling system. I bought a cheap 6 rib belt and ran the car with the modified cooling system, 8 rib setup and 6 rib belt just to make sure the cooling system and pullies would all work correctly. I ran into two issues with the setup. The overdrive damper and stock water pump pulley would build a little pressure in the system and the used a/c clutch I got from the junkyard was slipping.
The pressurized cooling system ended up blowing one of the factory hoses I reused but I was able to cut it shorter on the side of the road and make it home. Turned out I had the thermostat in backwards
View attachment 1635479
I just put off the ac issue and didn't use the ac the rest of the year.

The winter I was mocking up the blower I also had to rebuild the motor in my jeep I blew up. It was so damn cold the water from the block was refreezing on the concrete floor. I told myself I was finishing the garage before the next winter. So the mustang didn't get touched for the remainder of the driving season.

I decided to go full in on redoing the garage to make it more enjoyable to be in since I spend a ton of time in there.
What it looked like before, remembered to take a before picture while starting the insulation.
View attachment 1635482 View attachment 1635480

What I ended up with. Fully drywalled, insulated,heated garage with led lighting, new workbench and dedicated sub panel for welders, heaters and new outlets.
View attachment 1635481 View attachment 1635483 View attachment 1635484
Holy cow! I remember reading through your thread back when you started it. Talk about a true labor of love. I don't think you'll ever sell it after all the blood, sweat, tears and money you've poured into it. The end product is a gem. I love the finished garage, too. You did a great job on that, too!

Good luck with your build as Im reading your thread it reminded me of someone (myself) lol when I was a dumb high school senior in 2007 when I bought my mystic cobra lol now its fully built 9s car.
You've got an awesome (Mystic) Cobra, too! That thing runs as well as it looks.
 

Users who are viewing this thread


Top