JBA ceramic shorty vs FRPP thread

KingCobra07

Traction is a virtue
Established Member
Joined
May 30, 2012
Messages
958
Location
Seattle
Thia thread is about the quest for shorty headers.

So, after much dismay and difficulties with my FRPP shorty header fitment, i splurged and picked up some of the ceramic JBA shorty headers. JBA is the only other company that put out shorty headers for these cars that i know of.

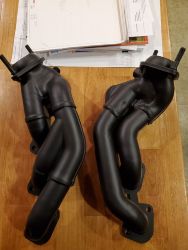
Well, i just received the box today and these things look pretty wicked...

20200123_181149_zpspzw1bzoi.jpg

20200123_181500_zpsx3jwgsmh.jpg


One thing i notice right off hand, is the passenger side header sticks out further from the flange face than the ford racing. 4.5 inches vs 4 inches. Another interesting attribute is when you look directly at the passenger flange, you can see that the runners never go past the lower bolt holes. The Ford racing do, and that is the point of contact with the frame rail that started this journey.

Here is the JBA
20200123_181344_zpsibzkrfwe.jpg

Here is the Ford Racing (notice 3rd runner)
20191015_185922_zpsbivp1y00.jpg


Another interesting included piece in the JBA box was some 1 1/2 x 3/8" spacers that can be used to raise the motor if needed
20200123_190311_zpsrjyjhsix.jpg


So that's all I've got right now....this weekend comes fitment and potentially installing some SHORTY headers that will work!

And before anyone comes at me saying why didn't you just buy long tubed, blah blah blah. I just removed kooks LT's off my car to make room for a hellion TT kit, which utilizes stock manifolds, but who wants those cast POS things? I got two turbos to spool!
 

Attachments

  • 20191015_185922_zpsbivp1y00.jpg
    20191015_185922_zpsbivp1y00.jpg
    49.3 KB · Views: 112
  • 20191015_185922_zpsbivp1y00.jpg
    20191015_185922_zpsbivp1y00.jpg
    49.3 KB · Views: 118
Last edited:

HKusp

Well-Known Member
Established Member
Joined
Apr 17, 2019
Messages
486
Location
Hampton, Maryland
They certainly look nice. I currently have JBA long tubes but they aren't ceramic coated. Had issues this summer with underhood temps and IAT2's causing the defueling of the car. I have a new Craig Davies pump and VMP triple pass HE to install this weekend while finishing up the Gen2R and AEM A/F gauge installatio . When the ambient temps come up later this year, if those steps don't stop the defueling, I may go ceramic coated LT's to see if they help.
 

SCGallo2

Balanced performance
Established Member
Premium Member
Joined
Mar 4, 2014
Messages
1,191
Location
Southern MD
I am very interested in fitment also. I have a MM K-member and was turned off after seeing this note:

JBA Shorties.jpg
 

03 DSG Snake

Unknown Cyborg
Established Member
Joined
Nov 3, 2002
Messages
21,049
Location
CA
I'm in the middle of replacing midlength headers with JBA titanium ceramic shorties on my 03 Cobra.

Fitment is pretty good, maybe a bit too tight by the steering shaft (aftermarket). There was some slag inside the primaries where they meet the flange, but not enough to make me want to grind it down and lose the coating.

The bit about the Kmember is odd, the majority of GT500s LOWER the engine, usually for a bigger blower. I have been wanting tomdrop mine for my STB fitment, but the JBAs look like a no go in that scenario.
 

KingCobra07

Traction is a virtue
Established Member
Joined
May 30, 2012
Messages
958
Location
Seattle
They certainly look nice. I currently have JBA long tubes but they aren't ceramic coated. Had issues this summer with underhood temps and IAT2's causing the defueling of the car. I have a new Craig Davies pump and VMP triple pass HE to install this weekend while finishing up the Gen2R and AEM A/F gauge installatio . When the ambient temps come up later this year, if those steps don't stop the defueling, I may go ceramic coated LT's to see if they help.

I run the Killer chiller system and a super snake hood. Keeps the iat2's icy, even from the massive 4.5L whipple i was running
 

KingCobra07

Traction is a virtue
Established Member
Joined
May 30, 2012
Messages
958
Location
Seattle
I'm in the middle of replacing midlength headers with JBA titanium ceramic shorties on my 03 Cobra.

Fitment is pretty good, maybe a bit too tight by the steering shaft (aftermarket). There was some slag inside the primaries where they meet the flange, but not enough to make me want to grind it down and lose the coating.

The bit about the Kmember is odd, the majority of GT500s LOWER the engine, usually for a bigger blower. I have been wanting tomdrop mine for my STB fitment, but the JBAs look like a no go in that scenario.
Thats interesting....ill post some photos tonight, but it appeared JBA already ground out the slag that would have been there from the welds inside the primaries. AND I actually ordered titanium too, but they shipped me these ceramic silver ones. Gotta say i dont dislike the silver now that ive seen them.

Calling stage 8 today to order some collector hardware, as these don't have studs. Ive already got a new set of header to head stage 8 lockers that I'm going to see if i can make work. The hardware JBA included in the box wasn't too bad though. 12 point 10mm head bolts with locking collar washers. Ill post these as well tonight.
 

KingCobra07

Traction is a virtue
Established Member
Joined
May 30, 2012
Messages
958
Location
Seattle
Some side by sides of the FRPP and JBA's

Driver
20200124_123322_zpsb3r4eyd4.jpg

Passenger
20200124_123201_zpsqnhyhgvs.jpg


They deinitely went different routes with the designs. Fords driver seems alot tighter and compact, then their passenger side just kicks out like the manufacturer got lazy and didnt want to make a tighter turn piece.
JBA, both sides look fairly similar. I imagine the driver has the collector neck as it is for the steering shaft clearance.

As promised, a pic of the pre grind on the slag JBA did....
20200124_123446_zpscwwe63ds.jpg


And a shot of the included hardware. 6 point, not 12. My mistake
20200124_123356_zpsjk7shun2.jpg
 

HKusp

Well-Known Member
Established Member
Joined
Apr 17, 2019
Messages
486
Location
Hampton, Maryland
Well one thing is certain, the drivers side collector ends up in a vastly different placement. I imagine that is going to make for a different fitment on your X/H pipe etc.
 

Robert M

800 HORSE FUN!!
Established Member
Joined
May 15, 2003
Messages
9,157
Location
Sunny, Fla.
Some side by sides of the FRPP and JBA's

Driver
View attachment 1620469
Passenger
View attachment 1620470

They deinitely went different routes with the designs. Fords driver seems alot tighter and compact, then their passenger side just kicks out like the manufacturer got lazy and didnt want to make a tighter turn piece.
JBA, both sides look fairly similar. I imagine the driver has the collector neck as it is for the steering shaft clearance.

As promised, a pic of the pre grind on the slag JBA did....
View attachment 1620471

And a shot of the included hardware. 6 point, not 12. My mistake
View attachment 1620472

Were the Stage 8 locking header bolts an option to use with the JBA's? The bolts with the tabs and E-rings that install and will not back out? I used them on most of my bolts with the FRPP shorty install, but they would not work at all locations.

I am def. looking forward to the install feedback for these JBA's.

Now to build it to the back?........

Picturedownload5-2-09035.jpg


R
 

KingCobra07

Traction is a virtue
Established Member
Joined
May 30, 2012
Messages
958
Location
Seattle
Looks pretty close. I think it was just the angle of the photo. Looks like it should still work with the stock pipes.

20200125_112854_zpsusjn1vx8.jpg


And yeah? I was able to get them all on the FRPP's when i got them mounted on my car. Trick is you have to have enough of the small retainer tabs. The M kit for gt500 doesnt include any of the smalls, just med and large.

I went into my shop today and begun the install. Ill post it with pictures later tonight. Very eventful wrenching day
 

HKusp

Well-Known Member
Established Member
Joined
Apr 17, 2019
Messages
486
Location
Hampton, Maryland
I see, it definitely looks like it was the angle of the pic. It feels good making progress. Made a bunch last night myself. Hopefully going to get to the point where I can get the base start-up tune loaded tomorrow. I am pretty close.
 

KingCobra07

Traction is a virtue
Established Member
Joined
May 30, 2012
Messages
958
Location
Seattle
I decided to start with the install on the passenger side, that being the side the ford racing setup disagreed with my frame rail.

Pulled the starter, undid the motor mount on that side, lifted the motor about 3 inches. I then got the remflex gaskets and stage 8 bolts up top in place, and found i had to pull the iron block mount as well, after the photo.
20200124_192910_zpsvjy8whmr.jpg

Before i went to mount the header up, i put my EGR delete nut cap on the header. I'm guessing it was from the ceramic coating, but it definitely didbt want to go on. Id suggest to thread chase it. I ended up putting some anti seize on the threads then cranked the nut on, 1/2 forwards, 1/4 back each time to help it cut away the ceramic coat.
20200124_192949_zps1yxqbpbt.jpg


Then slid the header up and into place. It didnt feel too happy about lining up. After pushing upwards as hard as i could, i got one bolt in on the bottom, with all guide bolts still in the top, it showed me just how far off these flanges were machined. I took the header off the motor and did some head scratching. I quickly came to a solution....
Pulled out my mad dog bits and got to drilling
20200124_201542_zps0nwpkigc.jpg

I upped the holes along the bottom with my 3/8" bit. If i get a chance next time, id probably step it up to 13/32, but after another test fit and some anti seize, i managed to force the header into place and began to tighten the bolts. It was difficult to get them in with the flange holes pressing on them, but i made it happen (Ratcheting 11mm is your friend)
20200124_202248_zpsq26rd1lf.jpg

I was happy with the torque, top side and bottom, then begun reassembling. Next issue. The header interferes with the iron motor mount. Notice the highlighted area in yellow.
20200124_204043_zpsiinuz6ur.jpg

I removed then inspected the motor mount
20200124_204222_zpsxgvvabm2.jpg

I cane to the conclusion it wouldn't be a structural issue to remove some of the material, so i took it to my bench grinders stone.
20200124_204603_zpstjzxi6yo.jpg

I reassembled it and now we've got some clearance I'm happy with. Torqued it down(, and begun to lower the motor into place with the supplied spacer. From the back it looks like were all clear where the ford racing contacted the rail
20200124_205357_zpscw5zexdb.jpg

A look from the front, and we have a slight problem. Luckily, very slight. I decided a dent could be put there where it kisses the rail, or after the driver header goes on, shift the k member a hair.
20200124_205418_zpsf76hucxc.jpg

A quick look up top at my killer chiller lines, a little rearranging and some zip ties to come later, and we should be good!
20200124_210549_zpskado3jwv.jpg

I'm going to wait until we have both on to put the lockers on. Do 1 large pass when fitment is 100% and good to go.

On a side note, with the bmr k member and the spacer, i has to swap out the 2.5" motor mount bolts i had for 3". No biggie.

So final thoughts on passanger side install,
Would have been great if JBA took the time to make sure their flange matches up with the car the headers are made for, but okay, maybe its a one time mistake...as for the engine mount, it was an easy fix, and a small engine or K shift should alleviate the one runner touching the rail. Or, leave it in place, let them heat up, dent itself, then move it a hair. The choice is yours....

Ill post about the driver side tomorrow
 

Robert M

800 HORSE FUN!!
Established Member
Joined
May 15, 2003
Messages
9,157
Location
Sunny, Fla.
Well, so far "some altercations", but not a major issue from what you have explained. It will be interesting to see what you find with the left side......

R
 

KingCobra07

Traction is a virtue
Established Member
Joined
May 30, 2012
Messages
958
Location
Seattle
Wow. So the driver side was a bit more than i could have imagined....aside from the problematic flange being incorrectly machined for the lower bolt holes, the upper machined out portion was even worse. So here's the multi day install...

Started out same as passenger side, lifting the motor and pulling the solid mount, also pulling the steering shaft and setting it out of the way

The instructions on this side that came with the headers said you must install the lower, rear most bolt first, followed by the top bolts. The first problem i ran into was the bolt fitting on the hole.
20200125_114207_zpspyjkmdkb.jpg

So, knowing the holes were going to be off anyways, i upped the size another 3/16s of an inch. First to 3/8, then to 13/32nds. Bolt still didn't quite want to slip in, so...
20200125_115123_zps3fptsnnc.jpg

So, bolt in, got it threaded into the head. This is after i figured out the header wont slip into place without loosening the coolant hard line that runs along above the oil cooler. Undid the oil cooler bolt, bolt above alternator, and loosened the bolt on the back of the head to be able to slip the thing up in there. So, bolt in....
20200125_125537_zpsairtfdwz.jpg

then did as the instructions said and went top side to put the bolts in. Cylinder 5 bolt went right in, cylinder 6, probably off 3mm. Not even close to the threads, almost cross threaded the thing trying to start it. So, manifold comes back out. I decided to try it as the instructions on the passanger side said, to install all the upper bolts first, slide the manifold on, and start doing the bolts on the under side. So, slipped the manifold back in, and no dice. After trying to get that bottom bolt in i gave up. Threads were far off again. Decided to run to the store to pick up some 1/4 round inch stones for my die grinder, and proceeded to take down all 4 of the angled channels on the header. Opened them up 1/16, tried it with the bottom bolt first, then again ran into problems when trying to thread in cylinder 6, while cylinder 7 and 8 looked like they were going to be near impossible to get my hand to. Header out, grind more, but this time grind the hell out of it, so the flange still will hold the bolt flange, but its close. Decided to put the top 4 in, only about 3 or 4 turns into the threads. So far so good. Slipped it up and managed to be able to hold the header off the head far enough to make the back bolt thread in. The next 3 lower bolts were a breeze and i put my ratcheting 11mm wrench to good work. Sorry for the lack of pictures, but i was about ready to purposly light the car on fire.

I put the steering shaft back in ppace along with the engine mount and set it back on the perch with the spacer. I was a little worried about the cast mount but on this side it has a slight bit of clearance.
20200126_153928_zpsucn406am.jpg


The only issue with touching is on the AC line that runs on that side. It seems ill most likely have to zip tie it to the brake lines to try and hold it up high enough
20200126_160553_zpsn6huua9z.jpg

So, with the installation complete i put the O2 sensor in and decided to put all the locking hardware in at a later date. Still waiting for some of the small size retainers and collector bolts to arrive in the mail.
20200126_160443_zpscuwj1ilc.jpg


So, aside from the major headache of this install, i suppose the outcome was better than my ford racing headers. If you can get a set of these with the correct flange holes, these would be great.

I put in a call to JBA this morning and sent them some photos of the measurements showing how far off the holes were. Going to see how good their customer service is, but i don't have very high hopes at the moment. Maybe i can get a set with proper holes and swap them out., or at least get some money back for this headache.

Either way, on to the fun part...turbo install....
 

Users who are viewing this thread


Top